
Do you want to make a gorgeous, handmade jewelry piece that is sure to turn heads? Look no further than the art of making flower bracelets! In this post, we’ll provide step-by-step instructions on how to make flower bracelet with simple items you have lying around the house.

Whether you are looking for an accessory for yourself or a gift for a special someone, crafting your own flower bracelet is the perfect way to add unique and personal flare to any outfit. Let’s get started!
How Do You Make a Flower Bracelet with String?
Gather your supplies. You will need scissors, a needle, colorful string or embroidery floss of your choice, and a selection of beads in the shapes and sizes that you prefer. You can either mix and match different colors or go with one color scheme to achieve a specific look. Cut the string into four equal lengths. The length of the string should be twice as long as the desired finished product.
Tie all four strings together in a knot at one end. This will serve as the beginning of your bracelet and give you a unified foundation for working. Thread each individual strand through the eye of the needle, then tie a knot to secure it in place.
Start stringing your beads by choosing the desired pattern and design you want for your bracelet. Push the needle through each bead, one at a time, until you have reached your desired length. Make sure to keep all four strings lined up together as you go.
You Can Check It Out To Make Suffolk Puffs
9 Methods How to Make Flower Bracelet
1. Gather Your Supplies.
For this project, you will need a length of floral wire, a pair of wire cutters, and a selection of flowers. You can use fresh or artificial flowers for this project. If you are using fresh flowers, be sure to choose ones that will hold up well when wired. While you can do this project with one type of flower, you can also mix and match colors and varieties to create a unique look.

2. Cut the Wire to the Desired Length.
Wrap one end of the wire around your wrist to gauge the correct length. Cut the wire using the wire cutters, and then wrap the end around your wrist again to make sure it is comfortable. However, be sure not to make it too tight, as this can cause discomfort. If you have problems cutting the wire, try using a pair of pliers to help. Make sure to leave a few extra inches to work with, as this will give you more flexibility.
3. Choose Your Flowers.
Select flowers that are similar in size and shape for a uniform look, or mix and match different varieties for a more eclectic design. If you’re creating a bouquet for someone special, consider adding flowers that hold a special meaning to them. Make sure the colors complement each other and the vase. Although you might be tempted to buy your flowers at the grocery store, local florists will usually have a much wider variety of blooms and better quality. While it may cost a little more, you’ll be rewarded with a much prettier arrangement.
4. Begin Attaching the Flowers to the Wire.
Start with one flower, and thread the stem through the wire. Wrap the stem around the wire several times to secure it in place. Repeat with additional flowers, spacing them evenly along the length of the wire. If necessary, use a pair of pliers to tighten the wire and help keep the flowers in place. Make sure you don’t wrap the wires too tightly, or else the flowers may appear wilted.
5. Arrange the Flowers.
Once you have attached all of the flowers, it is time to arrange them in a way that looks aesthetically pleasing. Play around with different placements and combinations until you find something that works well.
Consider layering larger blooms behind smaller ones or using contrasting colors for visual interest. If you are not confident in your ability to design a pleasing arrangement, look online for flower arrangement tutorials and tips.

Place the finished product in a vase or other container and enjoy your beautiful creation!
6. Secure the End of the Wire.
When you are happy with your arrangement, wrap the end of the wire several times around itself to secure it in place. Once again, make sure not to wrap it too tightly so that you don’t damage the delicate stems of your flowers. If your floral wire is particularly thin, you may want to wrap some florist tape around the end of the wire to provide extra support. Finally, trim off any excess wire. Although it is not necessary, you may also want to add a dab of hot glue on the back of the wire to help it stay in place. Now your flowers are safely attached to the stem and ready for arranging.
7. Tie a Ribbon Around Your Bracelet.
To finish off your flower bracelet, tie a ribbon around the stem-wrapped wire. Pick a color that will complement your flowers and add an extra special touch. You can also decorate the ribbon with beads, pearls, or other embellishments to give it a unique look. Once you have everything tied together, your flower bracelet is ready to wear!
8. Take Care of Your Bracelet.
To ensure that your flower bracelet stays looking fresh, keep it away from direct sunlight and water. If you are using artificial flowers, dust them occasionally to keep them looking their best. If you’re using fresh blooms, spritz them with a bit of water every few days to make sure they don’t dry out too quickly. If your bracelet has any special finishes or decorations, make sure to clean them periodically with a soft cloth. Following these simple steps will help keep your flower bracelet looking beautiful for a long time.
9. Wear and Enjoy!
Your flower bracelet is now finished and ready to be worn. Wear it with pride and show off your beautiful creation everywhere you go. The intricate blooms and petals will make your bracelet stand out from the crowd. With a few simple steps, you can add some sparkle to your look and show off your creativity. So go ahead, give it a try and enjoy your beautiful handmade flower bracelet!

With a little patience and creativity, you can easily make your own flower bracelet. So don’t wait – get out there and start crafting! Good luck!
You Can Check it Out to Pick Up Stitches for a Collar
Things to Consider When Making Flower Bracelet
1. Choose Appropriate Beads:
The type of beads you choose to use will depend on the size and style of your bracelet as well as the look you’re going for. Smaller beads will create a more delicate look, while larger beads can be used to make bold statement pieces. If you’re looking for a more unique and intricate bracelet, consider using seed beads or vintage glass beads.
2. Consider Different Color Combinations:
Flower bracelets are all about color combinations, so think carefully about what colors will work best together. For example, if you want a subtle floral-inspired look, try pairing pastel blues and yellows with soft greens and pinks. Or opt for a bold design by mixing bright hues like orange, purple, and red together.
3. Pick the Right Clasp:
The right clasp is essential to keeping your flower bracelet secure. Traditional lobster claw clasps are great for larger pieces, while magnetic clasps work well for delicate bracelets. If you’re looking for something even more unique and eye-catching, consider using a toggle or slide clasp instead.
4. Add Charms or Other Embellishments:
For an extra special touch, add charms or other embellishments to your bracelet. You could choose to use tiny metal beads shaped like flowers, small glass bugs, or dainty feathers – the possibilities are endless! Just make sure that whatever you choose doesn’t overwhelm the overall design of the piece.
5. Get Creative with Stringing Techniques:
Don’t be afraid to experiment with different stringing techniques when making your flower bracelet. From the classic ladder stitch to more intricate Peyote or Brick stitch patterns, there are plenty of ways to create a beautiful and unique piece. If you’re feeling adventurous, try combining several different stitches together for a truly one-of-a-kind look.

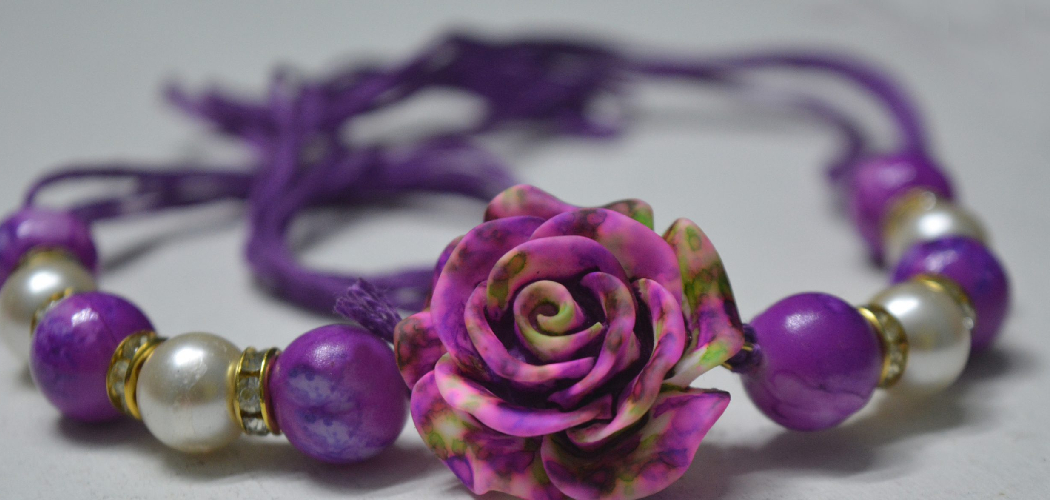
What Is a Bracelet Made of Flowers Called?
A bracelet made of flowers is usually referred to as a “flower bracelet.” These bracelets can be made with real or artificial flowers and may also include other embellishments such as beads, pearls, charms, ribbons, etc.
The type of flower that is used will depend on the look you are going for and the materials that you have available. These bracelets are often made with a strong elastic band to ensure they stay securely on the wrist.
Conclusion
So, there you have it – a simple guide on how to make flower bracelet! Whether you’re looking for a fun activity to do with friends or a unique gift for someone special, this DIY project is perfect.
With just a few supplies and some time, you can create a beautiful and one-of-a-kind piece of jewelry. Follow the steps above and see for yourself how easy it is to make your own flower bracelet!
You Can Check It Out To Make an Origami Crown