
Are you ready to make some craft items like Suffolk puffs? Making Suffolk puffs is actually easier than you think. Here are the steps to make them.

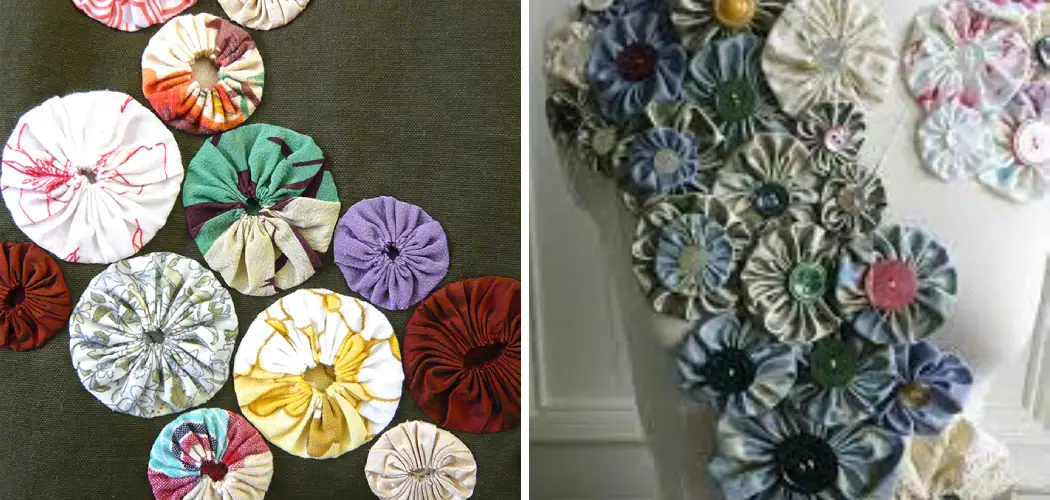
Suffolk puffs are pieced textiles that can be used to cover or decorate other items. These delicate, eye-catching pieces of craftwork add a unique touch to everyday home furnishings and can be made with either traditional quilting materials or fabric from upcycled clothing.
Making Suffolk puffs requires careful preparation of the fabrics but when you’ve finished your project, you will have an item that is truly one-of-a kind! In this blog post, we will walk through all the steps, from choosing the right fabrics and equipment to creating beautiful puff designs.
o grab a cup of tea, get ready for some creative sewing, and learn how to make suffolk puffs deceptively simple yet lovely works of art today!
What Will You Need?
Before you start, you will need the following materials:
- Cotton fabric in two colors (a lighter and a darker shade)
- Seam ripper
- Embroidery scissors
- Cardstock for templates
- Needle and thread
- Iron and ironing surface.
Once you’ve gathered your materials, it’s time to start making the puffs!
10 Easy Steps on How to Make Suffolk Puffs
Step 1: Create Templates
Once you have all your items ready, it’s time to create the puff template. Make sure to draw a circle with a diameter of 6 inches on the cardstock; this will be used as your puff base. Then cut two strips of fabric in different colors that measure at least ¾ inch wide each.
The length of these strips should be greater than the circumference of your circle template, which would be 18.85 inches (6 x 3.14). Finally, mark a small triangle at one end of each strip, making sewing easier later.
Step 2: Lay Fabric
Lay down the two colors of fabric together right sides facing each other, and begin pinning them together. Make sure to create straight lines along the edges with pins to ensure accuracy when sewing later on. Be careful in this step since it will affect the overall look of your puff design.

Step 3: Sew Strips
Once you have pinned the strips, it’s time to sew them together. Using a needle and thread, start sewing from the marked triangle until you reach the end of your strip, then backstitch at both ends for reinforcement. Next, remove all pins as you go in order to maintain accuracy while stitching.
Step 4. Add Puff Template
Once you have finished sewing the two strips together, place your puff template onto the fabric and pin it on. Make sure to use plenty of pins as you go so that your fabric won’t move around while you are cutting. You can also use chalk to draw a few lines around the template in order to keep everything in place.
Step 5: Cut Out Fabric
Using a pair of embroidery scissors, carefully cut out the fabric according to your puff template. Make sure to cut all four layers of fabric at once in order to save time and effort. Once you have completed this step, remove all pins and set aside your cutout piece.
Step 6: Iron Seams
Now it’s time to iron the seams flat. Start from one end and slowly work your way up. Make sure to use a low heat setting, and don’t forget to press the seams flat with an ironing board cover in order to protect your fabric from burning. Don’t forget to use the steam setting on your iron if necessary.

Step 7: Sew the Seam
Once you have pressed all of the seams, it’s time to sew them together. Start by taking one end of the seam and sewing it towards the centre, then do the same with the other end. Keep going until you have sewn all four sides together neatly.
Step 8: Turn Fabric Inside Out
Now that you have completed sewing your puff piece turn it inside out using a seam ripper if needed. Make sure to keep everything neat, and no fabric gets caught in between the seams. Use a pair of tweezers or an extra needle to help with this process.
Step 9: Stuff with Polyester Fibre
Once you have turned your fabric inside out, it’s time to stuff your puff. Using a spoon or a measuring cup fill the puff evenly with polyester fiber until it is full and plump. Make sure to leave some extra space at the top to close off the puff later.
Step 10: Finish Off Puff
The final step is to close off your puff. Take one end of the opening and fold it inwards, then carefully pin it down using enough pins so that it won’t move around when sewing. Once all pins are in place, start stitching along the edges until you reach where you started from, and backstitch at the end for added reinforcement.
And there you have it! You now have a delicious and fluffy Suffolk Puff that is ready to enjoy. With these ten easy steps, you can now create unique and delicious puffs that will be sure to impress your friends and family. Enjoy!

You Can Check It Out To Crochet a Shark
5 Additional Tips and Tricks
1. If you want your Suffolk Puffs to look extra fluffy, use two layers of fabric instead of one.
2. To add a unique twist, you can use different fabrics and combine multiple colors.
3. Don’t forget to use a low heat setting when ironing your seams in order to prevent the fabric from burning.
4. Make sure to leave enough space at the top of your puff for stuffing with polyester fiber.
5. Use plenty of pins when marking out and cutting the fabric so that it won’t move around while you are working on it.
With these tips and tricks, you can make the most delicious and fluffy Suffolk Puffs. Enjoy!
5 Things You Should Avoid
1. Don’t use too much pressure when pressing the seams flat, as it could damage your fabric.
2. Avoid using sharp scissors as they can tear and pull the fabric during cutting.
3. Make sure not to stuff your Puffs with too much polyester fiber otherwise, it will be difficult to close off the opening without tearing the fabric.
4. Don’t forget to backstitch at both ends of a seam for added reinforcement, especially when you are sewing along delicate fabrics such as chiffon or silk.
5. Lastly, never skip steps in order to save time! Take your time and follow all instructions carefully so that you don’t end up with an uneven puff shape or sloppy stitching.
Now that you know what to do and avoid, get started on making some delicious Suffolk Puffs today!
6 Different Design Ideas
- Use velvet fabric for a more luxurious look.
- Create a floral design by using multiple colored fabrics in one puff and embroidering some flower petals on the edges.
- For a more rustic feel, use denim or burlap fabric instead of cotton or silk.
- Try using a combination of prints, such as leopard print and polka dots for unique patterns.
- Add some sparkle to your puffs with sequins, glittery thread, or beading along the edges for an eye-catching touch!
- Make mini puffs by using smaller pieces of fabric and trimming the edges for a more delicate look.
With these five different design ideas, you can create Suffolk Puffs that are truly unique and special! Have fun experimenting with different fabrics and designs, and get creative with your Suffolk Puffs. Enjoy!
Can You Wash Suffolk Puffs?
Yes, you can! Suffolk Puffs are made from cotton or silk fabrics, which are washable. However, hand-washing is recommended for delicate fabrics to prevent them from shrinking or tearing.

When you are ready to wash your puffs, simply fill a sink with cold water and add some mild detergent. Gently swish the puff in the soapy water, being careful not to stretch or wring it, and rinse thoroughly until all soap residue has been removed. Allow your Suffolk Puff to air dry naturally, and then fluff it up with your hands before enjoying it again!
You can also spot clean your Suffolk Puff with a damp cloth if necessary.
With these tips in mind, now you know how to keep your Suffolk Puffs looking and smelling fresh!
Conclusion
Suffolk puffs are a fun way to capture the joy of crafting with the cloth. They are an ideal craft for beginner sewers, and children will love helping out with putting the pieces together. With these simple steps on how to make suffolk puffs, you can transform just a few pieces of fabric into a beautiful piece of art.
Crafting Suffolk puffs is a great indoor activity for a rainy day or as part of an outdoor picnic in the sunshine. So, grab some fabric pieces and start creating your own unique piece. And why not challenge yourself and explore some more techniques used in crafting with cloth?
Embroidery and appliquéing are only two potential methods to add creativity to your Suffolk puff projects. There’s no limit to what you can create if you take your time and have patience when making crafts like these!
You Can Check It Out To Embroider Leaves