
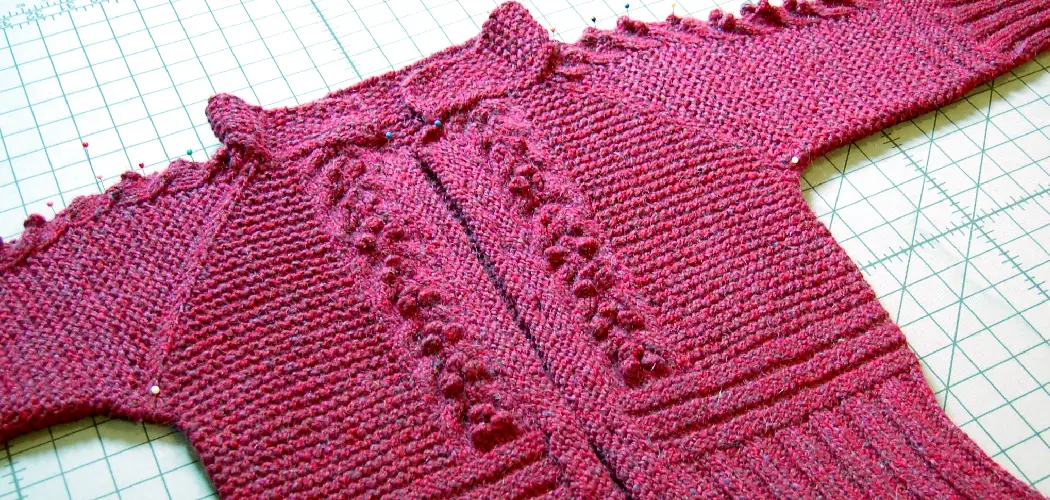
Are you ready to up your knitting game? If so, the bobble stitch transforms any project from average to extraordinary! A fun texture-rich technique, this multi-dimensional stitch can be used for cowls, scarves, blankets, and more. It brings a pop of color and style into each piece and adds a dimension that helps create an eye-catching item like no other.

The Bobble Stitch is a great way to add texture and interest to any knitting project. Whether it’s used for making cushions and throws or adding extra embellishment to hats, sweaters, and scarves – this stitch is both fun and easy to learn!
In this blog post, we will explore how to knit the bobble stitch so you can create beautiful pieces of knitwear in no time. So why not get comfortable with your favorite knitting needles, and let’s get started on becoming a pro at the bobble stitch?
What Will You Need?
Before you get started with the Bobble Stitch, make sure that you have the following supplies:
- Yarn (any weight)
- Appropriately sized knitting needles for your yarn of choice
- A yarn needle to weave in ends after finishing
Once you have all of your supplies, let’s move on to how to master the Bobble Stitch!
9 Easy Steps on How to Knit the Bobble Stitch
Step 1. Select the Pattern:
Select the pattern you wish to create with the bobble stitch. This could be a single repeat or multiple stitch repeats in different rows and columns. Be careful to follow the pattern in your knitting. It is important to note that the bobble stitch pattern should be created in a knitting area with no decrease or increase.
Step 2. Cast On:
Cast on your project’s required number of stitches and begin working in the desired stitch pattern according to the instructions. Don’t forget to leave a few inches of yarn at the end for knitting in the ends. Otherwise, you may have to start all over again!
Step 3. Knit One Stitch:
Knit one stitch as usual and then move the yarn to the front of the work. Ensure that the yarn is not too tight and that it can still be easily moved around. Because the bobble stitch is on the right side of your work, make sure you keep the yarn in front.
Step 4. Yarn Over:
Yarn over (wrap the yarn around your right-hand needle) and knit one stitch. Move the yarn to the back of your work. Yarn over and knit one stitch again. Move the yarn to the front of your work. Repeat this step three more times so that you will have a total of five stitches on your right-hand needle at this point.
Step 5. Knit All Five Stitches Together:
Now it’s time to knit all five stitches together in order to create a bobble effect. To do this, simply insert your left needle into all five stitches at once and then wrap the yarn around it as normal for knitting one stitch and pull through. Don’t worry if it looks a bit awkward at first – you will get the hang of it with practice.

Step 6. Take Out The Bobble Stitch:
Once you have finished knitting the bobble stitch, take it out of the needle and pull until it forms a tight ball. This will help to keep your stitches even and neat. Remember to keep the yarn in front while you are working.
Step 7. Continue Knitting:
Continue knitting your pattern, following the instructions, and repeating steps 1-7 as necessary until you reach your project’s desired length or size. For example, if you are making a scarf, you may want to repeat the pattern every row or two. There are no hard and fast rules for this, so just use your imagination!
Step 8. Weave In The Ends:
Once your work is complete, use a yarn needle to weave in any loose ends and secure them tightly so that they don’t come undone in future washings. You can also use this time to add any extra embellishments if desired. It will also add a nice, finished look to your project.
Step 9. Enjoy!
Admire your work and enjoy the texture and detail that you have created with the bobble stitch! With practice, you can easily make beautiful pieces of knitwear – so don’t forget to show off your new skills with all of your friends and family.
Happy knitting!
By following these easy steps, you will soon be on your way to becoming a pro at the Bobble Stitch! With just a few supplies and some practice, you will be able to create beautiful pieces of knitwear in no time. So why not get comfortable with your favorite knitting needles, and let’s get started on mastering the Bobble Stitch!
You Can Check It Out to Make Stitch Crochet Kit

5 Additional Tips and Tricks
- Try starting each bobble with a slip knot. This can help keep the stitch tight during knitting and enable you to create consistent, round bobbles.
- When knitting the bobble, ensure that you knit tightly around the needle, as this will help to create a neat and even bobble when you are finished.
- Don’t forget to add an extra stitch at the end of the row before beginning the next one; this will help maintain your bobble’s shape while knitting your project.
- Use a smaller needle size than usual for the purl stitches that make up each bobble; this will ensure that they remain firmly in place as you knit them together.
- If possible, use lighter-weight yarn for your project; this can help to keep your bobbles from becoming too bulky or misshapen during knitting.
Following these simple tips and tricks can help you create beautiful, consistent bobbles with each project. Happy knitting!
5 Things You Should Avoid
- Don’t pull the yarn too tightly when creating a bobble. If you do, it can be difficult to unravel the stitch later on if needed.
- Don’t forget to leave enough slack in between each bobble, so they don’t all end up squashed together.
- Make sure that you knit the stitches of each bobble individually and not as one big stitch.
- Take care to ensure that your bobbles are even. Otherwise, they won’t look right against the rest of your knitting pattern.
- Never skip a row when knitting a bobble – this can make them look uneven and could lead to holes in your fabric!

By following these tips and taking your time when creating the bobbles, you’ll be on your way to mastering the bobble stitch in no time!
What are the Different Patterns of Bobble Stich
1. The Classic Bobble Stitch: This is the most basic version of a bobble stitch and consists of a series of knits, purls, and increases. The number of knit and purl stitches that you use will depend on how big you want your bobble to be.
2. The Crisscross Bobble Stitch: You’ll need two different yarn colors for this one. You’ll start with one color and then switch to the other after several rows to create a zigzag pattern. This is best for creating intricate designs or large-scale projects.
3. The Reverse Bobble Stitch: In this variation, the decrease (or “unpicking”) comes first, followed by the increases (or “making”). This creates a bobble that looks like a sideways-facing mountain and can be used to create interesting textured designs.
4. The Mini Bobble Stitch: This pattern is perfect for creating small and subtle details in your projects. It only requires one row of stitches and produces a tiny but effective bobble when viewed from the front side of the work.
5. The Multi-Color Bobble Stitch: This technique is great for brightening up your project with multiple colors! By carrying two strands of yarn at once, you can easily switch between different hues as you go along. This makes it an ideal choice for adding some extra color to a project.

Whichever bobble stitch pattern you choose, you’ll be sure to create beautiful and eye-catching pieces in no time! With these tips and tricks, you can start knitting with the Bobble Stitch! Have fun, and don’t forget to show off your finished creations!
Conclusion
Congratulations on learning the bobble stitch! You should now be confident that you can follow any pattern or instructions for this stitch. Knitting is a wonderful and creative hobby, engaging both your hands and mind.
The bobble stitch combines the meditative power of knitting with interesting textures to create a wonderful piece of fabric. With such wide different varieties of stitches to choose from, your choices are limitless, and the possibilities are multiple.
Explore various popular stitches, as well as online resources like YouTube tutorials, needles and yarn shops, and bookshelves full of inspiring patterns. May your creativity flourish as you embark on a journey to discover new techniques and fabrics!
Hopefully, the article on how to knit the bobble stitch has provided you with the knowledge and confidence to start this rewarding hobby. Good luck, and happy knitting!