
Are you looking for a way to express your deepest feelings? Writing love letters is a timeless and treasured expression of affection that can make someone’s day.
Crafting the perfect love letter takes time and thought, but it doesn’t have to be as daunting if you break down the steps. With this helpful guide on How to Fold Love Letter, anyone can write an intimate message that will stand out from any other ordinary note!

If you plan to place your love letter in an envelope, it’s important that you properly fold it before inserting it.
Our expert advice will walk you through every step, from deciding what to say and organizing how best to word your thoughts to folding them into an unforgettable message. Get ready to send some serious love with this tried-and-true method today!
What Will You Need?
Before you start folding, make sure you have the following supplies in hand:
- Paper or cardstock
- Pen and pencil
- Ruler
- Scissors
- Glue or tape
Once you’ve gathered all the necessary supplies, it’s time to get folding!
10 Easy Steps on How to Fold Love Letter
Step 1: Measure and Mark Your Paper
The first step is to measure your paper or cardstock. You should mark two points on the long side that are exactly four inches apart from each other. This is important as it will determine how easily and nicely your letter will fold.
Step 2: Fold the Paper
Take the marked paper and fold it at the marked points. You should have something that resembles a gatefold. This is the base of your fold. Be sure to make the folds as neat as possible. For a professional touch, use the edge of a ruler to press down on the folds, creating crisp edges.
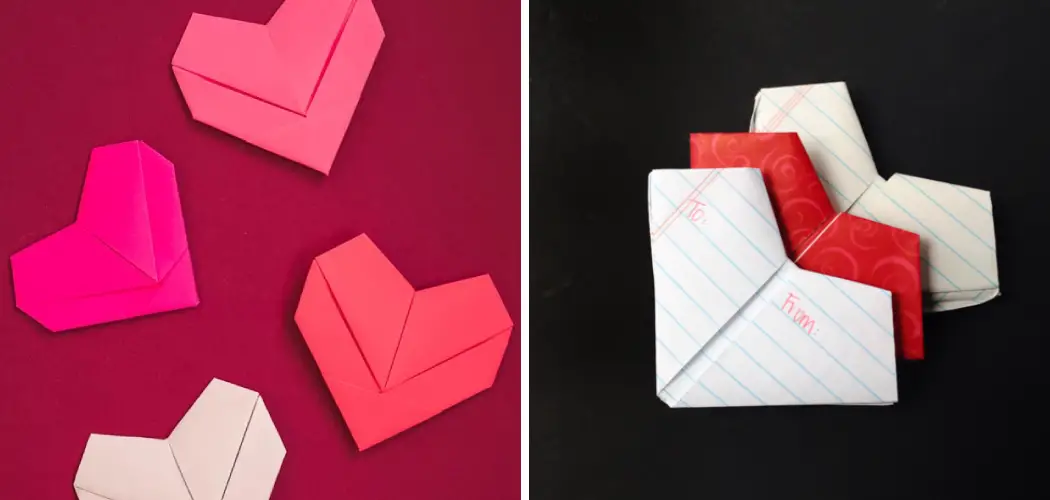
Step 3: Create a Heart Shape
Now, it’s time to create the heart shape. Fold the paper in half again, but take each end of the gatefold and bring them together in the middle. You should now look at what resembles a heart’s top half. The folds should meet exactly in the center for an accurate heart shape.

Adjust as necessary. Next, use the scissors to round off the other end of the paper, creating the bottom of the heart. Make sure to cut both layers of paper at the same time to keep the heart symmetrical.
Step 4: Secure the Heart Shape
Once you’re satisfied with the heart shape, it’s time to secure it. Apply a small amount of glue or place a piece of tape inside the heart where the folds meet. Press down firmly and allow it to dry if you’re using glue.
Now, you should have a heart-shaped folded love letter. This fold adds a unique touch to your letter and symbolizes the love and affection contained within the words written on the paper.
Step 5: Write Your Love Letter
Now that you’ve created your heart-shaped canvas, it’s time to fill it with words of love. Unfold your heart and spread it out flat. Pick up your pen or pencil and start writing your heartfelt message on the inside.
Remember, the purpose of this letter is to express your deepest feelings, so take your time and don’t rush. Allow the words to flow naturally from your heart onto the paper. Once you’re satisfied with your message, refold the letter back into its heart shape. Your folded love letter is now ready to be delivered to your beloved.
Step 6: Add a Personal Touch
Consider adding a personal touch to make your love letter even more special. This could be a tiny, hand-drawn sketch, a sprinkle of your favorite perfume, or even a smear of your lipstick on the corner of the heart.
This personal touch will make your letter physically unique and serve as a token of your affection that your beloved can keep as a souvenir. Once you’re done, your personalized, heart-shaped love letter will be given to the person you love.
Step 7: Deliver Your Love Letter
Now comes the moment of truth – delivering your love letter. Select a moment when the recipient will likely have time to read it without interruption. You could leave it somewhere for them to find, like under their pillow or in their favorite book.
Alternatively, you could hand it to them directly or mail it if they live far away. Wherever or however you deliver it, ensure it is done in a way that respects their privacy and that the moment is as special as the words you have penned.
Step 8: Follow-Up After Delivery
After delivering your love letter, give your beloved time to process it before you expect any response. A love letter is a deeply personal gesture; it may evoke strong emotions that might take some time to digest.

After some time, follow up with them subtly and gently to see if they want to discuss its contents. Remember, writing a love letter aims to express your feelings, not to demand reciprocation. Be patient, and respect their feelings and reactions.
Step 9: Be Prepared for Any Response
Once you’ve delivered your love letter, be prepared for any response. Remember, everyone’s emotions and reactions are different. Some might cry, some might laugh, some might feel overwhelmed, and some might stay silent. The response does not necessarily measure your affection or the quality of your letter. It’s simply a reflection of their feelings at that moment.
Step 10: Reflect on the Experience
After you’ve written, folded, and delivered your love letter, take some time to reflect on the entire experience. How did it feel to express your feelings in such a personal and creative way? How did it feel to fold your emotions into a heart and then give that heart to someone else? Regardless of how your beloved responds, remember that the act of expressing your love is a brave and beautiful thing.
By following these steps, you can create a unique and beautiful folded love letter for your beloved. Writing letters of love is an ancient art form that can help us express our emotions personally and meaningfully.
5 Additional Tips and Tricks
- Consider using special paper or cardstock for your love letter. You can find unique and ornate papers in stationery stores that will lend an extra special touch to your letter.
- If you want to make the folded shape even more intricate, try creating a pop-up heart inside the letter. This gives it an impressive 3D effect and adds a unique element to your letter.
- Consider decorating the outside of the heart with a simple design, such as polka dots or stripes. A few strokes of color can make all the difference and give your letter an extra personalized touch.
- If you want to ensure your beloved receives the love letter in one piece, consider using an envelope slightly larger than the letter itself. This will prevent it from getting damaged or crumpled during transit.
- If you want to add an extra layer of protection, consider sealing the envelope with wax or a personalized sticker. Your beloved will be sure to appreciate all of your thoughtful touches!

Writing love letters can be daunting, but by following these steps and considering these additional tips and tricks, you can create a meaningful and heartfelt letter for your beloved. With practice, you’ll develop the skills necessary to express your love eloquently and personally.
5 Things You Should Avoid
- Avoid rambling. Your love letter should be concise and to the point – too many extraneous details can make it seem less sincere.
- Avoid using overly flowery language. Keep your writing simple and authentic, as this will reflect more genuine emotion.
- Remember to proofread your love letter before sending it, as typos or grammar mistakes could detract from the message.
- Avoid being overly critical or demanding in your letter – remember, the aim is to express love and appreciation, not to demand a certain response.
- Try to avoid sending your love letter when you feel emotional, as this may lead you to write something that is not genuine or heartfelt.
Writing a beautiful love letter is no easy task – but with practice, you can create something truly memorable for your beloved. Keep these tips in mind while writing yours, and share the love!

Conclusion
Folding a love letter is an art, and it can be quite challenging to get it right. However, by following these easy steps on how to fold love letters, you can make beautiful origami gifts that can bring joy and joyous memories to the receiver of your love note.
For some added creative touch, why not add a special message on the inside page or even write their name in different colors? Let’s pair the love letter with a single flower or chocolate to make it extra special. Whatever you decide, remember that folding a love letter should reflect you, your emotions, and your intentions.
Hopefully, this article has given you the confidence and inspiration to write and fold your love letter. It’s an unforgettable way to show someone how much you care – so don’t wait any longer. Start folding!
Happy writing! 🙂
You Can Also Check This Out to Make a Heart Shape Pillow