
For generations, the craft of crochet has been a beloved art form used by crafters to create beautiful handmade items with their own two hands. Whether you are looking for an enjoyable way to spend your free time or hoping to make some heartfelt gifts for loved ones, learning how to crochet is an accessible and rewarding skill that can be picked up quite quickly.

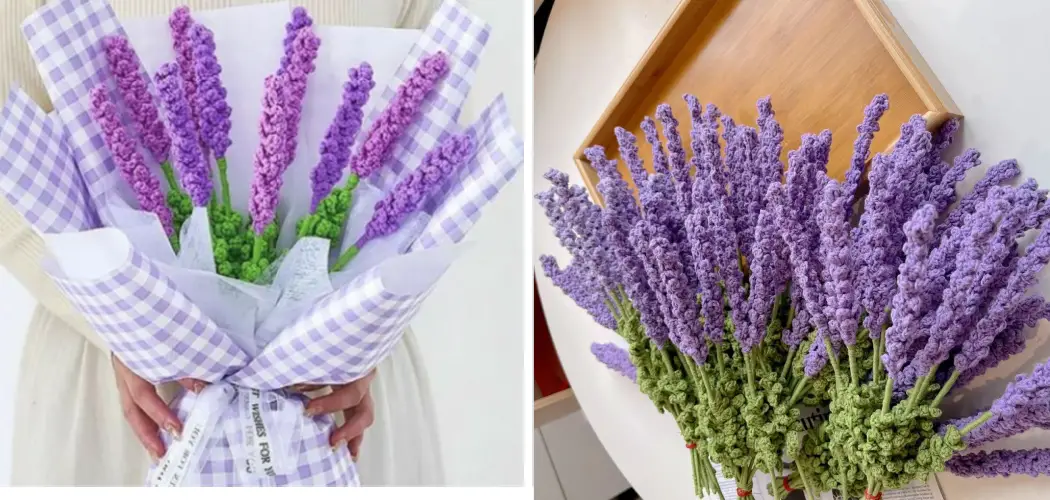
One item in particular that many beginners may first want to learn how to make is the ever-so-popular lavender – its timelessly attractive design and beautifully bright color make it perfect for incorporating in all sorts of projects from amigurumi creations and jewelry pieces, right down to fashionable apparel. So if you’re ready and raring to get crafting this really pretty flower pattern then follow our handy guide on how to crochet lavender!
Needed Materials
Given below are the basic materials you will need to get started with your lavender pattern:
Yarn
Choose a lightweight yarn as this is often the easiest for beginners. A solid color or variegated yarn will do just fine, just be sure to avoid anything too thick or fuzzy!
Crochet Hook
size depends on the yarn you’re using, for lightweight yarn a size E or 3.50mm hook should work well.
Scissors
Cut the yarn when you’ve finished your project!

10 Step-by-step Guidelines on How to Crochet Lavender
Step 1: Make the Foundation
Chain 5 stitches and join with a slip stitch to form a loop. It’s important to keep your foundation tight but not too tight or it won’t be able to hold the additional stitches. Otherwise, you may end up with a wonky-looking lavender! It’s also a good idea to count your stitches as you go along. But don’t fret if you make mistakes – it’s all part of the learning process.
Step 2: Make the Petal Round
Attach the yarn to one of the foundation loops and chain 3 stitches, then make 11 double crochet (DC) stitches into the loop. Slip stitch into the top of first chain 3 to finish off and cut yarn. Your petal round should look like a circle of little loops. This is where your lavender will start to take shape. It’s important to make sure you have the right number of stitches in each round so that it all stays even.
Step 3: Make the Inside Petal Round
Attach the yarn to one of the petal loops and chain 3 stitches, then make 11 double crochet (DC) stitches into each petal loop. Slip stitch into the top of first chain 3 to finish off and cut yarn. You should now have a second circle of petal loops inside the first one. It’s important to make sure that the inside petal round is neat and even.

Step 4: Make the Center of the Lavender
Attach the yarn to one of the inside petal loops and chain 3 stitches, then make 11 double crochet (DC) stitches into each loop. Slip stitch into the top of first chain 3 to finish off and cut yarn. This time, you should have a third circle of petal loops that are slightly smaller than the first two rounds.
You should now have a coordinating center for your lavender. But don’t be discouraged if it doesn’t look perfect – remember that practice makes perfect!
Step 5: Make the Stem
Chain 6 stitches, then single crochet (SC) in each stitch until your stem is as long as you want it to be. Slip stitch into the top of the first chain 6 loops to finish off and cut yarn. At this point, your lavender should be taking shape! This part is simple but it’s important to make sure your stem is even and not too tight. It should also be long enough to make a nice-looking stem.
Step 6: Attaching the Stem
Attach the stem to one of the center loops by inserting the hook through both the stem and loop, then making a single crochet (SC) stitch. Repeat this process until you have securely attached the stem to the lavender. You should now have a nice-looking stem attached to the center of your lavender.
It’s important to be careful when attaching the stem so that it stays secure. But don’t worry if it looks a bit messy – you can always go back later and tidy it up.
Step 7: Make the Leaves
Now for the leaves! Chain 5 stitches and make 1 double crochet (DC) stitch into the 4th chain from the hook, then make 3 more DC stitches in each of the remaining 2 chains. To finish off, chain 1 stitch and slip stitch into the same space as the first DC. Cut yarn and repeat the process for as many leaves as you’d like.
But be sure to keep them even! This will give your lavender a much fuller look. This part may seem tricky, but don’t be afraid to take your time and practice until you get the hang of it.
Step 8: Attaching the Leaves
Attach each leaf to the stem by inserting your hook through both the stem and loop, then making a single crochet (SC) stitch. Make sure that the leaves are evenly spaced apart from one another. It’s important to make sure the leaves are securely attached or they may come loose later on.
Now you can go back and tidy up any messy parts if necessary. It’s important to be gentle with your lavender as it’s quite fragile.

Step 9: Finishing Touches
For a more finished look, sew one or two small stitches in the center of each petal. This will help to give your lavender a fuller and more realistic shape. Although this step isn’t necessary, it can really help to make your lavender look more complete. It’s also a great way to practice and perfect your sewing skills! But don’t forget to be gentle when sewing as the yarn can easily break.
Step 10: Enjoy Your Finished Lavender!
You did it! Now you’ve completed your very own crochet lavender. Congratulations! Now you can proudly show off your new creation to all of your friends and family. Feel free to experiment with different colors and yarn weights – the possibilities are endless! Have fun crafting! Always remember to be patient and practice makes perfect.
Following these steps on how to crochet lavender, you should be able to crochet your own lavender with ease. Crochet is a great hobby for all skill levels, so don’t be afraid to get creative and try something new – you never know what kind of amazing projects and pieces you can make until you actually give it a go! Enjoy crafting!
Extra Tips
- Make Sure to Use a Good Quality Yarn That Won’t Unravel Easily. It’s Also Important to Make Sure the Yarn Color Coordinates With Your Lavender Design.
- To Give Your Lavender Extra Definition, Try Adding Some Flower Stamens or Small Beads in the Center of Each Petal.
- For an Extra Special Touch, You Can Add a Bit of Glitter or Sequins to Your Lavender.
- If You’re Feeling Creative, Why Not Try Making Different Types of Flowers Such as Roses and Daisies? Again, the Possibilities Are Endless!
- Making Crochet Flowers is Also a Great Way to Practice and Perfect Your Crochet Skills. So Don’t Worry if Your First Attempt Isn’t Perfect – Practice Makes Perfect!
- Finally, Don’t Forget to Have Fun and Be Creative With Your Crafting. There’s No Right or Wrong Way to Make Something Beautiful – the Sky is the Limit!
Frequently Asked Questions
Q: What is the Best Yarn to Use for Crocheting Lavender?
A: The best yarn for crocheting lavender is a lightweight yarn, as this will be the easiest to work with. A solid color or variegated yarn can be used – just avoid anything too thick or fuzzy!

Q: What Size Crochet Hook Should I Use?
A: The size of the crochet hook you should use depends on the type of yarn you’re using – for lightweight yarn a size E or 3.50mm hook should work well. Be sure to check the yarn label for recommended hook sizes!
Q: How Do I Attach the Stem and Leaves?
A: To attach the stem and leaves, simply insert your hook through both the stem/leaf and loop, then make a single crochet (SC) stitch. Be sure to keep the leaves evenly spaced apart from one another when attaching them!
Q: How Can I Make My Lavender Look More Realistic?
A: To make your lavender look more realistic, you can sew one or two small stitches in the center of each petal. This will help to give your lavender a fuller shape and add some extra detail!
Conclusion
Overall, crocheting lavender is an enjoyable activity for all skill levels. Having the right tools and materials makes it even more fun to create your own art. Whether you’re a beginner looking for an easy way to gain the basics of crochet or a seasoned pro who desires to make something unique, lavender is a great choice.
With so many varieties of colors available, you can find the perfect hue that speaks to you and makes something special. Get creative and give this craft a go today – you won’t regret it! You can purchase pre-packaged supplies online or at local yarn shops and start crafting your masterpiece right away! Thanks for reading this article on how to crochet lavender.