
Crocheting offers a world of creative possibilities, allowing crafters to bring their imaginations to life through yarn and hook. If you’re seeking to add personality and uniqueness to your stuffed animals or amigurumi projects, learning how to crochet a muzzle is a valuable skill.

A muzzle not only adds character and dimension to your creations but also provides a canvas for intricate detailing that can truly make your amigurumi stand out.
Whether you’re crafting cute animals, fantasy creatures, or even dolls, mastering the art of crocheting muzzles will open up new avenues for customization. In this guide, we’ll explore the step-by-step process of crocheting a muzzle that perfectly complements your amigurumi’s expression and brings a touch of realism or whimsy to your handmade treasures.
The Purpose and Use of a Crochet Muzzle for Animals
Before starting, make sure you have all the necessary materials and tools. You will need crochet thread or yarn, size 2-3mm crochet hook, scissors, measuring tape or ruler, and stitch marker (optional). When selecting your yarn, it should be lightweight and breathable for maximum comfort.
A crochet muzzle can be used to help control the behavior of animals such as dogs and horses. It helps prevent biting, barking, or chewing, which can lead to negative behaviors. Additionally, it is important to remember that muzzles should not be used as a form of punishment or restriction; instead they should be seen as an aid in training and reinforcement.
When selecting the size of your muzzle, make sure to measure the circumference of the animal’s snout. Refer to your pattern instructions as some have different sizing measurements. It is important to ensure the muzzle fits correctly and comfortably for your pet; it should not be too tight or too loose.
Materials & Tools Needed to Crochet a Muzzle
- Crochet Thread or Yarn: Choose a lightweight and breathable yarn to ensure the muzzle is comfortable for the animal. The color selection is up to your preference.
- Crochet Hook: A size 2-3mm crochet hook is ideal for this project. This size will allow for the tight stitches needed to ensure the muzzle’s durability and functionality.
- Scissors: You will need a pair of sharp scissors for cutting the yarn.
- Measuring Tape or Ruler: You’ll need to measure the size of the animal’s snout to ensure the muzzle fits correctly. Hence, a measuring tape or ruler is essential.
- Stitch Marker: While not mandatory, a stitch marker can be helpful for marking your place in your pattern, especially when working in the round.
With these materials and tools at hand, you are ready to start crocheting a muzzle for your animal.
10 Steps How to Crochet a Muzzle
Step 1: Gather Your Materials

To crochet a muzzle, you’ll need appropriate yarn in the desired color, a crochet hook that matches your yarn weight, a yarn needle, and scissors. Select a yarn that is soft and suitable for your project’s size to ensure the muzzle integrates seamlessly with the rest of your amigurumi.
Although any yarn weight can be used, a medium or worsted-weight yarn is best for creating durable and comfortable muzzles.
Step 2: Choose Your Muzzle Style
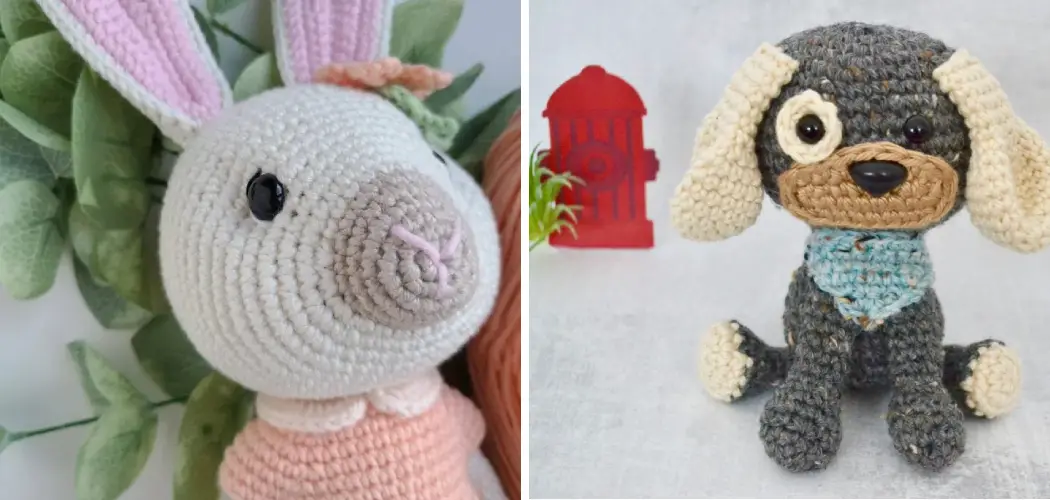
Decide on the style of muzzle that best suits your amigurumi’s character and expression. You can opt for a small, simple muzzle for a minimalist look or go for a larger muzzle with more intricate details for added realism or charm. Consider adding additional elements to the muzzle such as teeth, whiskers, and rosy cheeks.
Step 3: Start with a Magic Ring
Begin by creating a magic ring with your chosen yarn. This will form the center of your muzzle and allow for a seamless start. Alternatively, you can begin with a chain and crochet into the first stitch to create a circular base.
To create a magic ring, make a loop with your yarn and insert your hook into the loop. Make sure that the tail of the yarn is on the outside. Wrap the yarn around your hook once and draw it through the center of the loop. You should have two loops on your hook – one from wrapping and one from chain stitching.
Step 4: Crochet the Foundation Round
In the magic ring, crochet a certain number of single crochet stitches. The number of stitches will depend on the size of the muzzle and the thickness of your yarn. This round will form the base for building the muzzle’s shape.
Once you’ve made all the stitches, slip stitch into the first single crochet stitch of the round. While crocheting the foundation round, it’s helpful to insert a stitch marker into your first single crochet stitch to easily identify it.

Continue increasing each round until you reach the size of muzzle desired. To increase, simply add an extra single crochet stitch in between stitches from the previous round. Continue this pattern until the muzzle is wide enough and long enough for your pup.
Step 5: Increase Stitches
In the next round, work multiple single crochet stitches into each stitch of the previous round. This increase will create a gradual expansion of the muzzle, giving it a curved and dimensional appearance. The exact number of stitches will vary based on your chosen design. For a plain muzzle, work two single crochet stitches into each stitch of the previous round.
For a more elaborate design, work three or even four stitches into each stitch. When you’ve finished your increases for this round, chain one and move on to the next step.
Step 6: Shape the Muzzle
Continue working in rounds, gradually increasing the number of stitches in each round to create the desired muzzle shape. The shape can range from a simple round to a more elongated oval, depending on your amigurumi’s expression and character.
Step 7: Add Dimension with Stitches
To add texture and depth to the muzzle, incorporate stitches such as half-double crochet or slip stitches in specific rounds. These stitches can create the illusion of a natural indentation or even a smile, enhancing the expression of your amigurumi.

Step 8: Attach the Muzzle
Once the muzzle is the desired size and shape, position it on the amigurumi’s face and use the yarn needle to sew it securely in place. Take care to align the muzzle correctly for the intended expression. For example, when finished the muzzle should be angled up slightly for a happy expression or down slightly for a sad one.
When sewing the muzzle into place, be sure to make it secure enough so that the muzzle won’t come off easily, but also not too tight as your amigurumi will still need to be able to move their mouth underneath.
Step 9: Add Details
Depending on your design, you can further enhance the muzzle with details such as a small embroidered nose, stitches for a mouth, or even tiny whiskers. These subtle touches contribute to the overall character and charm of your amigurumi.
Step 10: Finish and Secure
After attaching the muzzle and adding details, weave in any loose yarn ends using the yarn needle. Ensure that all stitches are secure and that the muzzle is firmly attached to your amigurumi. To make sure the muzzle is secure, tie a knot and then weave in any remaining yarn ends. Make sure the knot is tight so your amigurumi will stay safe!
Tips for Choosing Suitable Colors for the Animal’s Appearance
When crocheting a muzzle for your pet, it’s important to choose colors that will not only look good but also suit the animal. A muzzle made in the wrong color can detract from their overall appearance and make them stand out in an unfavorable way.

It’s best to pick muted tones which work with one another and won’t draw too much attention away from your animal’s face. Popular colors that look good on most animals include basic shades of gray, brown, and black. These understated colors will not detract from the beauty of your pet.
You can also choose brighter colors to add a bit of flair to the muzzle. While still muted, adding colorful accents such as pink or blue can help make it stand out. Other colors like yellow and green can also be used to add a bit of vibrancy to the muzzle.
In addition, if you’re making a muzzle for an animal that has multiple colors in its fur or markings, try to match the colors as closely as possible so it looks natural with the rest of their coat. Doing this will make sure your pet looks great in their muzzle.
Conclusion
All in all, it is not difficult to learn how to crochet a muzzle for your pet. Not only will it be an enjoyable and fulfilling experience for you, but you’ll also be helping your furry friends in the long run. It’s important to remember that measuring your pet is vital before starting any project, especially one with clothing or an accessory.
Pay close attention to the techniques used and size of the stitches so your muzzle fits perfectly! Once you’ve completed this project, share the end result with us! We can’t wait to see how creative and unique your own muzzle looks. Congratulations on taking the first step towards creating a muzzle – we know you’ll make something pretty amazing!