
Do you want to take your crochet skills to the next level? Learning how to crochet a daisy flower is an easy and fun way to add beautiful texture and subtle color accents to any project. With just a few simple steps, you can create intricate shapes with delicate petals that will look like they came from a professional crocheter’s workroom.
At the end of this blog post, you will have mastered making a gorgeous daisy flower for decoration or as part of another project! In addition, learning how to make these daisies allows for endless creative possibilities – whether it be on hats, bags, sweaters or even blankets! So grab your hooks and yarn so we can get started on learning how to crochet daisy flowers today.
What is Crochet?
Crochet is a technique of creating fabric using yarn or thread, a hook, and a combination of basic stitches. It’s similar to knitting but uses one hook instead of two needles. Crocheting allows for more versatility in design as it can create both flat and three-dimensional shapes.
There are different types of crochet stitches that can be used to create various textures, patterns and designs. Some of the basic stitches include single crochet, double crochet, treble crochet and slip stitch.
How Do You Crochet Easy Daisy?
Crocheting an easy daisy flower is a great way to add a bit of beauty and texture to any project! To crochet an easy daisy, you will need the following items: yarn, a crochet hook, scissors, and a measuring tape.
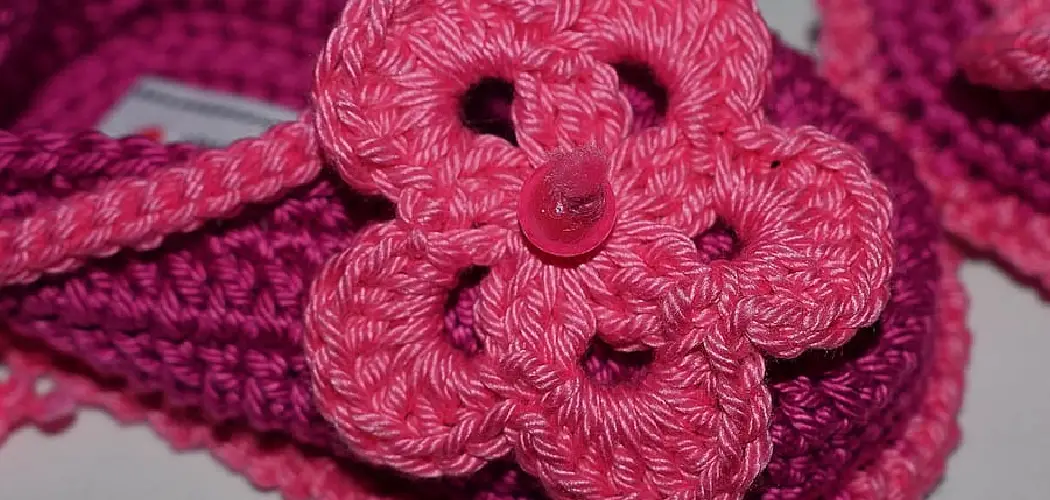
To begin, ch 6 loops onto your crochet hook. Then, close the loops together with a slip stitch, creating a circle. Next, chain four and make a double crochet into the center of the circle. Follow this up with another chain of four, and then make three treble crochets in the center of the circle.
This will form the daisy’s petals. Continue repeating these steps until you have created eight petals for your daisy flower. To finish off, join all of your petals together by making one slip stitch at the end of each petal.
Congratulations! You have now successfully crocheted an easy daisy flower! This simple pattern is perfect for beginners and can easily be used to embellish hats, scarves, blankets, or any other project you have in mind.
Pros and Cones:
As with any new skill, there are both pros and cons to learning how to crochet a daisy flower. Some of the pros include:
- It’s a Great Way to Add Unique Embellishments to Your Projects.
- Crocheting is a Relaxing and Therapeutic Activity.
- Learning New Crochet Stitches Can Expand Your Overall Crochet Skills.
However, some cons may include:
- Crocheting Can Be Time-consuming.
- It May Take Some Practice to Perfect the Daisy Flower Pattern.
Overall, the pros outweigh the cons and learning how to crochet a daisy flower is a worthwhile skill to have in your crafting repertoire.
Materials Needed:
Yarn:
You can use any type of yarn for your daisy flower, but thinner yarn will create a more delicate and detailed look. You can also experiment with different colors to create unique and vibrant daisies.
Crochet Hook:
The size of your crochet hook will depend on the thickness of your yarn. For a standard medium-weight yarn, a size H/8 (5mm) or I/9 (5.5mm) hook should work well.
Scissors:
A good pair of scissors is essential for any crochet project. Make sure they are sharp and able to easily cut through yarn.
Measuring Tape:
A measuring tape can come in handy when making a daisy flower, as it allows you to keep track of the size and proportions of your petals.
10 Methods on How to Crochet Daisy Flower
1. Choose the Right Yarn
The first step in learning how to crochet a daisy flower is to choose the right yarn. A worsted-weight yarn will work well for this project. You will also need a size G or H crochet hook.
If you are planning to crochet a larger flower, choose a thicker yarn and hook.
While cotton yarn is recommended for this project, you can choose to use any type of yarn that will provide the desired look and feel. Although any color of yarn can be used, white or yellow yarn will create the most realistic-looking daisy flower.
2. Make a Slip Knot
To start, you will need to make a slip knot on your crochet hook. To do this, take the tail end of your yarn and make a loop. Then, insert your hook into the loop and pull the yarn through. This will create a new loop on your hook, which is now considered the “active” loop.
If you need more help making a slip knot, there are plenty of videos available online to help guide you. Although this step may seem small and insignificant, a slip knot is necessary for any crochet project. However, don’t worry if it takes a few tries to get the slip knot right! In crochet, practice makes perfect.
3. Chain Stitch
Next, you will need to do a chain stitch. To do this, simply wrap the yarn around your hook and then pull it through the active loop. This will create a new loop on your hook, which is now considered the “active” loop. Repeat this step until you have created a chain that is about 12 inches long. To finish, cut the yarn and pull it through your last loop.
If you have done this correctly, your chain should be tight and secure. Though it may take some practice to get the tension just right, with enough patience, you will be able to create a perfect chain. Make sure to leave a tail of at least 6 inches after you’ve finished your chain. This will make it easier to attach the daisy flower later.
4. Single Crochet Stitch
Once you have created your chain, it’s time to start working on the actual daisy flower. To do this, you will need to do a single crochet stitch into the second chain from your hook. To do this, insert your hook into the second chain from your hook and then wrap the yarn around your hook. Next, pull the yarn through the chain and then through the active loop on your hook. This will create one single crochet stitch.
It’s important to note that you are working into the back loop of each stitch. This will create a neat and defined edge for your daisy petals. You will also need to do this for each stitch as you create the flower petals.
5. Double Crochet Stitch
For the next row of stitches, you will need to do a double crochet stitch into each stitch across. To do this, insert your hook into the next stitch and then wrap the yarn around your hook twice. Next, pull the yarn through the stitch and then through both loops on your hook. This will create one double crochet stitch. Repeat this step until you have reached the end of the row.
Although this may seem like a lot of steps, once you get the hang of it, it will become second nature. Remember to keep working into the back loop of each stitch for a defined edge.
6. Triple Crochet Stitch
For the next row of stitches, you will need to do a triple crochet stitch into each stitch across. To do this, insert your hook into the next stitch and then wrap the yarn around your hook three times. Next, pull the yarn through the stitch and then through both loops on your hook.
This will create one triple-crochet stitch. If you’re having trouble, refer to the video tutorial for a visual demonstration. To complete the Daisy Flower, continue to repeat steps 5 and 6 until your desired size is achieved. Congratulations! You have now made a beautiful crochet daisy flower.
7. Slip Stitch
To finish off the daisy flower, you will need to slip the stitch across each of the stitches. To do this, insert your hook into the next stitch and then wrap the yarn around your hook once. Next, pull the yarn through both loops on your hook. This will create a slip stitch. Repeat this step until you have reached the end of the row.
Once you have finished the slip stitch, cut off your yarn and weave in any loose ends. Additionally, you can add a chain stitch into the center of the daisy flower to secure it further. To do this, simply insert your hook into the center of the daisy and pull a loop of yarn through it. Then, just make a regular chain stitch and cut off the yarn when you are done.
8. Finish Off
Once you have finished your daisy flower, it’s time to finish off your work. To do this, chain two and then make one single crochet using the same stitch as the last slip stitch. This will secure your work and give it a neat finish.
Fasten off by cutting the yarn and pulling it through the last loop on your hook. Your daisy flower is now ready to be used for decoration or given as a gift. Enjoy your creation! To learn more about crocheting, consider taking classes or watching tutorials online. With practice and patience, you’ll become a crochet expert in no time!
9. Connect the Petals
Now it’s time to connect all of the petals together. To do this, simply make one slip stitch into each of the stitches across the bottom of the daisy flower. This will create an invisible seam that connects all of the petals together. To finish off, cut your yarn and pull the end through the last loop that you made to secure it.
Although this may seem intimidating, once you’ve done it a few times, it will become much easier. You can now move on to the next steps and create a beautiful daisy flower masterpiece. To make your flower even more special, consider adding a stem and leaves or using different colored yarns to make it unique. Have fun and happy crocheting!
10. Weave in Your Ends
The last step is to weave in your ends. To do that, thread a yarn needle with the end of your yarn and sew it into the back of the flower. Make sure to secure the yarn in multiple places so that it doesn’t come undone or unravel over time. Otherwise, your hard work and beautiful daisy flower may fall apart. Once all ends are woven in and secured, give your flower a final look over and make any necessary adjustments for a perfect finish.
It’s important to take the time to weave in your ends and secure them properly for a polished final product. This will also ensure that your daisy flower will last for years to come.
Following these steps on how to crochet daisy flower, you can make multiple daisy flowers and create your own bouquet or add them to other crochet projects. With practice, you will be able to make these flowers quickly and easily. You can also experiment with different yarn types and hook sizes to create unique variations of the daisy flower. The possibilities are endless, so have fun exploring and creating beautiful crochet pieces with this versatile and easy-to-learn technique. Happy crafting!
Additional Tips:
- Experiment With Different Yarn Colors and Textures to Create Unique Daisy Flowers.
- Add Embellishments Such as Beads or Embroidery for a Personalized Touch.
- Use Your Crochet Daisy Flower as a Decorative Accent on Hats, Bags, or Even Home Decor Items.
- Practice Makes Perfect! Keep Practicing and Trying New Techniques to Improve Your Crocheting Skills.
- Consider Making a Set of Daisy Flowers in Different Sizes to Create a Bouquet or Arrange Them on a Wreath.
- Don’t Be Afraid to Make Mistakes; They Can Often Lead to Unique and Creative Designs. So Have Fun and Let Your Creativity Flow!
- Check Out Online Forums and Communities to Connect With Other Crocheters and Get Inspiration for Your Next Project.
- Don’t Limit Yourself to Just Daisy Flowers. Explore Different Types of Crochet Flowers and Create a Beautiful Garden of Your Own. Happy Crocheting!
Frequently Asked Questions:
Q: Do I Need to Use a Specific Type of Yarn for This Project?
A: No, you can use any type of yarn that you prefer. However, some types may be easier to work with than others. If you’re just starting out, consider using a medium-weight yarn or something similar to make it easier to handle. It’s also important to note that the size and texture of your flower may vary depending on the type of yarn used.
Q: Can I Make a Bigger or Smaller Daisy Flower?
A: Yes, you can adjust the size of your daisy flower by changing the length of your starting chain and the number of stitches in each row. Just remember to keep an even number of stitches so that all petals are equal in size. You can also experiment with different types of yarn and hook sizes to achieve different sizes and textures.
Q: How Do I Attach the Daisy Flower to My Project?
A: To attach your daisy flower, you can use a yarn needle to sew it onto your desired project. You can also use a hot glue gun or fabric glue if you are attaching it to a non-crocheted item. Another option is to sew a safety pin or hair clip onto the back of your flower for easy attachment.
Q: Is This Project Suitable for Beginners?
A: Yes, this crochet daisy flower project is suitable for beginners as long as you have basic knowledge of crochet stitches and techniques. It’s also a great project for practicing different types of stitches, such as single crochet, double crochet, triple crochet, and slip stitch. With some practice and patience, you’ll be able to create beautiful daisy flowers in no time!
Q: Can I Use This Pattern to Sell My Finished Product?
A: Yes, feel free to sell your finished products made from this pattern. However, please do not sell or distribute the pattern itself without permission. Happy crocheting!
Thank you for reading our tutorial on how to crochet a daisy flower. We hope you enjoyed learning this fun and easy project. Remember, the possibilities are endless when it comes to crochet, so let your creativity flow and experiment with different colors and styles.
Conclusion:
Crafting can be a great stress-relief activity for busy days, and daisy flowers are a great way to start. Try out the steps from today’s blog post, and remember that practice makes perfect – after all, anything worth having is worth working hard for!
If you still need help with your daisy flower, don’t hesitate to reach out; all crafters have needed help at some point in their lives. Here’s hoping everyone out there takes on the challenge of learning how to crochet Daisy Flower and finds success with all of their crafty endeavors!