
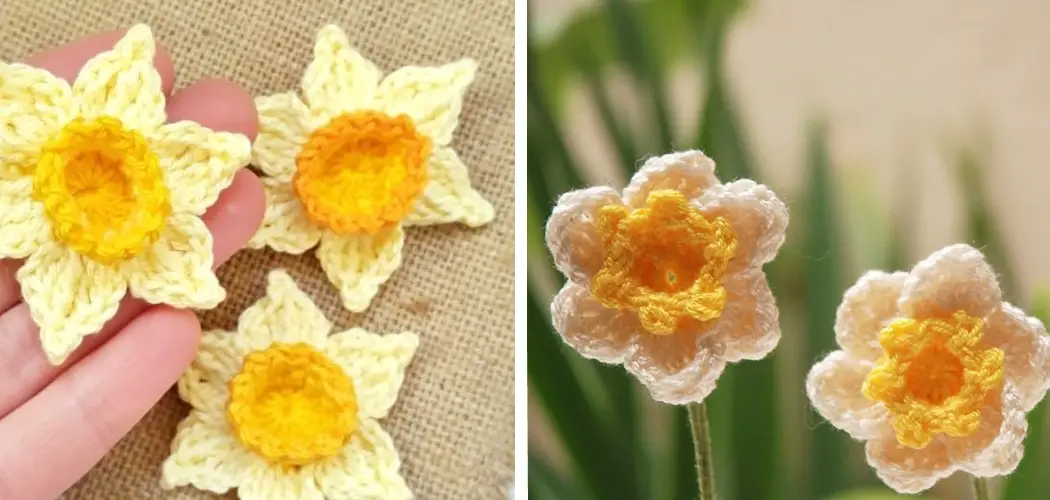
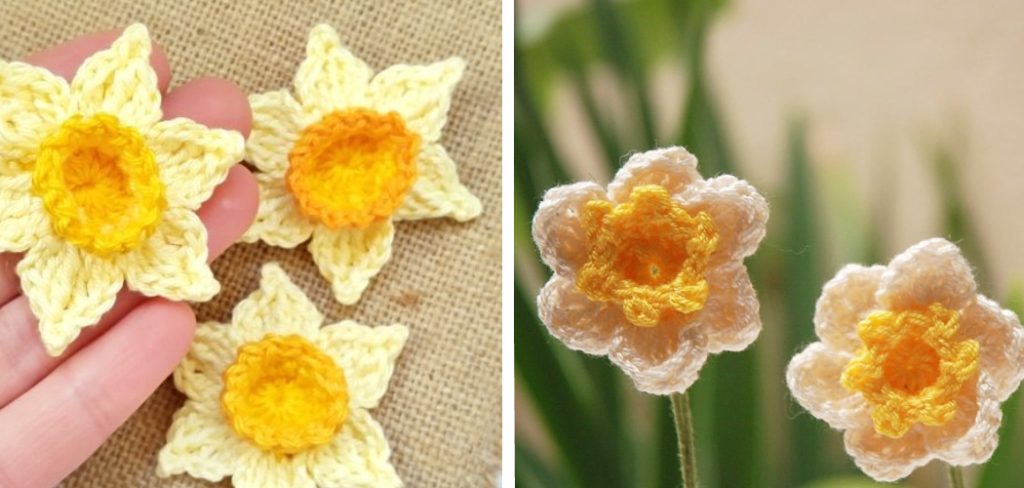
Are you looking to add a springtime touch to your home decor? We’ve got the perfect project for you – how to crochet daffodils! This easy-to-follow tutorial will show you how to create beautiful and realistic looking daffodil flowers.
Crocheting homemade decorations and accessories is both fun and rewarding, but with so many intricate stitch patterns available, it’s easy to get bogged down. That’s why I have decided to put together this comprehensive tutorial on making daffodil shapes out of yarn.
In just a few steps, you’ll be able to create colorful crocheted blooms that can instantly brighten any room! From choosing the right materials, perfecting your basic stitches, assembling, and finishing touches – in this guide on crocheting daffodils, we will cover everything and more!
Get ready to unleash your creativity by crafting these cheerful springtime flowers. Keep reading to learn more!
What Will You Need?
Before you start crocheting, you’ll need to get your supplies in order. Here is a list of items that will help you make the perfect daffodil:
- Worsted weight yarn in yellow and purple
- Crochet hook size H/8 (5mm)
- Tapestry needle
- Polyester fiberfill
Once you have all of your materials, you’re ready to start crocheting daffodils!
10 Easy Steps on How to Crochet Daffodils
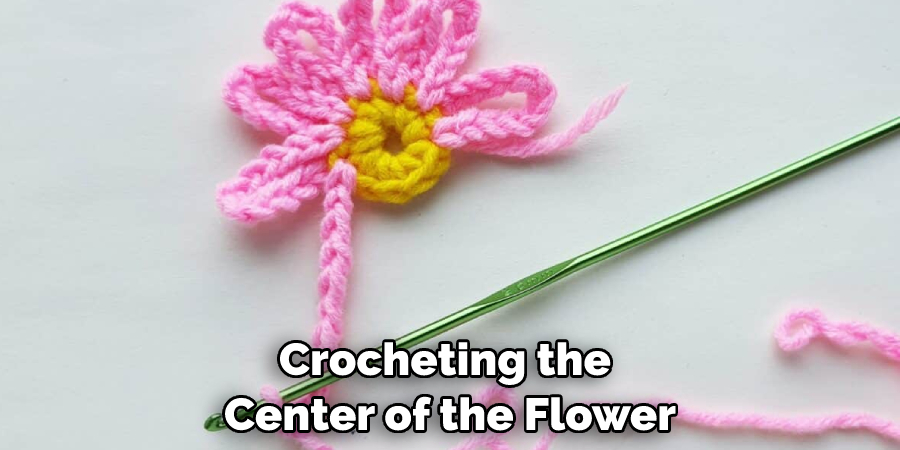
Step 1: Crocheting the Center
The first step is crocheting the center of the flower. This will be made using yellow yarn and a size H/8 (5mm) hook. Make a magic circle, then chain 2, single crochet 6 stitches into the circle, and slip stitch onto the top of your chain 2. Pull tight to close the circle, and ensure it’s not too loose or too tight.
Step 2: Crocheting the Petals
Next, you’ll need to create your petals. To do this, use purple yarn and the same hook size you used for the center. Make a slip stitch into your center circle, chain 3, single crochet 4 times in the same spot, and slip stitch into the back loop of your starting chain. Repeat this pattern 5 more times to make 6 petals in total.
Step 3: Assembling The Petals
Now that you’ve created all six petals, it’s time to attach them to one another. For this step, you’ll need to use a tapestry needle and yellow yarn. Starting at the base of one petal, sew down through each one until you reach your first petal again. Pull tight and knot off the end to secure your work.

Step 4: Add the Filling
The last step is to add the filling. This will give your flowers a more voluminous and realistic look. Use polyester fiberfill to stuff the inside of your petals, making sure to be extra gentle when pushing the stuffing down into the center so that you don’t break any of your stitches. Once you’re finished, tie off the end and cut off any excess yarn.
Step 5. Try Different Variations
If you want to make your daffodils stand out even more, try crocheting them in different shapes and sizes. You can also change up the colors of the yarn – how about pastel pink or white? There are so many possibilities for crocheting daffodils, so get creative and have fun with it!
Step 6. Designs and Displays
Once you’ve made your daffodils, how will you use them? Crocheted flowers are perfect for adorning headbands, scarves, bags, and so much more. You can also arrange the daffodils in a jar or vase to create a cheerful springtime display. The possibilities are endless! Remember, daffodils are just the beginning – you can apply this same technique to almost any kind of flower.
Step 7. Maintain and Care
To keep your daffodils looking their best, you’ll need to care for them properly. Whenever possible, hand-wash the decorations with mild soap and warm water. Lay flat to dry and store in an airtight container when not in use. This will help ensure that your crocheted blooms remain as vibrant and beautiful as ever!
Step 8. Store and Share
With crochet daffodils under your belt, you can now share the beauty of your creations with others. Gift them or keep them as a decorative piece in your home – either way, these cheerful blooms will surely bring smiles all around! Be careful before gifting the flowers, as they may have sharp ends and pins. You will need to secure them before gifting them.
Step 9. Inspire Others
Crocheting daffodils is a great way to show off your creative side! If you’re feeling inspired, why not take a step further and teach someone? Not only will they benefit from your new-found skill, but you could also spark an interest in crafting in someone else – how wonderful would that be?
Step 10. Enjoy Crafting
Above all else, remember to enjoy yourself! Crafting should be fun, and if it begins to feel like a chore, take some time out and return to it when you’re feeling refreshed. You can now create beautiful blooms with ease – how rewarding is that? So, grab your crochet hook and get started – happy crafting!

By following these steps, you can create cheerful decorations for any season or occasion. Whether you decide to share the love of crocheting with others or keep the finished pieces all to yourself, enjoy every crafting moment! Happy crocheting!
You Can Check It Out To Crochet a Raccoon
5 Additional Tips and Tricks
- Before starting to crochet the petals, make sure that you have a tight base. This will ensure that your daffodil stays together and has stability.
- Use different types of yarn when creating the petals. This can add texture and dimension to your daffodil, making it look more realistic.
- Make sure to use a consistent pattern when crocheting the petals – this will give your daffodil an overall symmetry and balanced look.
- Add small beads or sequins in the middle of each flower for extra sparkle!
- Don’t forget to add long strands of yarn when attaching the petals to the stem – this will help keep them secure and give your daffodil a more natural look.
With some practice and these tips, you’ll be able to crochet beautiful daffodils in no time! So get your yarn and hook ready and start crocheting! Good luck!
5 Things You Should Avoid
- Do not pull the yarn too tight when working on each stitch. Keeping your stitches loose will make it easier to work through and will help prevent any gaps from forming in your daffodil.
- Avoid using acrylic or synthetic fibers, as they may become brittle over time and could easily cause your daffodils to fall apart.
- Do not add too many details – this can detract away from the beauty of the flower and make them look messy.
- Do not rush when crocheting, especially if you’re a beginner! Take your time and enjoy the process to ensure that you produce quality results!
- Avoid cutting corners – take the time to follow all the steps so that you can guarantee beautiful results every time!

With these five tips and tricks in mind, you’ll be able to crochet daffodils easily. So get your materials ready and start crocheting – happy crafting!
What Type of Yarn Should You Use?
The best type of yarn to use when crocheting daffodils is a cotton or wool-based one. These are softer than synthetic ones, allowing you more control over how tight the stitches need to be. They also last longer than synthetic fibers, which can become brittle over time, making them perfect for long-lasting daffodils.
When selecting the yarn, be sure to choose one that is lightweight and soft, as this will give your daffodil a more natural appearance. If you’re looking for something with a little extra sparkle or texture, then consider using metallic or variegated yarns. These types of yarn can really bring out the beauty of your flower!
That’s all there is to it! With these tips and tricks in mind, you can now create beautiful blooms that will brighten any space. So get your materials ready and start crafting – happy crocheting!

Where Can You Adjust the Difficulty Level?
The difficulty level of crocheting daffodils can be adjusted by how many petals you choose to add. You can use just two petals per flower if you want an easy project. You can increase the difficulty by adding more petals for a more realistic look.
The number of rows in each petal is also something that can be varied to adjust how challenging your daffodil will be. The longer the row, the harder it will be to complete – so if you’re just starting out or looking for a less intricate design, go with shorter rows.
Finally, how tight or lose you crochet your stitches affects your finished product’s difficulty. If you’re looking to challenge yourself, try going for tighter stitches – this requires more concentration but yields amazing results!
Conclusion
Whether you’ve been crocheting for years or are just starting out, making a daffodil is an excellent springtime project. This tutorial takes you through each step of the process in detailed instructions, complete with helpful images and diagrams. Crocheting a paperclip may seem intimidating initially, but it’s nothing short of magnificent when the final product is netted in yellow and white loops!
Hopefully, this blog post on how to crochet daffodils has inspired and encouraged you to create your own beautiful daffodils. You don’t need an expensive supplies list – just some yarn, scissors, and a bit of patience! With practice and determination, any beginner can gain skills to make a wide range of crochet products that will bring life to any decorating scheme.
A homemade craft with its own unique flair will always have more heart than mass-produced versions too!
You Can Check It Out to Fix a Dropped Purl Stitch