
Have you ever had a project where you just wanted to get to the end, only to find that the dreaded dropped purl stitch has marred all your hard work?

Although it can be incredibly frustrating and disruptive, here’s the good news: fixing a dropped purl stitch is not as daunting as it may seem, and with some detailed guidance and patience, your knitting will be back on track in no time.
In this blog post, we’ll walk through step-by-step instructions for how to fix a dropped purl stitch so that your knit fabric looks even, professional, and, most importantly – finished!
Can You Fix a Dropped Purl Stitch?
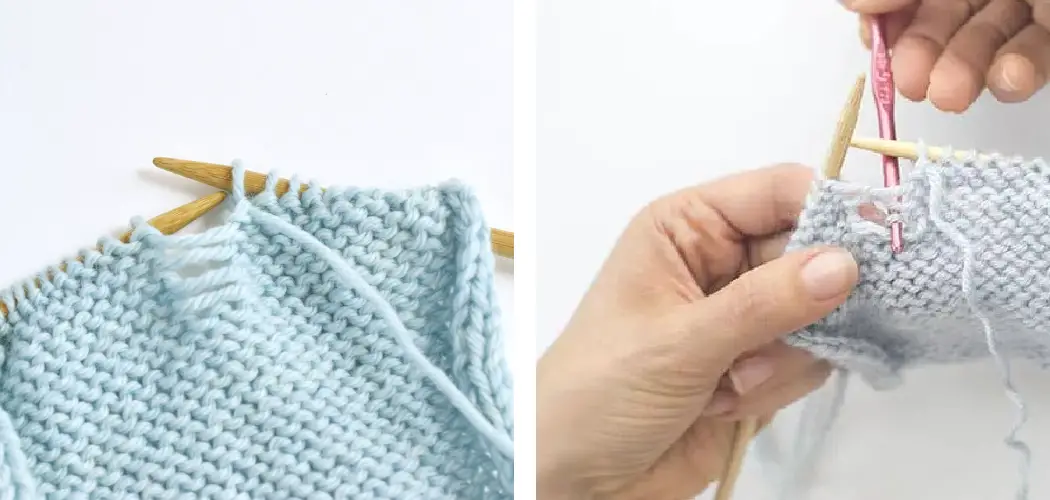
Dropped purl stitches can happen to even the most experienced knitters; luckily, they are an easy fix. To restore the stitch, you must insert your knitting needle from front to back into the space where the dropped stitch used to be. You will then take the yarn that is attached to the ball and wrap it around your needle once counterclockwise.
Pull this new loop of yarn through the old stitch from back to front, and then use your needle to pick up this new stitch onto your regular needle on your left hand. Finally, you should be able to pull tight and close the loops for your project to have that perfect finish. With just a few simple steps and a bit of patience, you’ll soon have a mistake-free project!
Why Should You Fix a Dropped Purl Stitch?
Dropped purl stitches are frustrating, but they don’t need to ruin your knitting project. Knowing how to fix a dropped purl stitch can help you save time and maintain the intended look of your piece. Taking the time to carefully insert your needle into the stitch below and pass it over the loose loop will prevent future unraveling.

It will also keep the tension consistent throughout your work and maintain the pattern as it was originally intended. The right technique can even disguise dropped stitches in ribbed areas of your knit fabric, like cords and cables, so take some time to practice this skill set before disaster strikes!
7 Steps to Follow on How to Fix a Dropped Purl Stitch
Step 1: Locate the Dropped Stitch
The first step is to locate the dropped stitch. It should be easy to spot if you’re still on the same row as the mistake. But if you’re several rows down from where you dropped it, look carefully at your knitting and try to find the gap or lose strand that indicates a dropped stitch.
Step 2: Bring the Dropped Stitch Back Up the Needles
Once you’ve identified your dropped stitch, pick it up with a crochet hook or spare knitting needle. Be sure to grab the yarn at the front and work from left to right so that you don’t twist the stitch. Then, slide it carefully back onto the left needle.
Step 3: Pass the Dropped Stitch Over Other Stitches
Use the knitting needle to pass the dropped stitch over other stitches until it’s back where it should be in your pattern. Make sure that you keep the stitch tight as you work so that there is no loose strand visible in your work.
Step 4: Secure the Dropped Stitch
If you’re working with circular needles, it may be necessary to use a smaller needle to secure the dropped stitch. Then, just pass it through and make sure that it won’t come off again.

Step 5: Re-Knit the Dropped Stitch
Now that your dropped stitch is back where it belongs, you can re-knit it how it should look. If you’re not sure how to do this, refer to your pattern instructions or use a tutorial online.
Step 6: Tighten Any Loose Strands
Once you’ve re-knit the stitch, there might be some excess yarn or lose strands. Make sure to tighten up any of these and weave them in so that your knitting looks neat and tidy.
Step 7: Sit Back and Enjoy Your Work
Once you’ve taken care of the dropped stitch, sit back and admire your work. Fixing a dropped purl stitch is no easy feat, so give yourself a pat on the back for how far you’ve come!
That’s it! You’ve now learned how to fix a dropped purl stitch. With these seven steps in mind, you can easily get your knitting back on track and create stunning projects.
Things You Need to Know Before Fixing a Dropped Purl Stitch
Fixing a dropped purl stitch can be intimidating for a beginner knitter. However, with the right knowledge and step-by-step guide, it’s not as hard as it looks. Before beginning the repair process, it is important to identify what kind of stitch you need to fix because that will determine how you proceed.
Is it a purl loop or a garter stitch? If there are still live stitches on the needles, make sure these stitches are secure enough to maintain their positions as you manipulate them. Additionally, you should also have some patience and an ample amount of light so you can see up close.

Lastly, make sure to have your knitting instructions at hand for reference and, most importantly–a bit of courage! With all these tips in mind, fixing a dropped purl stitch is totally doable!
5 Benefits of Fixing a Dropped Purl Stitch
1. The Purl Stitch is More Secure
When you drop a purl stitch, it can become loose and unravel. By picking up the dropped stitch, you can secure it and prevent it from becoming further unraveled.
2. The Purl Stitch is Less Likely to Ladder
If you do not pick up a dropped purl stitch, it is more likely to ladder. This means that the stitches will run up or down the yarn, creating an unsightly hole in your fabric.
3. The Purl Stitch is More Uniform
Picking up a dropped purl stitch will make your fabric look more uniform. If you do not pick up the dropped stitch, the hole created will be visible and make your fabric look less uniform.
4. The Purl Stitch is Less Likely to Gap
If you do not pick up a dropped purl stitch, it is more likely to gap. This means that there will be spaces between the stitches, which will make your fabric look less uniform.
5. The Purl Stitch is More Likely to Be Tight
If you do not pick up a dropped purl stitch, it is more likely to be tight. This means that the stitches will be pulled too tight and will make your fabric look less uniform
6 Common Mistakes People Make When Trying to Fix a Dropped Purl Stitch
1. Not Securing the Dropped Stitch Before Working the Next Stitch
If you don’t secure the dropped stitch before working on the next one, it’s very likely that your stitch will unravel further. To secure the dropped stitch, simply insert your needle into the stitch below the dropped stitch and then knit or purl the stitch as usual.
2. Trying to Fix the Dropped Stitch from The Wrong Side of The Fabric
It’s much easier to fix a dropped stitch from the right side of the fabric, as you can see exactly where the stitches are and how to work them. If you try fixing a dropped stitch from the wrong side of the fabric, you may make things worse.
3. Not Using a Crochet Hook
A crochet hook can be a very helpful tool when it comes to fixing a dropped purl stitch. Simply insert the hook into the dropped stitch and then use it to pull the strand of yarn through the stitch. You can then proceed to purl or knit the stitch as usual.

4. Inserting the Needle Into the Wrong Side of The Fabric
When inserting your needle to fix a dropped purl stitch, be sure to insert it into the right side of the fabric. If you insert it into the wrong side, you may create an extra hole in your fabric.
5. Not Using a Lifeline
A lifeline is a strand of yarn that is inserted into your knitting at a certain point and can be used to “rescue” your stitches if you make a mistake further down. If you’re worried about making mistakes when fixing a dropped purl stitch, be sure to use a lifeline to rip back and start again if needed easily.
6. Pulling Too Tight on The Yarn
When fixing a dropped purl stitch, it’s important not to pull too tight on the yarn, as this can cause your fabric to pucker or bunch up. Simply insert your needle and gently tug on the yarn until the stitch is secure, and then proceed with your knitting as usual.
You Can Check It Out to Crochet Daffodils
Is It Possible to Fix a Dropped Purl Stitch with An Extra Yarn Tail?
It may be possible to fix a dropped purl stitch with an extra yarn tail. However, this will require advanced knitting knowledge and skill. Generally, the best course of action if one has dropped a purl stitch is to unpick the entire row and start over again.
This can be time-consuming and tedious, but it’s often the safest way to get back on track with a complicated knitting pattern. Thankfully, there are some helpful techniques that experienced knitters can use to fix minor mistakes without having to redo a whole row completely.
If there is enough distance between stitches, manipulating an extra yarn tail can help shorten the process of fixing errors without sacrificing accuracy.
How Can I Tell How Many Rows Back My Dropped Stitch Occurred in Pattern Knitting?
Knowing where a dropped stitch occurred while pattern knitting can be incredibly frustrating, especially when you’re trying to match up a complicated design.
Luckily, there is an easy way to tell how far back the dropped stitch is located. All you need to do is pull on the thread underneath each fabric row until it forms a larger and longer loop.

Count how many loops you have to pull from your working row before the dropped loop appears in line with the rest of the stitches – this number will tell you how many rows back your dropped stitch occurred.
Spotting where the mistake was made quickly can save you time and energy as you go back and carefully fix the problem stitch.
Conclusion
Now that you know how to fix a dropped purl stitch, the next time it happens, don’t panic. Instead, simply follow the steps above, and you’ll be able to work your way back up and continue knitting without any disruption.
With some practice, this process will soon become second nature to you! And who knows, fixing a dropped purl stitch could even become one of your favorite techniques. Thanks for reading our post about how to fix a dropped purl stitch.
You Can Check it Out to Attach Pom Pom to Hat