
Are you an aspiring sewer struggling to get your needle threaded on the right settings? Look no further! This blog post provides a step-by-step guide to set up and begin using your sewing machine confidently.
Knowing how the needle threader works is essential whether you’re a novice or an experienced sewer. It allows you to quickly and easily thread your needles on the sewing machine without fumbling with tiny pieces of thread and trying to ensure everything is in the right place.

With this practical information, in no time at all, you’ll be enjoying all of the amazing creations possible with stitching – whether it’s for crafts or fashion design. So don’t delay – unlock the power of your sewing equipment today by learning how to use the needle threader on a sewing machine!
What Will You Need?
- Sewing machine
- Thread
- Needles
- Needle threader (if not included with your sewing machine)
Once you have all your components, it’s time to get sewing.
10 Easy Steps on How to Use the Needle Threader on a Sewing Machine
Step 1: Prepare Your Machine
Begin by setting up your sewing machine and ensuring it is firmly in place. This will help to ensure that any movements from the needle threader are steady and precise. If your machine is a mechanical model, ensure the bobbin winder and thread tension are set correctly before starting.
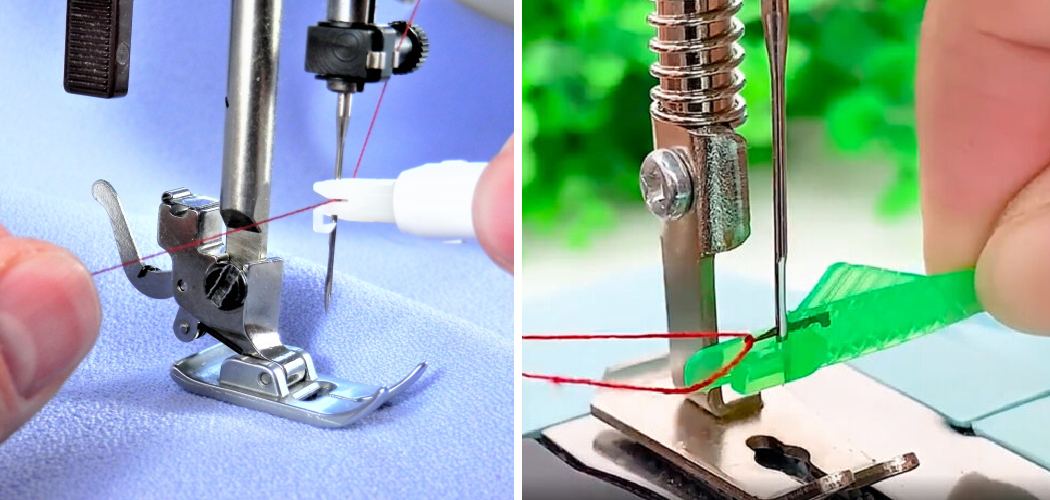
Step 2: Place Thread Through Needle Threader
Take the end of your chosen thread and carefully place it through the needle threader – making sure that it goes up through the small hole in the top. Keep hold of one end of the thread and keep it taut as you do this. Be careful not to pull the thread too tight, as this could damage the needle threader or even your sewing machine.
Step 3: Place Needle Through Threader
Next, you’ll need to guide the eye of the needle onto the needle threader. Hold your needle with the eye facing the threader and gently push it onto the threader’s hook. If your threader is built into the sewing machine, there should be a specific slot or guide for the needle to pass through.

Ensure that the threader securely holds the thread before moving on to the next step. Remember to handle the needle carefully to avoid any injuries.
Step 4: Engage The Threader Lever
Slowly lower the lever of the needle threader, pulling it down until it’s fully engaged. Most sewing machines will have a lever that controls the needle threader. Depending on your machine, this lever may be a separate part or form part of the threader unit itself.
As you lower the lever, the needle threader should rotate and push the thread through the eye of the needle. Ensure you do this slowly to prevent the thread from slipping out of place or the needle from breaking.
Step 5: Release The Threader
After the needle threader has pushed the thread through the eye of the needle, you can release the threader lever slowly. This will pull the threader back, leaving the thread through the needle’s eye. Be careful not to pull the threader back too quickly, as this might pull the thread back out of the needle. Your needle is threaded, and you’re ready to continue your sewing project.
Step 6: Verify The Thread Placement
After you have successfully threaded the needle, it’s time to validate the placement of the thread. You should see a small loop of thread protruding from the back of the needle eye. Gently pull this loop until you have an even amount of thread on both sides of the needle.

Ensure the thread is not tangled or knotted to prevent any sewing disruptions. If the thread doesn’t appear as expected, you may need to repeat the previous steps. Once you’re satisfied with the thread placement, you can move on to the next step.
Step 7: Lower the Presser Foot
With the needle successfully threaded, lower the presser foot onto the fabric you’re going to sew. The presser foot holds the fabric steady while sewing, ensuring straight and even stitches. Depending on your machine model, you might have a lever or a button to lower the presser foot. Make sure your fabric is positioned correctly under the needle before lowering the presser foot.
Step 8: Begin Sewing
Now that everything is set up correctly, you can begin sewing. If your machine has a foot pedal, press it gently to start stitching your fabric. Try to maintain a steady pace for the best results. If your machine has an automatic function, you can use that to start sewing. Keep an eye on the thread tension and the stitch quality as you go along.
Step 9: Adjust Thread Tension if Necessary
While sewing, watch out for any visible signs of thread tension problems. You may need to increase the tension if your stitches are loose and lack definition. If the thread breaks frequently or if the fabric ruffles as you sew, the tension may be too high, and you’ll need to reduce it.
Most machines have a dial or a slider that you can adjust until you get the perfect tension for your fabric and thread combination.
Step 10: Finish and Cut the Thread
After sewing the desired length, finish your line of stitching by activating the reverse stitch feature on your machine, if it has one, to secure the thread ends. If available, cut the thread using the machine’s thread cutter, or use a pair of sharp scissors. Be sure to leave a tail of thread long enough for the next time you need to sew.

By following these ten easy steps, you can confidently use the needle threader on your sewing machine. With practice and patience, you’ll soon be a pro at using it! Whether it’s for mending clothes or creating something unique, having the right tools makes all the difference – so ensure you have a reliable needle threader and get stitching!
5 Additional Tips and Tricks
- Always make sure the needle is up when threading your needle. This will help ensure the threader does not get stuck and damage your machine.
- When removing the needle from the sewing machine, always use a cloth or something soft to protect it from scratches or damage. This will extend its life and prevent any problems with future projects.
- Make sure to keep the threader dry and free from dirt. This will help it last longer and make it easier to use.
- When using the needle threader, you should check regularly for any signs of wear or damage on the needle. If there are any problems, replace the needle immediately so your machine will continue to work properly and efficiently.
- Finally, make sure that you always read your machine manual when using the needle threader or any other accessory for your sewing machine. This will ensure that you use it correctly and safely to avoid any potential problems with your projects or machine.
By following these tips and tricks, you can easily get the most out of your needle threader and have great results when using it on your sewing machine. Happy creating!
5 Things You Should Avoid
- Do not force the threader if it feels stuck. Instead, gently retract it and try again, ensuring the needle is in the correct position.
- Never use a needle threader on a too-small or fine needle. Doing so can cause the threader to break or damage the needle.
- Avoid using the threader on needles that are blunt or damaged. This can cause the threader to malfunction and possibly harm the machine.
- Remember to clean your needle threader regularly. A buildup of lint or dirt can affect its performance and longevity.
- Only use the threader to understand its function. Always refer to your machine’s manual or seek guidance if you need clarification. Misuse can lead to damage to both the machine and the threader itself.

Avoiding these mistakes will help you get the most out of your needle threader and extend its life. With proper care, it can be a reliable tool for many years to come!
How Can Needle Threaders Help?
Needle threaders are a great way to save time and effort when using your sewing machine. By threading the needle quickly and easily, you’ll be able to get right into your project without wasting valuable minutes attempting to thread the needle manually.
Additionally, many needle threaders are designed with features that make them more user-friendly, such as a magnifying lens or an ergonomic grip, making the process even easier.
Needle threaders also help to prevent eye strain from squinting at the needle for too long, and they are a great tool to keep close by while you work. With all these benefits, it’s easy to see why needle threaders are essential for any sewist!
Conclusion
With some practice and a bit of patience, you can now be proud of the fact that you know how to use the needle threader on a sewing machine with confidence.
Remember to take your time, make sure you connect the hook to the machine properly before inserting the thread through it, and this should all go much smoother. Have fun! Sewing projects can bring a sense of accomplishment and creative inspiration no matter what level of seamstress or seamster you are.
You can find pleasure and pride by finishing something that represents part of yourself. Therefore don’t hesitate to use some bright colors, eye-catching designs, or unique patterns to create something one-of-a-kind that will last for generations.
Finally, never forget that your mistakes can also lead to sparks of creativity – you never know when happy accidents could turn out great in the end!
You Can Check It Out to Thread a Needle With Embroidery Thread