
Knitting, an age-old craft cherished for its creativity and warmth, involves a symphony of techniques, each contributing to the creation of beautiful and functional garments. Among the fundamental maneuvers in knitting is the art of wrapping a knit stitch, a cornerstone for producing intricate patterns and textures.
Whether you’re a novice knitter seeking to unravel the mysteries of this technique or an experienced hand looking to refine your skills, mastering the art of wrapping a knit stitch is essential. This seemingly simple action involves looping the yarn around the needle in a precise manner, influencing the appearance and structure of the final piece.

From ribbing to cables, and even more elaborate lacework, understanding how to manipulate the yarn while knitting can open doors to a world of design possibilities. In this exploration, we will delve into how to wrap a knit stitch, understand its significance, and unravel the steps to execute it flawlessly, enhancing your knitting prowess and enabling you to embark on projects with confidence and finesse.
What Wrapping a Knit Stitch Means
Wrapping a knit stitch is an important part of knitting that not only gives the fabric a nice texture, but also provides structure and stability to your project. It’s a simple technique that requires just one extra step for each stitch, and can be used on almost any type of pattern. When done correctly, wrapping a knit stitch will result in neat, even stitches with a smooth texture.
So what exactly does it mean to “wrap” a knit stitch? In the most basic terms, wrapping a stitch merely means creating an extra loop around each stitch on your needle before pulling it off and onto the other needle. This creates two loops that will form the finished stitch instead of just one. Wrapping also helps keep your stitches even and tightly knit, giving your project a polished look.
Importance of Proper Stitch Wrapping for Preventing Holes in Knitting
When you’re knitting, wrapping a knit stitch correctly is extremely important to prevent holes from forming in your work. Incorrect wrapping of the stitch can cause weak spots or even gaping holes that can ruin an otherwise beautiful piece of knitting.
Luckily, there are some simple steps you can take to make sure every stitch gets wrapped properly and securely. Here are the basics of how to wrap a knit stitch.

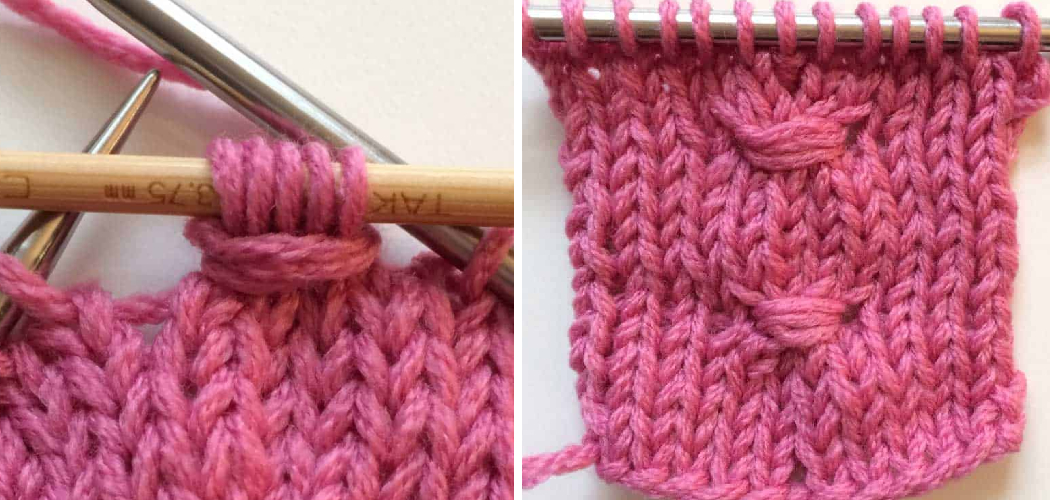
First, cast the required number of stitches on your needle. Then, insert your right-hand needle into the next stitch on the left-hand needle as if you were going to knit it. The yarn should be coming from behind and over the right-hand needle. Wrap the yarn around and back in front of the needle and then down to the back.
Next, you will insert your right-hand needle into the next stitch on the left-hand needle. This time, instead of pulling through a loop, just go around the yarn that is already there from when you wrapped it. Finally, pull the stitch off the left-hand needle and over onto your right-hand needle.
9 Methods on How to Wrap a Knit Stitch
The Knit Stitch
The knit stitch is a fundamental knitting technique used to create a variety of fabrics and garments. It is created by inserting the right-hand needle into the loop of the left-hand needle, wrapping the yarn around the right-hand needle, and pulling it through the loop. This creates a new stitch on the right-hand needle that can then be worked into a pattern.
Slip Knot Method
The slip knot method is one of the simplest ways to wrap a knit stitch. To begin, you will need to make a slip knot with your yarn and place it on your left-hand needle. Then, insert your right-hand needle into the loop of your left-hand needle and wrap your yarn around it in an anti-clockwise direction. Finally, pull the yarn through the loop to create a new stitch on your right-hand needle.
Wrap and Turn Method
The wrap-and-turn method is another way to wrap a knit stitch that is often used in more complex patterns. To begin, you will need to insert your right-hand needle into the loop of your left-hand needle as normal and wrap your yarn around it in an anti-clockwise direction twice.
Then, instead of pulling the yarn through both loops as usual, you will only pull it through one loop before turning your work over and starting again from step 1 with the remaining loop still on your left-hand needle.

Cable Cast-On Method
The cable cast-on method is another way to wrap a knit stitch that is often used when casting on stitches for projects such as sweaters or scarves. To begin, you will need to make two loops with your yarn around both needles before inserting them back onto one single needle as if they were one large loop.
Then, insert this single loop onto your left-hand needle as normal and proceed with steps 1 & 2 above to create each individual stitch until you have reached the desired number of stitches for the project.
Long Tail Cast-On Method
The long tail cast-on method is another way to wrap a knit stitch that can be used when casting on stitches for projects such as sweaters or scarves but requires more preparation than other methods due to its use of two strands of yarn at once.
To begin, you will need to measure out two strands of equal length from the ball of yarn before tying them together at one end. Then, tie this double strand onto the left-hand needle before proceeding with steps 1 & 2 above until the desired number of stitches has been reached.
German Twisted Cast-On Method
The German twisted cast-on method is another way to wrap a knit stitch that can be used when casting on stitches for projects such as sweaters or scarves but requires more skill than other methods due to its use of multiple wraps around both needles at once.

To begin, you will need to hold both needles together in one hand while wrapping strands of yarn around them several times in an anti-clockwise direction before inserting the tip of the right-hand needle into all loops created by wraps. Then, proceed with steps 1 & 2 above until the desired number of stitches has been reached.
Backward Loop Cast On Method
For those looking for an easy way to add extra stitches mid-project, the backward loop cast-on method may be just what you are looking for. To begin, take a strand from the ball in the working hand before creating a small backward “L” shape between the thumb and index finger.
Then, insert the tip from the free hand into this “L” shape before wrapping the strand from the ball around the tip once in an anti-clockwise direction before pulling tip back outwards while keeping the tension steady. Finally, proceed with steps 1 & 2 above until the desired number of extra stitches have been added mid-project.
Thumb Cast-On Method
For those who are looking for an even quicker way to add extra stitches mid-project, the thumb cast-on method may be just what you are looking for. To begin, take strands from the ball in the working hand before creating a small backward “U” shape between the thumb and index finger with a free hand.
Then, insert the tip from the free hand underneath this “U” shape while keeping tension steady before proceeding with steps 1 & 2 above until desired number of extra stitches have been added mid-project.
Knitted Cast-On Method
For those who are looking for an even quicker way to add extra sts mid-project without needing additional tools, the knitted cast-on method may be just what you are looking for. To begin, take the strand from the ball in the working hand before creating a small backward “V” shape between thumb and index finger with the free hand while keeping tension steady.

Insert tip from free hand underneath this “V” shape before wrapping the strand from ball around tip once in anti-clockwise direction before pulling tip back outwards. Then, proceed with steps 1 & 2 above until the desired number of extra stitches have been added mid-project.
Conclusion
Perfectly wrapping a knit stitch requires patience and practice, but with dedication and guidance from resources like this post, you can master it in no time! It’s easiest when done on circular needles, but this method can also be done on straight needles as well. Plus, the finished product will have beautiful, even edges and a consistent look that sets off your knitting projects!
So now you know how to wrap a knit stitch – what are you going to do with that knowledge? Don’t hesitate, get out there and start weaving your yarns into something astounding with your newfound skills. Who knows where learning to wrap a knit stitch can take you – uncovering knowledge of all kinds of fiber-working techniques or simply crafting something unique for yourself or someone special.