
Are you looking for an easy, beginner-friendly guide that will teach you how to sew a mitered corner binding? Do you want to add the perfect finishing touch to your sewing projects and make them look professional? Sewing mitered corners can be especially intimidating for novice seamstresses, but luckily it isn’t as complicated as it might first seem.
With just a few basic supplies and our step-by-step instructions, anyone can learn how to create these beautiful bindings – giving their handmade garments and quilts amazing visual appeal! Keep reading along if you’d like to understand why this type of binding is favored by so many experienced seamsters, plus get all the information needed in order to begin your own project.

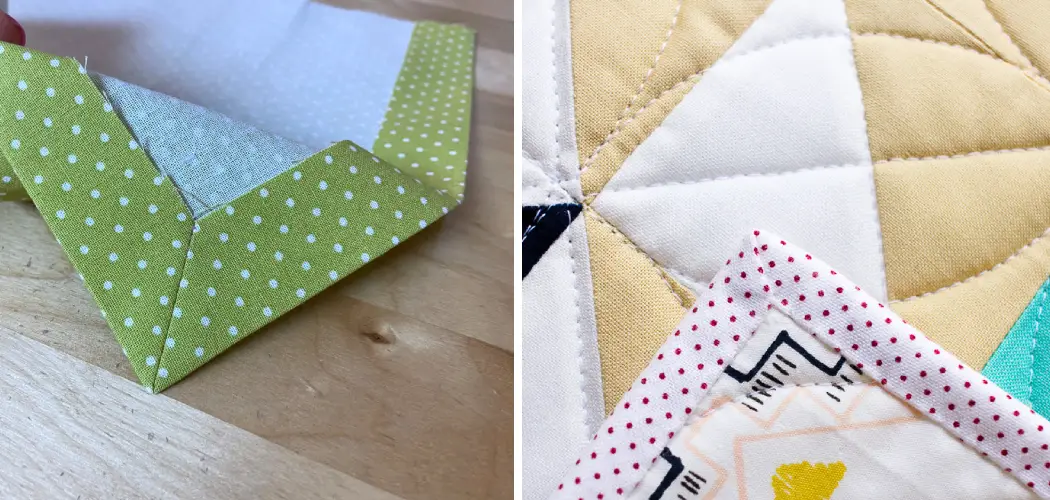
What is a Mitered Corner Binding and Why Use it?
Mitered corner binding is a type of edging that is used to provide a neat, professional finish on garments and quilts. This type of binding involves creating mitered corners along the edges of the fabric – a process that gives the finished item an elegant look that really stands out from other types of bindings.
Furthermore, mitered corner bindings are extremely durable, so they work great for projects that you plan on giving heavy wear or wash frequently.
Tools and Materials You Will Need to Sew a Mitered Corner Binding
- Tape measure
- Sewing machine
- Iron with the steam setting
- Pins
- Fabric scissors
- Press cloth (or scrap fabric)
- Bias tape or single-fold binding (your choice!)
- Thread in a color to match your binding
Step-by-Step Guidelines on How to Sew a Mitered Corner Binding
Step 1: Measure and Cut the Binding
Before you start sewing, you’ll need to measure and cut the binding. Start by measuring the length of the edge that will require binding – make sure to include any curves or corners. As a rule of thumb, add around two inches to the length of the edge for seam allowance.
Once you have a final measurement, cut your bias tape or single-fold binding so that it’s slightly longer than the edge. Take care to make sure that the ends of your binding are at a 90-degree angle – this will help when creating your mitered corners in step two.

Step 2: Make the Mitered Corners
Fold one end of the binding over at a 45-degree angle, making sure that it’s centered on the edge and pinning in place. Place your iron over the folded corner and press it in place for a few seconds to secure it even further. Then fold the other end of the binding over at a 45-degree angle so that it overlaps the first end. Pin in place and press with your iron again.
Step 3: Sewing the Binding in Place
Now, it’s time to start sewing! Place the binding on top of your fabric so that the wrong side is facing up – starting from one end of the edge, line up the binding with a ¼ inch seam allowance and begin sewing. As you approach the corners, slow down to ensure that they are sewn accurately. Once all four corners have been sewn in place, snip off any excess binding from the ends.
Step 4: Finishing Touches
On the underside of the binding, fold the seam allowance inwards so that it is hidden. Then press again with your iron to secure everything in place. Finally, top-stitch along the edges of the binding from the right side – this will give your mitered corners a professional finish and make sure that they stay in place for years to come!
Congratulations – you’ve just finished sewing a mitered corner binding! With these simple steps, you can now create beautiful bindings for any of your sewing projects – giving them that extra touch of professional quality. Have fun and get creative – happy stitching!
Additional Tips and Tricks to Sew a Mitered Corner Binding
1. When pressing the binding, make sure to use a pressing cloth or piece of scrap fabric – this will prevent the binding from getting shiny and stiff due to the heat of the iron.

2. To ensure precise mitered corners, measure twice and cut once.
3. When sewing around curves, take your time, and don’t be afraid to backstitch in order to secure the binding in place.
4. Starch can be a great tool when it comes to making bindings – applying a light coat of starch will give your fabric more stability and make sewing easier.
5. If you’re in a hurry and don’t have time to make mitered corners, single-fold binding can be used as an alternative. This type of binding is simpler to make – all you need to do is attach the ends together with a simple seam!
By following these tips and tricks, you’ll be able to create neat, professional-looking mitered corner bindings in no time. So, what are you waiting for? Get stitching and show off your amazing projects to the world!
Precautions Need to Follow For Resewing a Mitered Corner Binding
1. Before you begin, make sure your fabric and thread are compatible with one another. You should also test a sample first to make sure the colors of the fabric and thread will not clash when sewn together.
2. You’ll need to cut your pieces of fabric into mitered strips, with each strip about 2 inches wide. Making sure that the ends are cut at an angle is key for creating perfect miter corners when you sew them together.

3. Starting at the corner of your fabric piece, align one strip along the edge and pin it in place. You’ll want to make sure that the end is lined up with the corner for a neat miter joint.
4. Once pinned in place, sew along the edge being careful not to pull or distort the fabric as you go. This will ensure that the miter joint is sharp and even.
5. Repeat these steps on each corner until all four pieces are attached to create your mitered corner binding.
6. When finished, check your edges for any fraying or loose threads, and make sure they’re trimmed away before you use them! With a neat mitered corner binding, your fabric project will look professional and polished.
7. If you’re feeling extra fancy, you can even add decorative stitches along the edges of your binding to make it really stand out! With a bit of practice, sewing mitered corners is sure to be one of your go-to techniques in no time!
8. Finally, remember to always check the care instructions for the fabric you’re using so that your project lasts as long as possible. With a few simple steps and some patience, you’ll be one step closer to perfecting your sewing skills!
Following these precautions will help ensure that your mitered corner binding looks attractive and professional. With some practice, you’ll soon be sewing like a pro! Don’t let the fear of mistakes prevent you from creating something beautiful – with these tips in hand, you’re sure to make something amazing!
Frequently Asked Questions
What Type of Fabric Should I Use for a Mitered Corner Binding?
Any lightweight, synthetic, or natural fibers are appropriate for making a mitered corner binding. If you are using a heavier fabric, however, it is best to use bias tape instead of trying to make your own.
How Do I Measure the Proper Length of the Binding Strip?
Before you begin to sew the binding, it is important to measure the proper length of the fabric. To do this, add up the measurements of all four sides of your project plus an extra 3-4 inches for seam allowance.
What Type of Stitch Should I Use When Sewing a Mitered Corner Binding?
When sewing a mitered corner binding, it is important to use a stitch that will be strong and secure. A straight stitch or zig-zag stitch are both suitable for this type of project. However, if you plan to wash the finished item, then you should use a reinforced stitch such as an overlock or serger stitch.

How Do I Finish Off the Ends of the Binding?
To finish off the ends of your mitered corner binding, you will need to sew a final seam. To do this, fold and iron the two raw edges together so that they line up perfectly. Then, use a zigzag stitch or overlock stitch to secure the edges in place. This will create a neat, finished look.
What Other Tips Should I Keep in Mind When Sewing a Mitered Corner Binding?
When sewing the binding, it is important to pin or clip the fabric together before you begin stitching. This will help keep everything aligned and prevent any unwanted puckering or shifting of the fabric.
Additionally, take your time and use a slow pace when sewing the mitered corners – this will help ensure that all of your pieces line up perfectly. Finally, remember to iron each seam as you go along to give your project a professional look.
Conclusion
All in all,, knowing how to sew a mitered corner binding is a great skill to have and can be used in a variety of projects. By using the correct fabric, measuring for the proper length of the binding strip, using an appropriate stitch, finishing off the ends of the binding, and remembering other important tips, you will be able to create neat finishes on all your sewing projects.
With practice and patience, you’ll soon see that sewing a mitered corner binding isn’t as hard or intimidating as it looks. Good luck and happy stitching!