
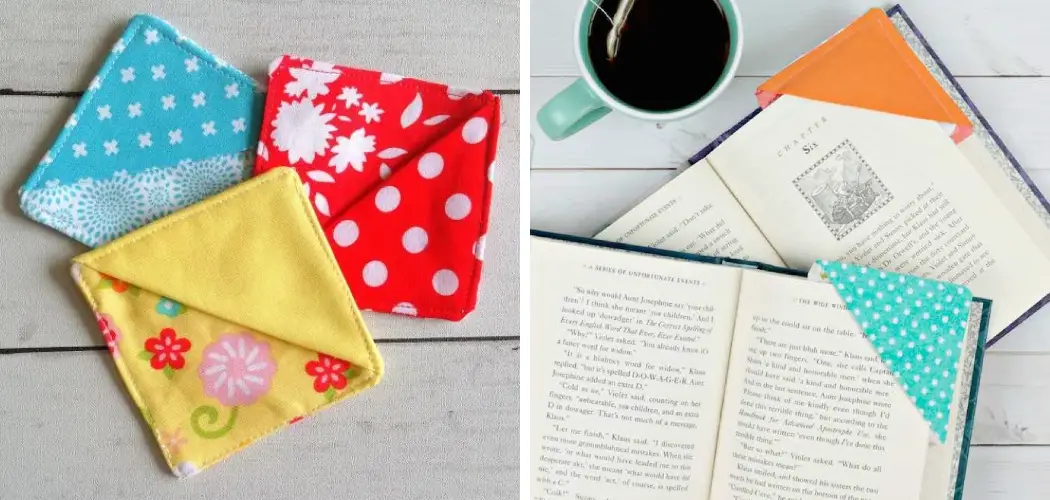
Do you love books and want to add a touch of creativity to your reading experience? If so, creating your own fabric corner bookmark is your perfect craft project! This easy DIY project gives your book an adorable bookmark that won’t fall out, and it’s also a great way to get creative with scrap materials from around the house.

Whether you’re a seasoned crafter or just starting, here’s how to make your fabric corner bookmark. Just follow these simple steps!
In this blog post, we’ll walk you through the steps on how to make a fabric corner bookmark – with templates included – so that you can enjoy literary-inspired designs all year long. So grab some scissors, scrap fabric pieces, and let’s get started!
What Will You Need?
Before you start, ensure you have all the materials needed to complete this project. Here’s what you’ll need:
- Template of the fabric corner bookmark (attached)
- A piece of scrap fabric in a size that fits your template
- Thread in a color that matches the fabric
- Paperclips or pins
- Sewing machine, needle, and thread
You’re ready to get started once you have your supplies ready to go!
10 Easy Steps of How to Make a Fabric Corner Bookmark
1. Print the Template:
Begin by printing out the template of the fabric corner bookmark onto cardstock. Cut it out with scissors or an X-Acto knife. You can also make a template from scratch if you prefer! If you do use the template, remember to adjust it for smaller or larger book sizes.
2. Cut the Fabric:
Lay out your fabric and place the template on top of it. Make sure to center the template. Now, use a pair of scissors to cut out the fabric around the template. The edges don’t have to be perfect, but you want them as close as possible for a nice finish.

3. Pin or Clip in Place:
Once you’ve cut out your fabric, use paper clips or pins to hold it in place on your work surface. This will make it easier when you start sewing together the bookmark. As you pin down the fabric, make sure that it’s flat and even.
4. Start Sewing:
Using your sewing machine or needle and thread, begin stitching along one edge of the fabric corner bookmark until you reach the end of that side. Make sure to backstitch at the start and end of each side to secure it. Additionally, remember to keep the stitches close together and even.
5. Sew the Other Edges:
Continue sewing along each edge of the bookmark, ensuring each stitch is secure. When you finish, your fabric corner bookmark should look like a pyramid shape. Trim any loose threads and turn them over so that the right side faces up.
6. Create a Notch:
Now, create a small notch at the top of your bookmark to represent where your book will be placed when using it as a page marker. To do this, simply fold in one corner of the template and sew across it twice for reinforcement. Be careful not to sew too close to the edge, or your stitches may come undone.
7. Trim Excess Fabric:
Once you have completed all the sewing and created the notch, it’s time to trim away any excess fabric. Use your scissors to cut around the edges and ensure they are even. You want to leave a small seam allowance so that everything stays together when in use.

8. Turn Inside Out:
Carefully turn your bookmark inside out and ensure all the stitches are secure. If needed, go back over any seams with a needle and thread for reinforcement. Keep turning it until the right side of the fabric is facing out.
9. Press for a Clean Finish:
Use an iron on a low setting to press down the seams of your bookmark for a clean finish. Make sure to leave the iron in one spot only a short time or it can damage your fabric! Check the seams, look for any stubborn wrinkles, and press them out.
10. Enjoy:
And voila! You’re all done. Now you can enjoy your homemade fabric corner bookmark and place it in a book of your choice. Not only will this keep the pages from turning, but it also adds a lovely touch of personality to any reading experience.
Following these simple steps, you know how to make a fabric corner bookmark! This craft project is great for personal use and makes the perfect handmade gift for any bookworm in your life. So what are you waiting for? Get creative and start making your own fabric corner bookmarks today!
5 Additional Tips and Tricks
1. Make sure your fabric pieces are cut accurately. Using a ruler or measuring tape is best to ensure that all angles and edges are straight.
2. To make the corners of the bookmark extra sharp, you may want to iron them before sewing them together. This will help create crisp lines, giving it a more professional finish.
3. After cutting out your fabric pieces, you can further personalize the bookmark by adding appliqués, patches, ribbons, or other decorative elements before sewing the pieces together.
4. When sewing on the ribbon loop, attach the bookmark to the books, and reinforce it with extra stitches so it does not break easily.
5. If you don’t want to sew the bookmark together, use adhesive fabric glue instead. Just ensure it is suitable for fabrics and will not stain or damage the material when dry.
Creating a fabric corner bookmark can be a fun and creative project that yields great results.

Remember to take your time with each step, pay attention to details, and experiment with different materials and designs. With some patience and creativity, you’ll have a beautiful handmade bookmark to enjoy!
6 Things You Should Avoid
- Don’t rush the process. Take your time to ensure that all measurements and angles are accurate.
- Avoid using low-quality fabrics or materials as they may not withstand frequent use and may not hold up in the long run.
- Avoid using less durable adhesives as it can cause damage to the fabric pieces over time.
- Refrain from skimming on reinforcements when attaching the ribbon loop to the bookmark – use extra stitches for added strength and durability.
- Stay away from complex designs or too much embellishment, as these can make it difficult to assemble properly and could result in a bulky finish product.
- Don’t forget to pre-wash fabrics before cutting out your fabric pieces, as this will help prevent any shrinkage or discoloration when cleaning the finished bookmark.
By Avoiding these 6 common mistakes, you’ll be able to create a beautiful and lasting fabric corner bookmark that will make reading more enjoyable!
5 Different Style Options
- Shaped: Make a triangular or heart-shaped bookmark for a unique look.
- Embellished: Add lace, buttons, sequins, and other decorative elements to make your bookmark stand out.
- Appliquéd: Create an appliqué of an animal, flower, or even words on the fabric pieces before sewing them together to make it more personalized.
- Printed: Use custom prints or patterns on the fabric to create eye-catching designs.
- Fringed: Cut fringes along the edges of the bookmark before sewing them together for an interesting touch.
There are so many styles when making a fabric corner bookmark that the possibilities are endless!
How Do You Make a Pocket Bookmark?
Making a pocket bookmark is a great way to add extra storage space while also displaying your favorite bookmarks. The steps for making a pocket bookmark are similar to that of the regular fabric corner bookmark but with an added step:
- Cut two pieces of fabric into squares or rectangles, depending on the size you want the pocket to be.
- Place one piece of the fabric right side up and pin the other piece of fabric onto it with the wrong sides facing each other. Make sure both pieces align properly before sewing them together along all four edges.
- Once you’ve sewn along the edges, turn it right side out and press with an iron so that it looks neat and presentable.
- Fold the pocket in half and sew along the edges to create a crease.
- Sew around the top edge of the pocket, leaving one side open for inserting the bookmark.
- Finally, attach a ribbon loop at the top of the bookmark so that it can be attached to books or planners easily.

Making a pocket bookmark is an easy and fun way to add some personality and functionality to your bookmarks collection! With just some basic sewing skills and supplies, you’ll have a great looking bookmark for all your reading materials!
Conclusion
Congratulations, you have just completed learning how to make a fabric corner bookmark! Now you can start taking advantage of the endless possibilities that this craft can offer you. With your spare time and some creative fabrics, you can easily create beautiful and unique bookmarks that reflect your personality or interests.
Who says functional crafts limit your ability to have fun? Put together an array of vibrant colors and patterns, and you’ll be sure to surprise yourself with an eye-catching project that makes reading easier. Immerse yourself in the process of making a bookmark and enjoy every minute of it, for it may just become your new favorite hobby.
Hopefully, these tips and tricks have helped you create a beautiful fabric corner bookmark that will bring joy to your reading habits! Happy crafting!