
Are you seeking a way to give your canvas project that modern, professional edge? Adding grommets is one of the simplest and most cost-effective ways of sprucing up any piece. Plus, it provides your artwork or fabric with extra stability due to its strong metal construction.
If you’re looking for a way to enhance the appearance and functionality of your canvas project, adding grommets is an easy and effective solution. Grommets are perfect for hanging banners and curtains and can also provide strength to any material that needs reinforcement, such as fabric or leather.

In this blog post, we’ll be discussing how to put grommets in canvas – from selecting the right supplies and tools to walking through step-by-step instructions on how to install them effectively. Read on if you want to learn more!
What are the Benefits of Installing Grommets in Canvas?
Grommets are great for adding a touch of style and professionalism to any canvas project. They also provide strength, sturdiness, and durability to the fabric. Additionally, installing grommets helps reduce the amount of wear and tear on canvas caused by tension or movement, as they’re designed to spread the weight throughout the fabric evenly.
In addition, you can use grommets to hang curtains, banners, or signs in any space, making them a great choice for home décor projects and outdoor activities. Likewise, they provide an easy way to attach straps or handles to bags or other objects.
What Supplies and Tools Do You Need?
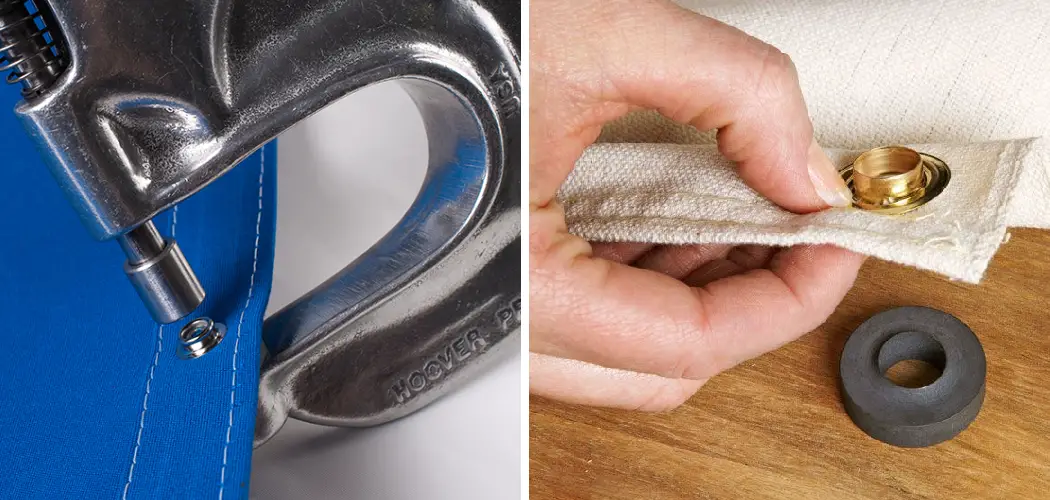
To install grommets, you’ll need two things: the first is a pair of grommet tools (also known as grommet pliers) to help with setting up your canvas project properly, and the second is a selection of metal grommets that come in various sizes depending on your needs.
The size of the grommet will depend on the size of the canvas project and how much weight it will need to support it. Generally speaking, you’ll want to select a grommet slightly larger than the holes in your fabric.
You’ll also need scissors or a sharp knife to cut the fabric and other accessories, such as string or twine.
10 Easy Steps on How to Put Grommets in Canvas
Now that your supplies are ready, it’s time to start installing your grommets! Follow these simple steps:
Step 1. Secure the Canvas Material:
Secure the canvas material to the table using pins or tape. This ensures that it won’t move while you’re working on it. Additionally, mark the area where you want to install your grommet before you begin.

Step 2. Mark Out the Hole Locations:
Using a pencil, mark out where you’d like to place your grommets by lightly drawing around them. Make sure they are evenly spaced apart! If you’re working with a patterned material, ensure that the grommets are placed in areas where the design won’t be affected.
Step 3. Cut Out the Holes:
Carefully cut out each hole with scissors or a sharp knife. If you’re working with a thicker material, you may need to use an awl or a leather hole punch to make the holes. As a safety precaution, make sure to wear gloves when using sharp tools.
Step 4. Place Grommet Through Hole:
Position each grommet into their respective holes from the backside of your fabric and press down firmly until they sit securely in place. Remember to recheck your alignment! Use a ruler to double-check that the grommets are placed evenly if necessary.
Step 5. Place Grommet Pliers Around Grommet:
Position the grommet pliers around the grommet, ensuring that both parts of the plier are placed properly around their respective sides. Additionally, make sure the grommet faces the correct direction. It will usually be marked with an arrow.
Step 6. Squeeze Pliers Together:
Gently squeeze the pliers together until you hear a clicking sound; this indicates that the metal pieces have been locked in place. This will secure your grommets for your canvas project! Additionally, if you’re working with leather or other thicker materials, you may need to use more force when squeezing the pliers.
Step 7. Remove Pliers from Grommet:
Carefully remove the grommet pliers from each of your grommets. Your installation is now complete! As a final check, perform a tug test to ensure the grommets won’t come undone. If everything holds up, you’re good to go!
Step 8. Secure Additional Materials (Optional):
If you’d like to, you can secure additional materials, such as string or twine, through the grommets by looping them around each one. This can be used for hanging banners and curtains, adding bag straps, and so much more! Don’t forget to double knot the strings for extra security.
Step 9. Test the Grommet’s Stability:
To ensure your grommets are secured properly, gently tug at them to test their stability. Once satisfied, you can proceed with any decoration or additional installation steps. Remember that if you’re using grommets to hang a banner or curtains, ensure the string is secured tightly.

Step 10. Clean Up Your Work Area:
Once you’ve completed your project, it’s important to remember to clean up after yourself; this will ensure that everything is neat when the next time comes around for another canvas project. Remember to properly dispose of scraps and put away all the tools you used.
And there you have it – a comprehensive guide on how to put grommets in canvas! We hope that you have found this tutorial helpful and that you can now confidently install grommets into any canvas project you create in the future.
5 Additional Tips and Tricks
- Make sure to use the right tools for your project. If you use canvas, get a grommet setting tool specifically designed for that material.
- Measure the fabric to ensure that you are putting grommets in the right places and that they will be spaced evenly.
- Use a cutting tool to make a small hole for each grommet, ensuring it is big enough so that the metal rim can fit through easily.
- Place your canvas on a solid surface or anvil so it doesn’t move when setting the grommets.
- Press down firmly when setting the grommet with your tool, making sure to go around it for a secure hold. This will help ensure your grommets don’t come loose over time.

These simple tips and tricks will make putting grommets in canvas much easier. With some patience and practice, you can confidently install grommets in your canvas fabric projects.
5 Things You Should Avoid
- Avoid using the wrong tools. Using anything other than a grommet setting tool made for canvas can cause damage to your fabric and may even cause injury.
- Don’t eyeball your measurements – use a ruler or measuring tape to ensure that all the grommets are spaced evenly and in the right spots.
- Don’t make a hole that is too big, as this can cause the rim of the grommet to come loose over time.
- Don’t attempt to set grommets while holding the canvas in your hands – always put it on an even surface for support.
- Lastly, don’t press down with too much force when setting the grommet, as this could damage your fabric and cause the grommet to become dislodged over time.
By following these tips and tricks, you can install grommets in your canvas projects with ease and confidence. With some patience and practice, you can take your canvas projects to the next level.
What is an Alternative to a Grommet Tool?
You can use a hammer and anvil if you don’t have access to a professional grommet setting tool. Place the canvas on the anvil and then position the metal rim of your grommet over the top. With a few gentle but firm taps from your hammer, you should be able to get it securely in place. Be sure not to hit too hard, as this could damage both your fabric and metal rim.
This alternative may require more precision than an actual grommet setting tool, but with a steady hand, it is still possible to achieve good results.
In conclusion, there are several ways to put grommets into canvas fabric projects – from using a dedicated tool made for canvas to using a more traditional hammer and anvil method. You can confidently install grommets in your canvas projects with patience and practice.

Conclusion
Anyone can put grommets on canvas with a few supplies, some time, and patience. Take your time with the process; it may look complicated, but it isn’t that difficult. The best way to learn is to get started and practice! To ensure success, always prep your fabric before installing the grommets and cut the hole with a rotary cutter instead of scissors.
Be sure to measure consistently for both holes and grommets when you are marking them on the fabric so that they will line up correctly. With these steps, putting grommets on canvas should become a breeze!
Hopefully, the article How to Put Grommets in Canvas has given you the confidence to jump right into your next project. Good luck, and happy sewing!