
Are you an avid crochet enthusiast looking for new ways to join pieces of your projects together? If so, then look no further than the mattress stitch! The mattress stitch is a high-quality sewing technique commonly used to seam two panels of single or double crochet stitches. Not only does it create nearly invisible seams, but it also adds a bit of structural support to the finished project and strengthens delicate yarns.

Regardless of whether you’re joining squares or making amigurumi dolls, mastering how to work this beautiful crocheting method will add finesse and polish to every piece you create!
In today’s blog post, let’s explore exactly how you can use the mattress stitch in crochet as well as some helpful tricks on how to mattress stitch crochet that make adapting it into all your creations much easier.
What is Mattress Crocheting?
Mattress crocheting, also known as the mattress stitch or ladder stitch, is a versatile technique that’s used to join two pieces of crochet fabric together. It’s a popular seaming method because it creates virtually invisible seams that look like part of the original project!
The mattress stitch works best on single crochet stitches and double crochet stitches due to their distinct bar shapes, and it’s a great way to join intricate patterns like granny squares or even make 3D items such as amigurumi dolls.
Required Items and Materials for Mattress Crocheting
In order to use the mattress stitch in crochet, you’ll need a few essential tools. The main supplies you’ll need are:
- Two pieces of fabric/crochet work
- Tapestry needle (can be metal or plastic)
- Matching yarn (or thread for smaller projects)
Once you have the necessary items, all that’s left to do is practice!
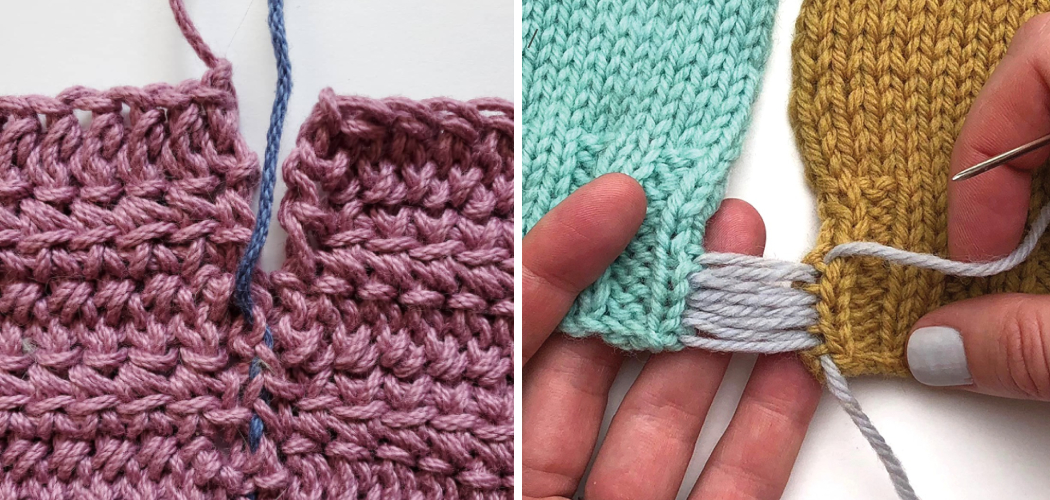
10 Steps on How to Mattress Stitch Crochet
Step 1: Lay Out the Fabric
Lay out the two pieces of fabric or crochet work on a flat surface, with the right sides facing each other. While doing this, make sure the sides you want to join are lined up evenly. Keep in mind that you can mattress stitch crochet both along the horizontal and vertical rows.
Step 2: Work at the Corner of One Fabric Piece

Starting at one corner, insert the tapestry needle through both layers of fabric/crochet work to create a small loop. For larger items such as Afghans or sweaters, start working from the bottom right corner of one piece and move up.
Step 3: Work Around the Post
Now, grab the working yarn and insert your tapestry needle around the post of the stitch nearest to you. Note that when mattress stitching single crochet stitches or double crochet stitches, you will be inserting your hook in between each post. As such, it’s important to make sure you’re inserting the needle in between each post and not on top of it.
Step 4: Insert Through Both Layers of Fabric
Once your tapestry needle is inserted around the post, pull the yarn through both layers of fabric/crochet work until a small loop appears. Then, pull
Step 2: Anchor the Thread
Thread your tapestry needle with a length of yarn that is slightly longer than the two edges you’re joining together. Next, insert your needle into the first stitch of one side and pull it through until there’s a small loop at the other end. Pull the yarn to anchor it in place.
Step 3: Insert Your Needle Around Post
Starting with the stitch next to the one that you used to anchor your yarn, insert your tapestry needle around the post of a single crochet or double crochet stitch. Make sure that you’re inserting your needle in between each post and not on top of the post.

Step 4: Pull Yarn Through
Once your tapestry needle is inserted around the post, pull your yarn through both layers of fabric/crochet work until a small loop appears. Then, pull tight to secure it in place. Also, make sure that the loop is pointing away from you.
Step 5: Repeat Steps
Next, insert your tapestry needle around the post of the stitch on the other side and pull your yarn through both layers of fabric/crochet work until a small loop appears. Make sure to keep a consistent tension throughout the process.
Step 6: Pull Yarn to Join Both Sides
Once you’ve created a small loop on both sides, pull your yarn tight to join the two pieces of fabric/crochet work together. Again, make sure that you keep a consistent tension throughout the process and that your loops are pointing away from you.
Step 7: Continue Joining
Continue inserting your tapestry needle around the posts of each stitch and pulling your yarn through both layers until you’ve completely joined the two pieces of fabric/crochet work. Depending on the size of the project, this process may take some time!
Step 8: Secure Thread End
Once you’ve reached the end of your project, loop your yarn around the stitch that was used to anchor it in the beginning and pull tight. Then, insert your tapestry needle through both layers of fabric/crochet work one more time before cutting off any excess yarn.
Step 9: Weave Ends
Finally, use a tapestry needle or crochet hook to weave in any yarn ends on the wrong side of the fabric/crochet work. This will help secure your mattress stitch seam, resulting in a more polished look.

Step 10: Admire Your Work!
Now that you’ve mastered how to mattress stitch crochet, it’s time to admire your work! The mattress stitch is one of the most versatile and beautiful seaming methods in crocheting, so be proud of how great your project looks. Whether you’ve used it to join granny squares or make amigurumi dolls, the mattress stitch will add a subtle yet sophisticated touch to any piece you create.
Now that you’ve learned how to mattress stitch crochet, have fun experimenting with this versatile technique! Whether you’re making afghans, sweaters, scarves, or anything in between, the mattress stitch is sure to give your projects a polished look. Plus, it’s easy to customize and can be used for both small and large-scale projects—so the possibilities are endless!
8 Tips to Be Good at Mattress Stitch Crochet
Mattress stitch crochet is an essential skill for creating seamless garments, blankets and accessories. With its quick and easy technique, you can join your pieces together with a neat finish in no time! To help you master mattress stitch crochet, we’ve come up with 8 tips to keep in mind:
- Choose the right yarn always. make sure the yarn you are using is the same weight to ensure similar shrinkage, or the tension may be different when crocheting. Also, make sure the colors are similar so that the join isn’t too visible.
- Recognize which stitches to use for seaming your pieces. It’s important to understand how mattress stitch crochet works and choose compatible stitches for each project. For example, if you are joining two stockinette stitched pieces together then you should use a single crochet stitch to seam them.
- Mark the pieces before seaming them together. This will help you keep track of where each piece should be joined to ensure a neat finish. Making stitch markers or using a water-soluble marker is an easy way to mark each piece before crocheting.
- Plan your seaming ahead of time. Make sure you plan out the sequence of joining each piece together and decide if the seam will be on the right side or wrong side of your project. This will help save time since you won’t have to undo and redo it later.
- Start at the edge of your project. Begin sewing from one edge of the piece, working inwards until you reach the center. This will help create a neat finish with even tension throughout your seaming.
- Work up to the stitch marker(s). When it comes time to seam pieces together, start by working up to the stitch marker(s) and continue crocheting until you have reached the center of your pieces. This will help keep tension even on both sides of the seam.
- Tighten your stitches as you go. As you are crocheting, make sure to tighten each stitch to ensure that there is no gaping between pieces when it is finished. This will help keep your seams neat and secure.
- Block your project after seaming. Once you have completed the mattress stitch crochet, it’s important to block the pieces so that they are even in size and shape. Blocking also helps ensure that the seam stays in place and looks neat.

By following these tips, you will be well on your way to becoming an expert at mattress stitch crochet! With practice, you can create beautiful and seamless garments with ease. So go ahead and give it a try!
Conclusion
Taking time to learn how to mattress stitch crochet can be beneficial in so many ways. It is a great way to join different yarns together, create moss stitches and seams that are strong and tight with no gaps. Furthermore, it gives your handmade items a professional look as well as making them enjoyable to use.
Plus, the mattress stitch is perfect for finishing amigurumi or other stuffed toys since the mattress stitches are invisible from the right side of the work. All these reasons combined make mattress stitching totally worth learning! With some determination and practice, you’ll soon be skillful enough to seamlessly complete crocheted pieces using mattress coincide for a flawless finish!