
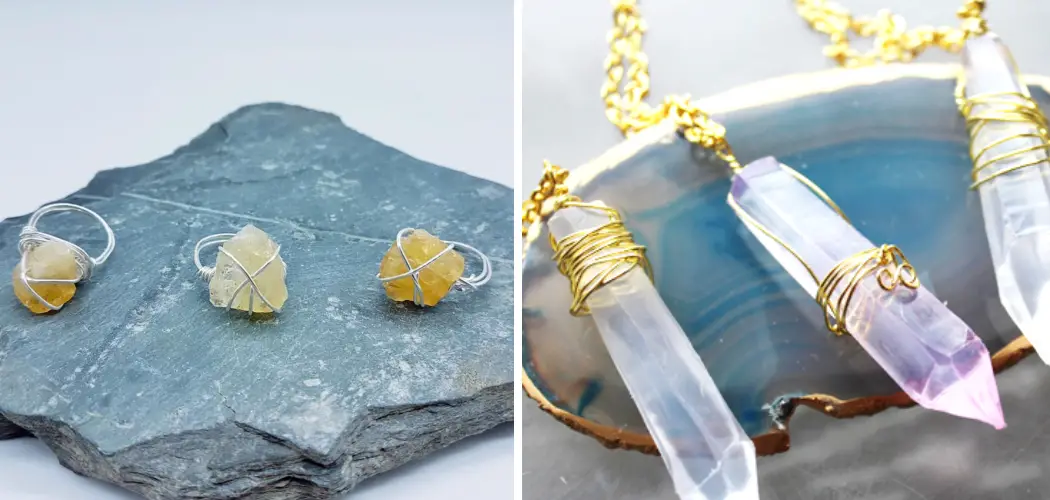
If you’re seeking a creative and unique way to express yourself, why not try making jewellery with crystals? This gem-filled craft is sure to add sparkle and dazzle to any accessory. Crafting your own one-of-a-kind pieces of jewellery can be incredibly therapeutic as well as enhance your imagination – plus, it’s an outlet for unlimited self-expression!
If the thought of creating beautiful beadwork with dazzling gems excites you, then this blog post will provide all the tips and tricks on how to make jewellery with crystals needed to make stunning jewellery with crystals. So grab some supplies and let’s get crafting!

Needed Materials
Given below are the required materials to make jewellery with crystals:
- Crystals (Can Be Purchased From Craft or Jewelry Stores)
- Jewelry Tools (Round-nosed Pliers, Wire Cutters, Etc.)
- Wire (Gauge Between 18 and 22 for Most Projects)
- Beads (Optional, for Added Texture and Color)
- Gemstones (Optional, but Recommended for Added Sparkle)
- Pendants/charms (Optional, to Complete the Look)
- Findings (Jump Rings, Lobster Clasps, Etc. Used to Attach the Pieces Together)
11 Step-by-step Guidelines on How to Make Jewellery With Crystals
Step 1: Gather Your Materials
Lay out all the required items in front of you, so that you can easily access them when needed. This will also help to make sure that you have all the necessary tools and components ready before beginning the project.
It’s also a great idea to take pictures of the items you’ve gathered, as this will help with any last-minute adjustments or changes. It’s important to note that these items can be easily acquired from craft and jewelry stores.
Step 2: Choose Your Crystals
When selecting your crystals, consider their size, shape, and color. Note that crystal jewellery pieces look best when they are symmetrical and balanced. Therefore, it is better to select crystals of similar size and shape for a neat look.

Color-wise, you can experiment with different hues or stick to one particular color scheme that suits your style. But whatever your choice, make sure it looks visually pleasing.
Step 3: Measure the Wire and cut It
Next, measure the required length of wire (that’s based on the size and number of crystals you have chosen) and cut it using wire cutters. It is important to make sure that the wire is cut precisely, as an uneven length will affect the entire project.
Make sure you have sufficient wire to create your desired pattern. Otherwise, you may need to start the whole process again. It’s important to note that thick wires (between 18 and 22 gauge) are the best for most projects.
Step 4: Secure the Wire to the Pliers and start Making a Loop
Using your round-nosed pliers, secure one end of the wire and start making a loop. To make this easier, you can also use a pen or pencil as an anchor point. But make sure the loop is big enough to secure all the crystals, otherwise, it will not be strong enough.
This loop will be the foundation for your jewellery piece, so it needs to be sturdy. It’s important to note that this process may take a few attempts to get it right.
Step 5: Create the Basic Frame for Your Jewellery
Once you have completed making the loop, create a basic frame by twisting the wire around itself. This will act as a base on which you can add your crystals. It’s recommended to use a tweezer or pliers while doing this step, as it will help to keep the frame neat and secure. Try to make sure that your frame is wide enough so that you are able to fit all the crystals onto it.
Step 6: Add Crystals to Your Frame
Now, it’s time to start adding your crystals to the frame. You can start with a single crystal in the center or arrange multiple gems in a pleasing pattern. Make sure that you secure each crystal to the frame using jewelry pliers. Otherwise, the crystals may get loose and fall off. It’s important to note that you can also use other beads or gemstones to add texture and color to your piece.

Step 7: Add Beads and Gemstones (Optional)
If you’d like, you can add beads and gemstones to your piece for an added texture and sparkle. Again, use jewelry pliers to secure each item to the frame. You can also use charms or pendants for a personalized touch. But make sure to adhere to the overall look you’re trying to achieve.
Step 8: Add Pendants/Charms (Optional)
Now it’s time to add pendants or charms to your creation for a personalized touch. Secure them using jump rings or lobster clasps (depending on the type of pendant/charm). It’s important to note that this step is entirely optional. If you don’t want to add charms or pendants, you can simply omit them.
Step 9: Finish Your Piece
To finish your piece, secure the end of the wire to the frame using jewelry pliers. Once you have completed this step, your jewellery is ready! You can then simply attach a clasp or jump ring according to your desired look. However, it’s important to note that some pieces may require additional steps for a more secure and polished look.
Step 10: Add Findings
The last step is to add findings like jump rings and lobster clasps. These will help you to connect your crystals to a necklace or bracelet chain, thus completing the look. It’s important to note that these findings can be easily acquired from craft and jewelry stores. But make sure to select items that match the style of your piece.
Step 11: Wear and Enjoy Your Creation!
And last but not least, it’s time to wear and enjoy your beautiful creation! Whether you plan on keeping it for yourself or gifting it to someone special, your handmade crystal jewellery will add some unique sparkle to any look. Always remember to take good care of your jewellery, as it will help it to last longer.
So go ahead and start crafting! From selecting the right crystals to adding charms and findings – creating custom jewelry pieces with crystals is a fun craft that anyone can enjoy. Following these steps on how to make jewellery with crystals will help you create the perfect piece in no time. Have fun and happy crafting!

Do You Need to Hire Professionals?
While crafting jewelry with crystals is a fun hobby, professional jewelers may be needed for complex pieces or if extra customization is required. Professional jewelers can also provide advice on selecting the right materials and tools to craft your desired jewelry piece. So depending on the size and complexity of your project, it might be helpful to hire professionals who specialize in this art form.
Your handmade jewellery pieces are sure to be admired by all! From one-of-a-kind earrings to dazzling necklaces, creating jewelry with crystals is a great way to add sparkle and joy to your life. So why not try making some today?
Frequently Asked Questions
Q1: What Type of Crystals Should I Use for Making Jewellery?
A1: When selecting crystals for jewellery-making, consider the size, shape, and color. It is best to go with symmetrical pieces in the same size and shape for a neat look. You can also experiment with different hues or stick to one particular color scheme that suits your style.
Q2: Do I Need Special Tools to Make Jewellery With Crystals?
A2: Yes, you will need to have specialized tools like round-nosed pliers and wire cutters for crafting jewelry with crystals. You can usually find these items at craft or jewelry stores. It is also recommended to use beading wire with a gauge between 18 and 22 for most projects.
Q3: How Do I Secure the Crystals to the Frame?
A3: The best way to secure crystals to the frame is by using jewelry pliers. Once you have twisted the wire around itself (to create a base), simply use the pliers to attach each crystal to the frame. For additional items like beads and gemstones, you can use the same technique.

Q4: Is It Difficult to Make Jewellery With Crystals?
A4: Not at all! In fact, making jewelry with crystals is a fun and rewarding hobby that anyone can enjoy. While it may take some trial and error to get the hang of it initially, with some practice you will be able to craft beautiful pieces in no time! There are also many tutorials and guides available online that can help you get started.
Conclusion
Overall, creating jewelry with crystals is an incredibly exciting and creative experience – not to mention a great way to show off your personal style. Not only will you be able to create unique pieces, but you’ll also get to discover the various magical properties of crystals that are said to bring healing and protection.
The possibilities for jewelry making with crystals are truly endless: from straightforward, effortless designs to larger projects that involve multiple components, it’s all quite achievable!
What’s more, why not take your designs online or even start a hobby business? So go ahead – trust your intuition and use your creativity to make stunning pieces of crystal jewellery. And if you ever find yourself feeling overwhelmed or stuck – remember to take things one step at a time.
After all, practice makes perfect! Now it’s time for you to start manifesting some crystal magic into reality. Thanks for reading this article on how to make jewellery with crystals.