
Friendship bracelets hold a special place in the hearts of many, symbolizing the bonds of camaraderie and affection between friends. Among the various designs, the daisy chain friendship bracelet stands out for its simple yet charming appearance.
Creating a daisy chain bracelet is not only a delightful way to express your friendship but also a fun and creative activity. In this article, we will guide you through the step-by-step process of how to make a daisy chain friendship bracelet, from selecting the materials to weaving the daisies together.

Whether you’re crafting it as a gift for a cherished friend or sharing the joy of bracelet-making with a group, this article will help you master the art of making a beautiful daisy chain friendship bracelet that symbolizes lasting friendship and joyous memories. Let’s begin this delightful journey of crafting heartfelt tokens of friendship.
What Is a Daisy Chain Friendship Bracelet and Its Significance?
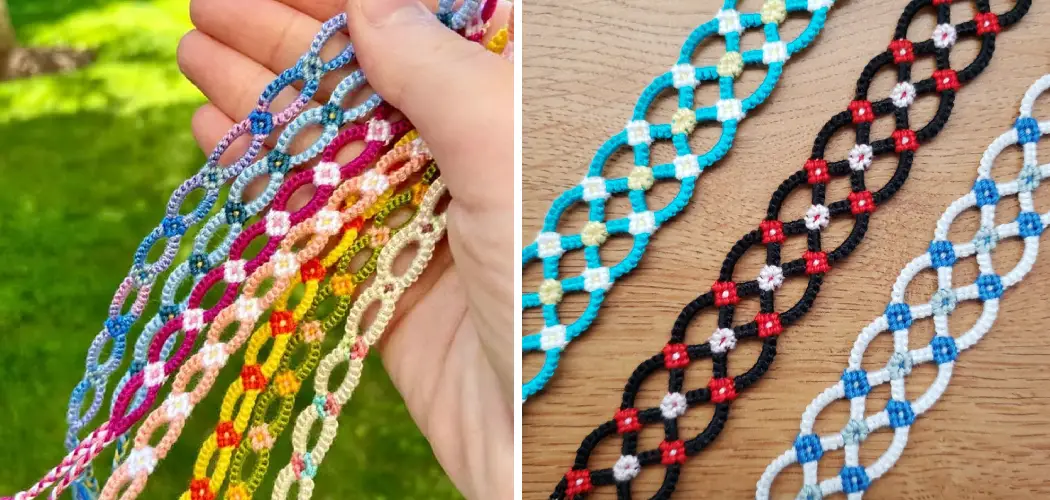
A Daisy Chain Friendship Bracelet is a beautiful and meaningful type of jewelry that has been around for hundreds of years. It is traditionally made by intertwining brightly colored threads together to form an intricate pattern, resembling the petals of a daisy flower.
Many cultures believe that when two friends exchange Daisy Chain Friendship Bracelets, it symbolizes their bond and is thought to bring good luck and protection.
Making a Daisy Chain Friendship Bracelet doesn’t require any special tools or materials, just some string and time. To get started, you’ll need at least two different colors of embroidery thread, cut into six-inch lengths. You should also have a needle on hand for tying the threads together and finishing off the bracelet.
Once you have your materials ready, begin by tying the two ends of one thread together to form a loop. This will be the center of your Daisy Chain Friendship Bracelet. Continue adding loops around this central loop to form the desired pattern and design. As you work, remember to always tie each new loop with a contrasting thread color from the previous loop.
The Materials Needed for Bracelet Making
Making a daisy chain friendship bracelet isn’t difficult, but you will need to gather the proper materials. Some of the items you’ll need include:

- Embroidery thread in several colors
- Scissors
- Tape or glue
- A needle with an eye large enough for the thread to fit through
- Optional: Beads or charms and a ruler.
Once you have gathered all your materials, it’s time to begin making your friendship bracelet! To start, cut the embroidery thread into 4 strands, each 24 inches long. Next, tie the ends together in an overhand knot as close to the end as possible. Make sure that all four strands are even in length.
10 Methods How to Make a Daisy Chain Friendship Bracelet
Method 1: Gather Materials
Before diving into the bracelet-making process, gather all the necessary materials. For a daisy chain friendship bracelet, you will need embroidery floss in different colors, a pair of scissors, and a clipboard or tape to secure the bracelet while you work.
Choosing the right embroidery floss colors is an important step, as it allows you to customize the bracelet to reflect the recipient’s taste or the unique significance of your friendship. Consider selecting colors that hold special meaning for you and your friend, such as favorite colors or those associated with shared memories.
Method 2: Measure and Cut the Embroidery Floss
The next step is to measure and cut the embroidery floss to the desired length. The length of the floss will depend on the wrist size of the person who will wear the bracelet and the number of daisies you want to include in the design.

A typical length is about 60 inches (150 cm) for each strand, but you can adjust it based on your preference. If you plan to make a wider bracelet with more daisies, you may need to cut longer strands of embroidery floss. To ensure consistency, use the same length for each strand.
Method 3: Secure the Floss on the Clipboard
To begin making the daisy chain friendship bracelet, secure the strands of embroidery floss on the clipboard or tape them to a flat surface. This step is crucial as it prevents the floss from tangling and keeps it steady while you weave the bracelet. Make sure the strands are aligned neatly and are easy to work with.
If you’re working with a group of friends, consider using a large table or a crafting board where everyone can secure their floss to ensure a smooth and enjoyable bracelet-making experience.
Method 4: Create the First Daisy
With the embroidery floss securely in place, it’s time to start creating the daisy chain. To make a daisy, take one strand of embroidery floss and fold it in half to form a loop at one end. Hold the looped end against the other strands of floss.
Take the loose ends of the floss and pass them through the loop, creating a knot to secure the daisy in place. The looped end will act as the center of the daisy, while the loose ends will form the petals. Pull the loose ends gently to tighten the knot, ensuring that the daisy is snugly in place.
Method 5: Add More Petals
With the first daisy created, continue adding more petals to form the daisy chain. Take the next strand of embroidery floss and pass it over the looped end of the first daisy, forming a loop of its own. Then, pass the loose ends of the floss through the loop and tighten the knot.

Repeat this process with the remaining strands of floss, creating a daisy chain. Each new daisy will share the looped end with the previous one, giving the bracelet a seamless and interconnected appearance.
Method 6: Repeat the Daisy Pattern
Continue repeating the daisy pattern until you reach the desired length for the bracelet. The number of daisies you make will depend on the bracelet’s width and the recipient’s wrist size.
You can add as many daisies as you like to create a full and intricate design or keep it simple with just a few daisies. Remember to maintain an even tension as you create each daisy to ensure a consistent and balanced look.
Method 7: Secure the Bracelet Ends
Once you have reached the desired length, it’s time to secure the bracelet ends to prevent unraveling. Take all the strands of embroidery floss and tie them together in a tight knot. You can double or triple knot the floss to ensure its durability.
To give the bracelet a professional finish, consider adding a dab of clear nail polish or fabric glue to the knot, as this will further secure the ends and prevent them from coming loose. Trim any excess floss close to the knot to neaten the bracelet’s ends.
Method 8: Customize with Beads or Charms
To add a personal touch to the daisy chain friendship bracelet, consider incorporating beads or charms. Beads and charms can represent shared interests, special memories, or symbols of your friendship. You can thread small beads onto the strands of floss before making the daisies or attach charms to the bracelet ends.
Choose beads and charms that resonate with your friendship and add a touch of individuality to the bracelet. This customization will make the bracelet even more meaningful and special for your friend.
Method 9: Make Matching Bracelets
Friendship bracelets are even more meaningful when shared with others. Consider making matching bracelets for your friends as a token of your affection. You can create identical bracelets or choose different color combinations that complement each other.

Making matching bracelets strengthens the bond of friendship and creates a unique connection between you and your friends. This gesture shows that you value your friendship and cherish the memories you share.
Method 10: Share the Bracelet with Your Friend
Finally, the most heartwarming step is to present the daisy chain friendship bracelet to your friend as a heartfelt gift. Explain the significance of the daisy chain design and the effort you put into crafting the bracelet. Express your appreciation for your friend’s presence in your life and the countless memories you’ve created together.
A handcrafted bracelet is not just a beautiful accessory; it is a symbol of the love and care you have for your friend. Sharing the bracelet will create a beautiful moment of joy and connection, further strengthening your friendship.
Conclusion
To make your own beautiful and unique daisy chain friendship bracelet, it is important to remember that with the right materials, some time, and a little bit of patience, even a beginner can come out with an amazing end product.
These simple bracelets are fun for exchanging amongst friends or even making as a gift. For varying difficulty levels, you can adjust the pattern and colors to make them more complex or simple- whichever fits your skill level best.
After all of the time and effort put in, you will be proud of your Daisy Chain Friendship Bracelet- one that’s sure to turn heads. Whether combining colors and choosing beads or tying knots, every step contributes to creating something special. Thanks for reading, and we hope this has given you some inspiration on how to make a daisy chain friendship bracelet!