
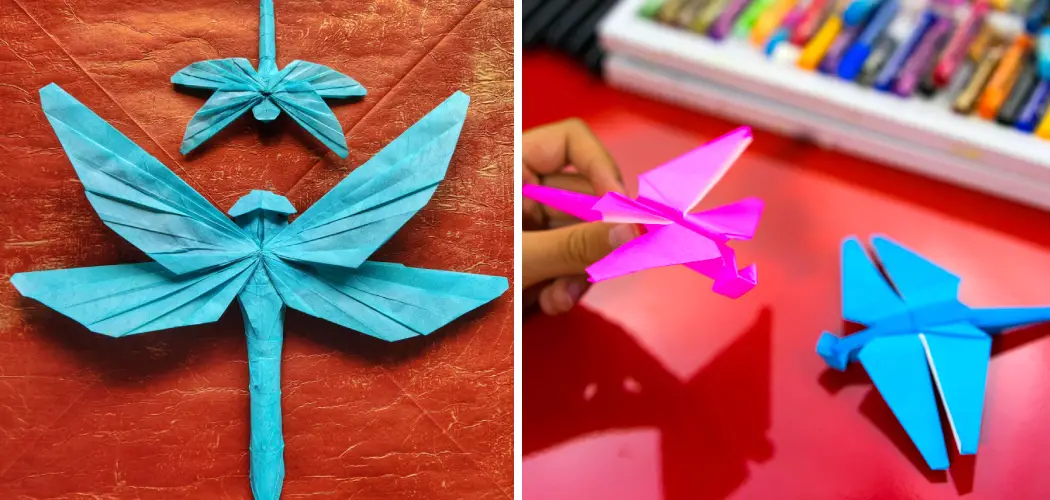
Are you looking for a creative activity that will provide both a fun and rewarding experience? Origami, the art of paper folding, is an extremely popular craft hobby amongst people of all ages – from children learning to make their first crane to adults honing their skills by creating complex designs.

If you’re ready to step up your origami game, this tutorial will teach you how to make an elegant dragonfly using basic techniques. With just a few folds of paper and some patience, we’ll show you how to make an origami dragonfly step by step!
Needed Materials
Given below are the materials that you’ll need to make an origami dragonfly:
- A Single Sheet of Square Paper (15cm X 15cm)
- Scissors
- Glue or Tape (Optional)
- Marker (Optional)
11 Step-by-step Guidelines on How to Make an Origami Dragonfly Step by Step
Step 1: Prepare the Sheet of Paper
Start by folding the paper in half both horizontally and vertically so that it forms an “X” on the surface. It’s important to ensure that each fold is as straight and precise as possible. But don’t worry if it isn’t perfect – it won’t affect the overall shape of your origami dragonfly.
If you wish, you can also use a marker to trace along the lines for extra precision. This first step is the most crucial as it will form the foundation of your dragonfly.
Step 2: Fold Diagonally
No matter which way the paper is facing, fold it diagonally. Make sure that all four corners of the sheet meet at a single point. But don’t worry if the folds aren’t exact – again, perfection isn’t crucial for this project. You can also use a ruler or marker to help you ensure that the fold is straight. It’s important to make sure that all four corners of the paper meet at one single point.

Step 3: Flip
Flip the paper over and repeat step two on the opposite side, making sure that all four corners overlap with one another in a single point. But don’t press down too hard – this can cause the paper to tear. This flip-and-fold method will create the classic “waterbomb” base that is essential for making an origami dragonfly. It’s important to make sure that all four corners of the paper meet at one single point.
Step 4: Make the Wings
Fold the two sides of the paper so that they meet in the middle. If you want to make sure that your wings are even, use a marker to draw an outline of their shape before folding them.
But don’t be afraid to get creative and make different shapes – the possibilities are endless! With your wings complete, it’s time to move on to the next step. This step will create the wings that are essential for making an origami dragonfly.
Step 5: Create The Tail
Bring one side of the paper up at an angle and fold it over at the top. This will create the tail of your origami dragonfly. It’s important to make sure that the fold is as straight and precise as possible, but don’t worry if it isn’t perfect. This step will create the tail of your origami dragonfly.
Step 6: Make The Head
Fold one side of the paper down to form a triangle shape, and then fold it back up. This will become the head of your origami dragonfly. However, you can also make the head any other shape you like – it’s up to you! This step will create the head of your origami dragonfly. If you like, you can use a marker to draw the outline of your creation before folding it.

Step 7: Create The Antennae
Fold two small triangles at the top of the head to form the antennae. Use a marker to draw lines on them for additional detail, if you’d like. Although it’s optional, it is a nice touch. This step will create the antennae of your origami dragonfly. But don’t worry if your antennae aren’t perfect – the possibilities are endless!
Step 8: Fold The Wings
Bring each wing up one at a time and fold it back down into itself. This will give your origami dragonfly a more realistic look. You can also use glue or tape to attach the wings if you’d like, but this is optional. This step will give your origami dragonfly a more realistic and detailed look.
Step 9: Secure The Wings
If your wings aren’t secure enough, you can use glue or tape to keep them in place. It’s important to make sure that the adhesive doesn’t seep through the paper and ruin your origami design. This step will secure the wings of your origami dragonfly in place. It’s important to make sure that the adhesive doesn’t seep through the paper and ruin your creation.
Step 10: Make the Eyes
Using a marker, draw two small circles on the head of your origami dragonfly for eyes. You can make the eyes any color you’d like, or leave them black if you prefer. This step will create the eyes of your origami dragonfly. You can also use other materials like small beads or glitter for additional detail.
Step 11: Admire Your Work
Congratulations! You’ve now successfully made an origami dragonfly. Show it off to your friends and family, or use it as a unique decoration in your home. Always remember, practice makes perfect – so don’t be afraid to try out new techniques and designs. It’s good to take risks and experiment with different materials. Have fun!

With these simple steps on how to make an origami dragonfly step by step, you can make your very own origami dragonfly in no time. So get creative and have fun! Have you ever tried making an origami dragonfly? What tips do you have for fellow crafters? We’d love to hear your thoughts in the comments below.
Additional Tips for Making Your Origami Dragonfly
- If You’re a Beginner, It Might Help to Use Thicker Paper. This Will Make It Easier to Fold and Manipulate the Paper Into the Desired Shape.
- If You Want to Make More Than One, Why Not Try Experimenting With Different Colors? You Could Even Use Patterned Paper!
- Get Creative! Once You’ve Mastered This Tutorial, Why Not Try Your Hand at Making Other Origami Animals?
- If You’re Having Difficulty Following the Steps, There Are Numerous Instructional Videos Available Online That Can Help.
- Don’t Be Afraid to Make Mistakes – It’s All Part of the Learning Process! And if You Don’t Get It Right on Your First Try, Keep Practicing Until You Do.
With a bit of patience and practice, anyone can master the art of origami. So why not give it a go? You never know what beautiful creations you may come up with!
Frequently Asked Questions
Q. Is It Difficult to Make an Origami Dragonfly?
A. No, it’s actually quite simple if you follow the steps outlined in this tutorial. With a bit of patience and practice, anyone can master the art of origami! It may take a few tries to get the shape and folds just right, but don’t give up – it’s all part of the learning process.
Q. What Kind of Paper Should I Use?
A. It’s best to use a square sheet of paper that is 15cm X 15cm in size. If you’re a beginner, it may help to use thicker paper as this will make it easier to fold and manipulate the paper into the desired shape. You can also experiment with different colors or patterned paper if you wish!

Q. Do I Need Glue or Tape To Secure The Wings?
A. It’s not necessary, but if you find that your wings aren’t secure enough, you can use glue or tape to keep them in place. It’s important to note that glue or tape should only be used as a last resort.
Q. Are There Any Other Tutorials I Can Follow?
A. Yes! Once you’ve mastered this tutorial, why not try your hand at making other origami animals? There are numerous instructional videos available online that can help you if you’re having difficulty following the steps. So have a look around and let your creative side shine!
Conclusion
Crafting is an excellent activity to make the most of your free time! Once you try making an origami dragonfly, you will see how simple it is to have fun with paper. Not only do people use origami as a recreational activity, but it also helps develop patience and motor skills.
When a person focuses on crafting something, their attention naturally drifts away from everyday problems of life, which can be beneficial for mental health. If your first attempt at making the origami dragonfly doesn’t come out right, don’t give up! Practice makes perfect, so just keep folding until your masterpiece is revealed.
It’s important to remember that perfection isn’t required when crafting. Have fun with the colors and patterns when assembling pieces for the origami dragonfly. Don’t worry if not everything aligns perfectly or if one piece appears slightly different than the other – it’ll give your creation that extra bit of personality!
Get creative and let your soul fly on paper wings – all it takes is some colorful paper and imagination to create something extraordinary! Thanks for reading this article on how to make an origami dragonfly step by step.