
Are you looking for an easy yet spooky way to deck out your home this Halloween? One of the most popular decorations is a tree made out of oranges and black ribbons. Not only is it simple, but you can also adjust the design however you’d like in order to make it as creepy, fun or sophisticated as possible! Read on to learn all the details about how to make a tree for halloween!
Halloween is one of the most fun and exciting holidays – it’s a chance for you to get creative and make something special out of ordinary materials! One way to celebrate this spooky season is by creating a colorful Halloween tree from everyday household items. Making your own Halloween tree can be a fun project that both adults and kids can take part in, not just for decorations but also as an interactive activity to encourage imaginative play.
Why is Making a Tree a Great Option for Halloween?
There are many reasons why making a Halloween tree is an excellent option for spooky decor. Such as:
1. Eye-catching
One of the main reasons why making a tree for Halloween is great, is the eye-catching factor. It will definitely draw attention to your home and create an atmosphere of mystery and excitement. Also, the tree can be decorated with various items such as lights, pumpkins and other Halloween decorations to really make it stand out.
2. Fun Activity
Making a Halloween tree can also be a fun activity for all ages! It’s a great way to get people together and have fun while creating something unique. Plus, you can customize it to your style and decorate it with items that you like.
3. Affordable & Easy to Make
Finally, making a tree for Halloween is an affordable option as there are plenty of materials available to use at discounted prices or even for free. Furthermore, the process of making the tree can be relatively easy if you know what you’re doing. All you need is a little bit of creativity and patience to come up with a fantastic tree that will be the star of your Halloween festivities!
So, if you want to make something unique this Halloween then why not try making a Halloween tree? With these reasons in mind, it’s easy to see why this could be a great option for your Halloween decor. Good luck and have fun!
How to Make a Tree for Halloween in 7 Easy Steps
Step 1: Gather the Materials
The very first step is to gather the materials needed for your tree. You will need some cardboard, scissors, tape or glue, and some black paint. So you have to make sure that you have all of these things before starting.

Step 2: Cut Out the Tree Shape
Using the cardboard, cut out a tree shape that is the size and design that you want for your Halloween decoration. Make sure to leave some room at the bottom so you can attach it to the wall later.
Step 3: Paint the Tree Black
Once you have your tree shape cut out, you can now start painting it. Paint the entire surface of the tree black for a spooky effect. If desired, you can also add some other colors to make it more interesting. You can be as creative as you want with this step!
Step 4: Cut Out Some Leaves
You can make leaves for your tree out of construction paper or other materials. Cut out some leaf shapes and paint them black so they will match the tree. You can also add some other colors to create a more intricate design.
Step 5: Glue the Leaves to the Tree
Now it’s time to attach your leaves to the tree. Use some glue or tape to stick them onto the tree in whatever pattern you want. Make sure that they are securely attached. You can use extra glue if necessary.
Step 6: Hang the Tree on the Wall
Once everything is all glued together, you can now hang your tree on the wall. Use some tape or nails to attach it securely, making sure that it won’t move around too much. But you have to be careful not to damage the wall while doing this.

Step 7: Add Some Finishing Touches
Finally, add some finishing touches to make your tree look extra special. You can use sparkly tape or glitter glue to draw patterns onto the leaves and give it a more festive look. You can also put small lights around it, or hang up some Halloween decorations to make it stand out even more.
And that’s how you can make a tree for Halloween in seven easy steps! With just a few materials and a bit of creativity, you can quickly create an amazing decoration that will definitely impress your friends and family. So this year, why not give it a try?
Some Additional Tips to Make a Tree for Halloween
1. Use a Variety of Materials
You can use a variety of materials to make your tree for Halloween. Try using foam sheets, felt, fabric, and even paper mache for added texture and color. Be careful when using any type of glue or adhesive.
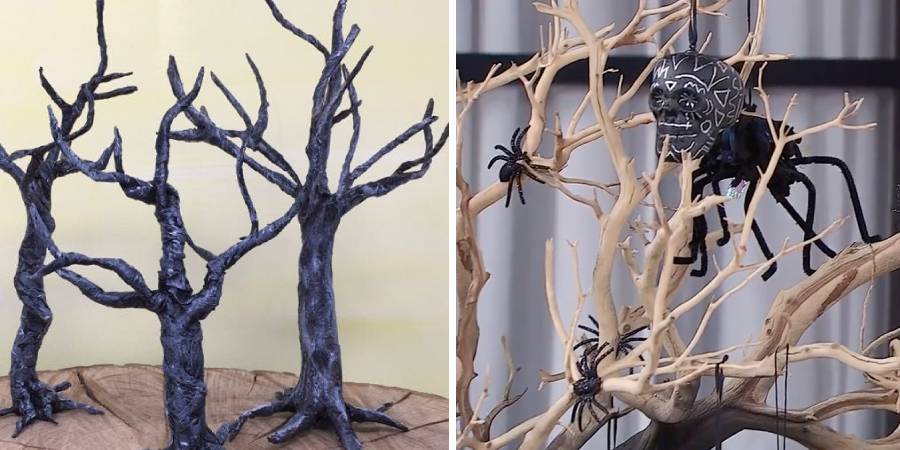
2. Add Spooky Elements
You can add spooky elements to your tree for Halloween such as bats, spiders, witches, and goblins. You could also add fake webs and dried leaves for a more realistic look. Also, consider using glow-in-the-dark paint to make your tree spookier.
3. Add Lights
Adding lights to your tree can help set a spooky atmosphere for your Halloween parties or decorations. Use battery-powered lights, so that you don’t have to worry about wires and dangerous cords when setting up your tree.
4. Let Your Imagination Go Wild
Let your imagination go wild when making a tree for Halloween. Have fun with the design and use your creativity to make it unique. You can even add glitter, feathers, or other decorations to give it more of a magical look.
5. Don’t Forget the Finishing Touches
Once you have finished creating your tree for Halloween, don’t forget to add the finishing touches. You can do this by painting it, adding ornaments, or even carving it with a woodburning tool. Have fun and get creative!

6. Avoid Fire Hazards
When creating a tree for Halloween, make sure to avoid any fire hazards. Don’t use real candles or electric lights near flammable materials such as fabric or paper.
7. Do Not Place the Tree Near Water
When hanging your tree for Halloween, make sure to not place it near water or other sources of moisture. This could damage the tree and ruin all your hard work. So be sure to hang it in a dry place.
With these tips in mind, you should be able to make a unique tree for your Halloween decorations. Make sure that you take safety precautions when using any tools and materials, and have fun! With a little bit of creativity, you can create a spooky tree to add some extra fright to your Halloween celebrations.
Frequently Asked Questions
How Much Time Does It Take To Make A Tree for Halloween?
The amount of time it takes to make a tree for Halloween depends on the size and complexity of the tree. Generally, trees with simpler designs take less time to assemble than more elaborate ones. Additionally, if you choose to paint or decorate your tree, that will add to the overall time it takes to complete. Also, it is important to take into consideration the time needed for the tree to dry and set. On average, it can take anywhere from a few hours to an entire weekend to complete a Halloween tree.
What Materials Are Needed To Make A Tree for Halloween?
The materials needed to make a Halloween tree vary depending on the design you choose. Generally, you will need some type of tree-shaped structure (such as a trimmed branch or foam skeleton), 1-2 rolls of black or white crepe paper heater, scissors, tape, and any decorations you want to add such as pumpkins, spiders, bats, or other spooky items. If you choose to paint your tree, you will also need paint and brushes.

What Are Some Ideas For How To Decorate A Halloween Tree?
There are many creative ways to decorate a Halloween tree. You can choose to keep it simple with white or black heaters, or use your imagination and add other decorations like pumpkins, spiders, bats, ghosts, and other witches’ accessories. You can also add lights, glitter, and garland to make your tree even more festive. To give it an extra spooky look, you could spray-paint the tree black or white. Lastly, don’t forget to hang a few Halloween ornaments from the branches!
Can I Use Real Trees To Make A Halloween Tree?
No, it is not recommended to use real trees for your Halloween tree. Real trees can be dangerous and flammable. Additionally, they are often more expensive than other types of materials used to make a tree for Halloween. Instead, you should opt for artificial or foam skeletons as the skeleton of your tree. These are much safer and cheaper than real trees.
What Are Some Safety Precautions To Keep In Mind When Making A Tree For Halloween?
When making a tree for Halloween, it is important to remember to take safety precautions. Don’t use real candles or electric lights near flammable materials such as fabric or paper. Additionally, make sure to not place the tree near water or other sources of moisture. Lastly, it is important to wear safety gear when using any tools such as saws and hammers. Following these tips will help ensure that your Halloween tree is safe and fun for everyone!

Conclusion
All in all, making a tree for Halloween is a fun and creative way to bring your own personal touch to the holiday. Don’t forget to have fun with it! Take some time to think through your design and pick materials that will make building the tree enjoyable.Whether it’s covered in faux fur or adorned with tiny lights, decorations are key for this project. Lastly, don’t be afraid if things don’t turn out exactly how you want them to—it’s all part of the experience! Together, by using these strategies we can get one step closer to having our very own unique Halloween tree creations.
We hope this guide on how to make a tree for halloween was helpful and that you have a spooky and safe Halloween season! But remember, safety first! Make sure to use proper tools and materials, follow safety precautions, and have an adult present when using sharp objects or dangerous cords. Good luck with creating your own Halloween tree creation. Happy Halloween!
You Can Check It Out to Crochet With Two Strands of Yarn