
Do you want to add a unique and eerie touch to your Halloween decor this year? If so, why not make your own spooky tree? With just a few supplies and some creativity on how to make a spooky tree, you can easily transform an ordinary tree into the perfect addition to your outdoor Halloween display.

So, grab your craft supplies and get ready – let’s show how to put together this creative holiday project!
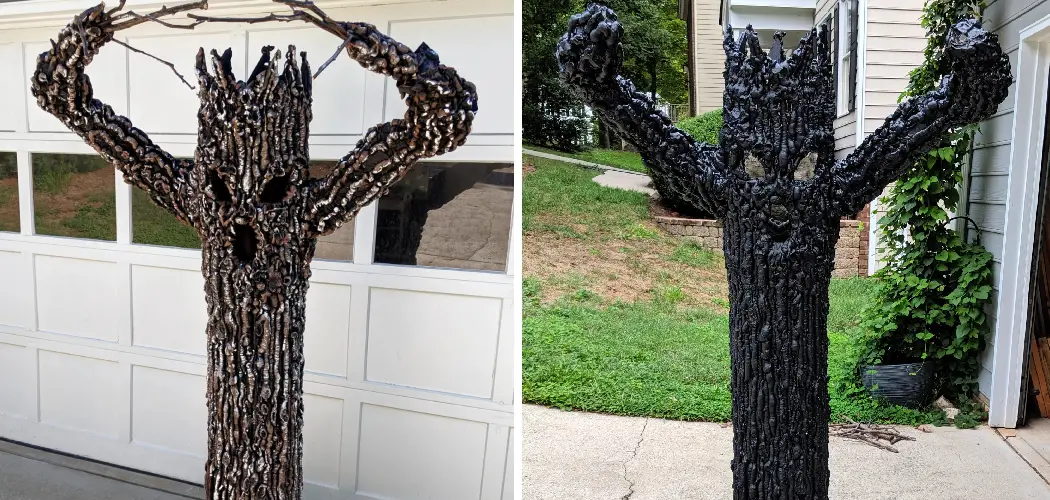
What is a Spooky Tree?
A spooky tree is a fun and creative Halloween decoration that you can make using a plain tree as the base. The idea is to add decorations or accessories onto the tree so it looks like a haunted, eerie scene. This could include things like pieces of fabric, skulls, spiders, bats and anything else you think might look creepy.
What You’ll Need
- A Tree
- Twine or Other String to Hang the Decorations From
- Pliers (to Help With Making Holes in the Tree)
- Various Decorations or Accessories Such as Fabric, Skulls, Fake Spiders, Bats Etc.
11 Step-by-step Instructions on How to Make a Spooky Tree
Step 1: Find a Perfect Tree
Look for one with lots of branches and a wide base. The tree should be free of any living creatures or debris. It should also be relatively easy to access so you can hang the decorations from it. But most importantly, make sure it’s a tree with character! If you can’t find one in your yard, many craft stores sell artificial trees that would work perfectly.
Step 2: Measure & Cut String
Using the twine or string of your choice, measure enough to go around the circumference of the tree and then add an extra few feet for tying knots later. Once you have a good length, cut the string and set it aside. This will be used to hang the decorations from the tree.

It’s a good idea to start with one long piece of string, rather than multiple smaller pieces. You can always cut it into shorter pieces and tie them together if needed.
Step 3: Make Holes in the Tree for String to Pass Through
Using pliers, make medium-sized holes in the tree where you want the decorations to hang. Make sure to leave at least two inches of space between each hole so that the string doesn’t overlap and cause tangles. You can also use a drill to make the holes if you prefer.
It’s best to make the holes near the branches so that they are not visible from the front of the tree. It will give your spooky tree a more authentic look.
Step 3: Attach String to Tree
Starting at the bottom of the tree, wrap the string around once and tie a knot. Make sure it’s tight! Continue this pattern all the way up the trunk of the tree until you have gone completely around it. But don’t tie the string off yet! You want to leave it loose so you can add decorations later.
This is also the time to add any pieces of string you want to hang from branches. It’s easier to do this before adding the decorations.
Step 4: Hang Decorations & Accessories
Now for the fun part – hanging your spooky decorations and accessories on the tree! Start by tying a piece of fabric around one of the lower branches, then move up until you have completely covered the tree in decorations. You can also weave pieces of string through the holes to hang spiders and skulls.

It’s up to you how creative you want to be – just make sure everything is firmly attached! It’s also a good idea to add some lights and battery-powered candles for an extra atmosphere. It will make your spooky tree look even more creepy!
Step 4: Create Holes in the Tree
Using the pliers, create small holes in the tree. These are for attaching the decorations. Make sure to avoid any areas with living creatures residing within them! It’s also best to stay away from the trunk of the tree as this can weaken it. This step isn’t necessary if you plan on using string to hang your decorations, but it can make the process much easier. You can also use a drill if you prefer.
Step 5: Hang Decorations
Starting at the bottom of the tree, begin adding your desired decorations or accessories. For each decoration, poke a hole in the tree with the pliers and then tie a piece of string onto it. This will secure the decoration of the tree. Continue this step until you have covered all desired areas. It’s a good idea to hang the decorations from both sides of the tree so your spooky tree looks balanced.
Step 6: Add Lights (Optional)
If desired, add lights to the spooky tree for an extra eerie effect. You can either drape strings of lights around the tree or use battery-operated ones to hang from specific branches. But make sure to use waterproof lights if you plan on using them outdoors.
This will help protect them from the elements and ensure that your spooky tree lasts all season. It’s also a good idea to use LED lights as they are much more energy efficient.
Step 7: Add Bats & Spiders (Optional)
For an extra spooky touch, add some bats and spiders around the tree. You can either hang them from the branches or stick them directly onto the trunk using adhesive. This will give the tree an even creepier look.

However, if you have any pets or small children around, make sure to use fake spiders and bats – real ones can be dangerous! It’s also a good idea to use glow-in-the-dark spiders for an extra eerie effect.
Step 7: Secure String to Tree
Once all of the decorations and lights are in place, go back over the string you previously attached to the tree and make sure it is securely fastened. Make sure any knots are tight so that everything stays in place once you’re finished. This is especially important if you plan on using the tree outdoors. It’s also a good idea to use waterproof string if you plan on using it outdoors.
Step 8: Add a Rope (Optional)
To make the tree even more spooky, you can add a rope or chain to the top of it. This will give your tree an extra special touch and really complete the look. It’s best to use a rope that is weatherproof so it won’t wear down from the elements. You can also buy or make a spooky sign to attach to the rope if desired. It’s the perfect way to finish off your spooky tree!
Step 9: Add Some Fog (Optional)
Fog machines can be added to the area around the tree to create an even spookier atmosphere. This is especially effective if you’re using lights for the tree. If you don’t want to buy a fog machine, you can also use dry ice to achieve the same effect.
Just make sure that if using dry ice, it is away from pets and children as it can be dangerous. It’s also a good idea to place any fog machines or dry ice away from the tree so they don’t get in the way of the decorations.
Step 10: Position Your Tree
Once all of your decorations are in place, it’s time to pick a spot for your spooky tree! Make sure you pick an area that is easily visible and will allow lots of people to admire your hard work. It’s best to place your tree so it is slightly elevated and in an area with adequate lighting. This will help bring attention to your spooky masterpieces!

Step 11: Enjoy!
You’ve done it! You have just created your very own spooky tree for Halloween. Now all that’s left to do is take a step back, admire your work and enjoy the holiday season. Always remember to take down your decorations when you’re done so they don’t cause any damage to the environment. Happy Halloween!
Following these steps on how to make a spooky tree can help you create the perfect spooky tree to add some extra flair to your outdoor decorations this Halloween. So, what are you waiting for? Get crafting and show off your creative side! Happy Halloween!
Tips & Warnings
- Make Sure to Use Caution When Creating Holes in the Tree as There Could Be Creatures Living Inside.
- if You Are Using Lights for Your Spooky Tree, Make Sure to Use Battery-operated Ones That Are Safe for Outdoor Use.
- Have a Spotter Nearby When Hanging the Decorations From the Tree in Case You Need Help Reaching Higher Areas.
- Wear Protective Gear (Like Gloves) When Handling Any Sharp Items Such as Pliers.
- Have Fun! This is a Creative Project, So Don’t Be Afraid to Add Your Own Personal Touches.

With the proper supplies and a bit of creativity, you can easily make your own spooky tree this Halloween season. So go out and get crafting – it’s time to show off your holiday spirit!
Do You Need to Use Professionals?
Although it is possible to make your own spooky tree, it can be helpful to use professionals who have experience with this type of project. Professionals are familiar with the process and will be able to help you create the perfect spooky tree for your outdoor display.
They may also offer additional services such as installing lights or creating special effects like fog machines – so don’t be afraid to ask about their services!
How Much Will It Cost?
The cost of making a spooky tree will depend on the materials and accessories you choose to use. However, keep in mind that using professionals will likely increase the cost – so make sure you have a budget in mind before getting started.
It’s also a good idea to shop around and compare prices of materials and services before making any purchases. This can help you to save money in the long run!
Frequently Asked Questions
Q: How Much Does It Cost to Make a Spooky Tree?
A: The cost of making a spooky tree will vary depending on the supplies you decide to use. Generally, you can expect to spend between $20-$50 on items like string, decorations and lights.
Q: What Kind of Decorations Can I Use for a Spooky Tree?
A: The type of decoration used is totally up to your own personal preference. You can look for items that have an eerie or creepy feel to them, such as spiders, skulls, bats and anything else you think might look good on the tree. You can also use pieces of fabric or other craft items for a more unique design.

Q: How Long Does It Take To Make a Spooky Tree?
A: The time it takes to make a spooky tree will depend on the size of the tree and the amount of decorations you choose to use. Generally, it can take anywhere from an hour to several hours to complete the project.
Q: Where Can I Find Supplies for Making a Spooky Tree?
A: Most craft stores sell items like string, lights and decorations that are perfect for spooky tree projects. You can also find these items online if you prefer to shop from the comfort of your own home.
Conclusion
What a fun and creative way to get spooky for the holiday season! Making a spooky tree is easy and enjoyable, and can be done with items that you have at home. It’s great for a family activity that would help bring the Halloween fun right into your own home.
You can get as simple or as complex as you like, so it’s perfect for people of all skill levels. Not only will this project keep you busy but it also gives you the opportunity to display your handiwork proudly.
Let loose your inner creativity and make your own spooky masterpiece! Whether you decide to make the classic black-and-white version or cast a spell with something unique – showcase it proudly in your home this month. Happy Crafting! Thanks for reading this article on how to make a spooky tree.