
If you’re a Cricut enthusiast, you’ve likely experienced the joy of creating stunning vinyl stickers to personalize and decorate various items. However, when it comes to removing vinyl stickers, especially intricate designs or delicate surfaces, the process can be a bit challenging.
Whether you want to replace a sticker or change the look of your project, knowing how to peel vinyl stickers from your Cricut creations without damaging the surface is essential. In this article, we will explore effective techniques and tips on how to peel vinyl stickers Cricut projects with ease and precision.

From choosing the right vinyl type to using the correct tools and methods, you’ll soon become a pro at cleanly removing vinyl stickers, allowing you to confidently experiment with new designs and refresh your projects effortlessly. Let’s get started and master the art of peeling vinyl stickers with precision and finesse!
The Popularity of Vinyl Stickers Made with Cricut Machines for Various Crafting Projects
Vinyl stickers made with Cricut machines have become increasingly popular over the past few years. The Cricut machine is a cutting tool used to create shapes and letters of almost any size from various materials. It has been widely adopted by crafters and hobbyists for projects such as scrapbooking, home décor, card making, and much more.
Vinyl stickers are great for adding a personal touch to any craft project. They come in all shapes and sizes, from standard rectangles to intricate designs and letters. Additionally, you can make your own unique vinyl stickers with the Cricut machine. All you need is the right materials and tools plus some patience to get started!
The Importance of Proper Peeling Techniques to Ensure Clean and Successful Results
When it comes to peeling vinyl stickers with a Cricut, proper peeling techniques are key. It doesn’t matter how accurately your machine cuts the sticker, if you don’t take your time and carefully peel the material away from its backing it may not stick properly – or worse, cause damage or leave behind a mess. Taking just a few extra minutes to do it right will ensure clean and successful results.

The most important thing to remember is always peel away from the backing – never toward it. Pulling against the sticker’s adhesive can cause it to stretch, rip or tear when you try to remove it. This can also leave behind bits of material or adhesive on either side, which can make it difficult to get the sticker to stick properly.
Another tip is to avoid using your fingernails or any other sharp objects when peeling as this can also cause damage or leave behind too much adhesive. Instead, use a blunt edge such as the side of a credit card to gently push the edges of the material away from the backing and peel it up. This will ensure smooth and consistent results as you work your way around the entire sticker.
10 Methods How to Peel Vinyl Stickers Cricut
Method 1: Use Removable Vinyl
When it comes to creating vinyl stickers with your Cricut machine, selecting the right type of vinyl is crucial for easy removal. Opt for removable vinyl instead of permanent vinyl, especially if you anticipate the need to change or replace the stickers in the future.
Removable vinyl has a lower adhesive strength, making it easier to peel off without leaving residue or damaging the surface. This is particularly important when applying vinyl stickers to delicate items like laptops, phone cases, or painted surfaces.
Method 2: Apply Transfer Tape
Before attempting to peel the vinyl sticker from the backing paper, apply transfer tape to the top of the design. The transfer tape serves as a protective layer and facilitates the transfer of the vinyl onto the desired surface. Gently press the transfer tape onto the vinyl design, ensuring there are no air bubbles or wrinkles that could interfere with the adherence.

Once the transfer tape is securely adhered to the vinyl, you can confidently peel the entire design without worrying about it sticking to your fingers or folding onto itself during the application process.
Method 3: Warm the Vinyl
For vinyl stickers that are particularly challenging to peel, employing gentle heat can be a helpful technique. Use a hairdryer on a low setting or a heat gun at a safe distance to warm the vinyl slightly. Be cautious not to apply too much heat or hold the heat source too close, as excessive heat can damage the vinyl or the underlying surface.
Once the adhesive is slightly softened, carefully peel the vinyl from one corner, gradually working your way across the design. Warmth softens the adhesive, making it more pliable and easier to release from the backing paper.
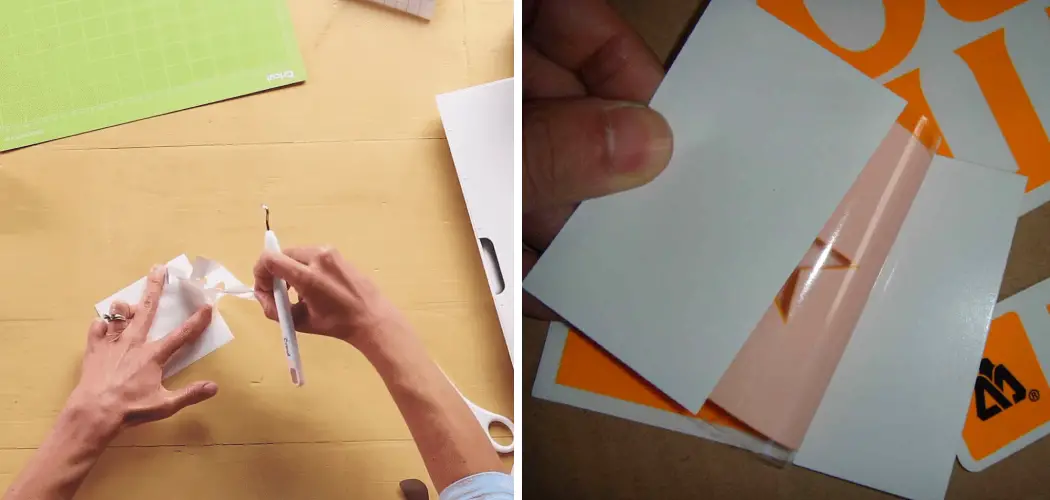
Method 4: Use a Weeding Tool
A weeding tool is an indispensable accessory for Cricut enthusiasts working with vinyl. This versatile tool is particularly useful when peeling intricate designs or small details, as it allows for better control and precision.
To use the weeding tool, insert it under a corner or edge of the vinyl sticker and gently lift it off the surface. The weeding tool’s fine tip allows you to navigate around delicate curves and edges, minimizing the risk of tearing or leaving behind adhesive residue.
Method 5: Apply Pressure on the Transfer Tape
If the vinyl sticker is not adhering well to the transfer tape, you can use a simple yet effective technique to improve the bond. After applying the transfer tape to the vinyl design, gently apply pressure using a squeegee or the edge of a credit card.

By pressing the transfer tape firmly onto the vinyl, you ensure a strong and secure bond between the two layers. This method prevents the vinyl from lifting or separating from the transfer tape during the peeling process, resulting in a clean and successful transfer onto the desired surface.
Method 6: Peel Slowly and at an Angle
When removing the vinyl sticker from the transfer tape and applying it to the target surface, it’s essential to peel it slowly and at a 180-degree angle, as close to the surface as possible. Avoid pulling the vinyl straight up, as this can cause the vinyl to tear or leave adhesive residue.
Peeling at an angle ensures a clean and smooth removal, maintaining the integrity of the design and minimizing the chances of damage or misplacement.
Method 7: Use Isopropyl Alcohol
After peeling the vinyl sticker, you may encounter adhesive residue left behind on the surface. To effectively remove this sticky residue, use isopropyl alcohol. Apply a small amount of isopropyl alcohol to a soft cloth or cotton ball and gently rub the residue until it lifts off.
Isopropyl alcohol dissolves the adhesive without causing damage to most surfaces. However, it’s crucial to test the alcohol on a small, inconspicuous area of the surface first, especially if you are working with delicate or sensitive materials.
Method 8: Heat the Residue
If isopropyl alcohol alone is not sufficient to remove adhesive residue, you can use gentle heat to assist in the process. Apply a hairdryer or heat gun on a low setting to warm the residue slightly. This softens the adhesive, making it easier to wipe away with the isopropyl alcohol or a clean cloth.
Be cautious not to overheat the area or use excessive force, as this can damage the surface or cause the adhesive to spread. Combining heat with isopropyl alcohol is an effective approach to tackle stubborn residue, leaving your surfaces clean and ready for the next creative project.
Method 9: Avoid Using Excessive Force
When peeling vinyl stickers or removing adhesive residue, it’s crucial to avoid using excessive force or pulling too aggressively. Vinyl stickers adhere well, and yanking them off can cause damage to the surface or result in a messy removal.
Be patient and take your time to peel the vinyl gently and carefully, especially when working with delicate surfaces or intricate designs. Similarly, when using isopropyl alcohol or heat, employ a gentle touch and avoid applying excessive pressure, as this may lead to unintended damage.

Method 10: Test on a Scrap Surface
Before applying vinyl stickers to the final surface, it is always advisable to test the adhesive on a scrap or inconspicuous area. This precautionary step allows you to practice your peeling technique and ensure the chosen vinyl type is suitable for your specific application.
Testing on a scrap surface also helps to determine the optimal temperature and time for using heat, as well as the compatibility of isopropyl alcohol with the material. By testing first, you can avoid potential mishaps and ensure a smooth and successful vinyl peeling process.
Conclusion
Congratulations on completing the steps to peel off vinyl stickers with Cricut! After following these instructions, you will no doubt become a master of this art form. You will be able to express your creativity and design unique projects that make use of vinyl stickers. As you peel off more vinyl stickers with a Cricut machine, you will become quicker and more efficient with handling them.
Make sure not to get lost in all the options available – always carefully select your vinyl sticker design; think practically about what works for your project best. Remember: the goal is to have fun, not just complete tasks! Follow these simple instructions outlined in this blog post about how to peel vinyl stickers cricut, and you’ll be able to get the job done with ease.