
Wrapping socks isn’t just a great way to keep your sock drawer in order, it’s also an excellent craft project for when you’re looking for something creative and fun! It may seem like a daunting task to wrap socks, but with the right tools and techniques, it doesn’t have to be!
With this blog post, we will take you through all the steps you need to know in order to master this seemingly impossible feat. Whether you are looking for a creative way of presenting a gift or simply want to get organized around your home, learning how to wrap socks correctly can make life so much easier.

From selecting the perfect wrapping paper that best complements your style aesthetic and needs down to threading a ribbon around this unique item – we’ll cover all aspects of complete sock wrapping success! All you need is this tutorial! Let’s get started!
The Benefits of Wrapping Socks
Wrapping socks may seem like a frivolous activity – after all, isn’t the point of socks that they get thrown in a drawer and forgotten about? However, this couldn’t be further from the truth! Sock wrapping provides many benefits. Here are just a few:
1. Organized Drawers
Wrapping your socks not only makes them look neater and more organized, but it also prevents the inevitable mess that can accumulate when you have an unorganized sock drawer. By taking the time to wrap each of your socks, you will be able to find what you need much faster – no more digging through piles of tangled socks!
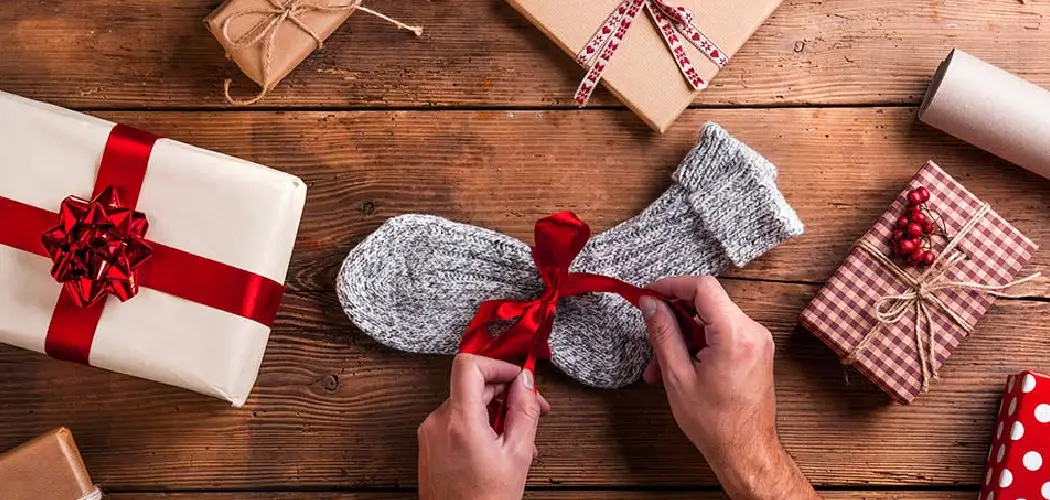
2. Perfectly Presented Gifts
Socks are a practical but often overlooked item that can make an excellent gift. With the right wrapping, you can make your sock gifts look just as presentable as any other gift. Wrapping also ensures that your socks stay looking their best for much longer – perfect for when you’re giving them away as presents!
3. Fun Craft Project
Wrapping socks is also a great way to have some fun and get creative! You can choose the perfect wrapping paper for your style, mix up colors and patterns, and be as creative as you want when it comes to finishing off the look with ribbons or other decorations.
Tools & Materials Needed
Now that you know all the benefits of wrapping socks, let’s get into what materials and tools you need to make this project a success. Here is your shopping list:
- Socks (obviously!)
- Wrapping paper
- Ribbon or twine
- Scissors
Once you have these all gathered, you’re ready to start wrapping!
How to Wrap Socks in 10 Easy Steps
Now to the best part – actually wrapping your socks! Here’s how you can do it in 10 easy steps:

Step 1: Lay the Socks
Start by laying out the sock flat on a table. Measure and cut out a piece of paper that is slightly longer than the length of your sock. While you can use any type of paper for this step, it is recommended to use wrapping paper as it provides the most professional look.
Step 2: Wrap It Up
Fold the paper lengthwise over the sock until it is completely covered. Then tuck and fold the sides in so that they meet underneath and make a neat package. Secure with tape if necessary.
Step 3: Thread the Ribbon
Cut a piece of ribbon or twine that is slightly longer than your sock and thread it through one end of the package. Pull the ribbon tight and tie it into a bow at the top, making sure to leave enough slack for you to make adjustments later on.
Step 4: Trim the Edges
Trim off any excess paper or ribbon from the package. This will give your sock a more finished and professional look. Trimming off the excess paper also makes it easier for you to tie a more secure bow.
Step 5: Secure Ends
Secure the ends of your ribbon with tape or glue. This will help ensure that your ribbons stay in place without slipping off. Make sure to check that all the edges are secure and there are no loose pieces. Also, make sure to leave enough room in case you want to untie and adjust the bow later on.
Step 6: Make It Pretty
This is where you can get creative with your wrapping! You can add decorations like pom-poms or even fabric flowers to really make your sock stand out. If you’re using ribbon, you can also try different techniques like looping and knotting to give your package an extra special touch.

Step 7: Admire Your Work
Take a step back and admire your handiwork! You’ve now successfully wrapped a sock – congratulations! Admiring your work is a great way to boost morale and show yourself that you can do amazing things with just a few supplies.
Step 8: Repeat as Needed
Now that you know how to wrap socks, it’s time to apply your newfound skills to the rest of your collection! With practice, you’ll be able to whip up a perfect package in no time.
Step 9: Enjoy the Benefits
Once you’ve wrapped all your socks, enjoy the benefits of an organized sock drawer and perfectly presented gifts! Wrapping socks is a great way to save time and add some extra style to your life.
Step 10: Celebrate Your Success!
Once you’ve wrapped all your socks, take a minute to celebrate your success! Whether you are giving away the socks as gifts or using them for yourself, knowing that you have achieved something creative and unique is an accomplishment worth celebrating.
And there it is – how to wrap socks in 10 easy steps! We hope this tutorial has helped give you some creative ideas and has shown you how easy it is to master the art of sock wrapping. So, grab those supplies and get started!
8 Maintenance Tips
Wrapping socks properly requires regular maintenance and upkeep. Here are 8 tips for keeping your wrapped socks in top condition:

- Check the wrapping periodically to make sure there are no loose threads or areas that need to be re-tied. If not, this could lead to fraying and eventual unraveling of the fabric.
- Make sure the wrapping is tight so that it won’t come undone easily. This can be achieved with proper tension and making sure the knots are tied tightly.
- Avoid using pins or other sharp objects to keep your wrapping secure–using these items could damage the fabric when removed. Instead, use twine or elastic bands to hold it in place without causing any harm.
- To help preserve the color of your socks, you can use a fabric softener or stain repellent on them before wrapping them. This will help keep their luster and protect against fading.
- If you need to store your wrapped socks for an extended period of time, make sure to place them in a cool, dry place where they won’t be exposed to direct sunlight or sources of heat.
- When you’re ready to wear your socks, make sure they are completely unwrapped before putting them on. This will help keep the fabric from stretching out and becoming misshapen over time.
- To help protect the wrapping from dirt and debris, you can place a piece of fabric or cloth over the wrapped socks when you’re not wearing them. This will keep them looking like new ones for longer.
- Finally, if your wrapped socks become dirty or stained, it’s best to spot-clean them with a damp cloth and soap before re-wrapping them again. Don’t attempt to machine wash them, as this could cause the fabric to shrink or become misshapen.
With these simple tips, you can ensure that your wrapped socks stay in perfect condition for many years to come! Plus, they’ll always look great and stylish no matter the occasion.
8 Common Mistakes to Avoid When Wrapping Socks
When it comes to wrapping socks, many people make mistakes that can lead to a less-than-optimal result. To ensure you get the best possible results when wrapping your socks, here are 8 common mistakes to avoid:

- Not smoothing out the fabric before wrapping. Make sure you take the time to smooth out any wrinkles and folds in the fabric before you begin wrapping. This will help ensure that your socks fit properly and look nice when finished.
- Not measuring the circumference of your sock before wrapping it. Measure the circumference of your sock to determine how much wrap is necessary for a secure fit.
- Not using enough wrap around the ankle or foot area of the sock. To ensure a secure fit, make sure your wrap is tight and covers the entire ankle or foot area.
- Not using enough pins when wrapping. When it comes to pinning the fabric together, be sure to use enough pins so that it stays in place while you are wrapping the sock.
- Not evenly spacing out the pins around the sock. If you want the sock to look nice, make sure that the pins are evenly distributed around the circumference of the sock.
- Not using enough fabric when wrapping. Make sure you use enough fabric to cover the entire circumference of your sock for a secure fit. Fabric that is too thin or too small may not provide the necessary support.
- Not cutting off excess fabric after wrapping. After you have finished wrapping up your sock, make sure to trim off any excess fabric to give it a nice, neat finish.
- Not using stretchy fabric when wrapping. If you need to wrap socks that have a snug fit, use a material that has some elasticity in it so the sock can move and stretch without losing its shape.
By following these simple tips on how to wrap socks and avoiding these common mistakes, you can help ensure your socks look great and fit securely around your feet!
Frequently Asked Questions
How Long Will It Take to Finish the Project?
It all depends on how long it takes you to wrap the socks. Usually, wrapping a single sock can take anywhere from 2-5 minutes, depending on your skill level and familiarity with the technique. The time needed for an entire project will depend on the size of your batch – larger batches may require more time.
What Supplies Are Needed For Wrapping Socks?
In order to wrap socks, you will need some basic supplies. These include sock yarn, a pair of scissors, needle, and thread, and a ruler or measuring tape. You may also need some additional materials, such as pins, fabric glue, or other adhesives, depending on your specific project. To ensure the best results, it is always a good idea to use the highest quality materials you can find.

Are There Any Special Techniques I Should Know About When Wrapping Socks?
Yes, there are a few key techniques you should know about when wrapping socks. First, it is important to use even tension when gathering and stitching the yarn around the sock. Also, taking your time to make sure the stitches are even is essential for creating a neat and tidy finish.
Finally, when stitching the sock closed, make sure to use a whip stitch rather than a running stitch for added strength. Following these steps will help you ensure your socks look professional and long-lasting.

Conclusion
Wrapping socks can be a tricky process, but avoiding these common mistakes can help you get the best possible results. With the right fabric and careful pinning and wrapping techniques of how to wrap socks, you will be able to achieve a secure fit that looks great!
Wrapping your socks for storage is not only a great way to keep them clean and organized, but it can also help preserve them so they last longer. And the best part? You don’t need to buy fancy stuffing material or gift boxes—just use what you already have at home.
This low-cost approach makes it easy and convenient to give your socks the TLC they deserve. So try this unique wrapping style and experience first-hand how easy it is to store your socks in an elegant way! Why not engage in some creative expression while protecting your socks from dust and dirt?
You will find that wrapping your socks in a box is both satisfying and practical. Plus, you’ll get lots of compliments when visiting someone who sees the beautifully wrapped sock packages!