
Decorating with trees is a fun and creative way to spruce up classrooms! Whether you’re looking for something simple, like paper art collages, or something more complicated, such as artificial foliage walls, there are plenty of ways to add some extra life and color to any classroom. It is important to know how to make a paper tree for classroom wall.

In this blog post, we’ll show you how to make an easy and affordable paper tree for your wall—it’s sure to liven up the room in no time! Let’s get started by gathering the materials needed and learning about the different types of trees available so you can pick one that best suits your needs.
What is a Paper Tree?
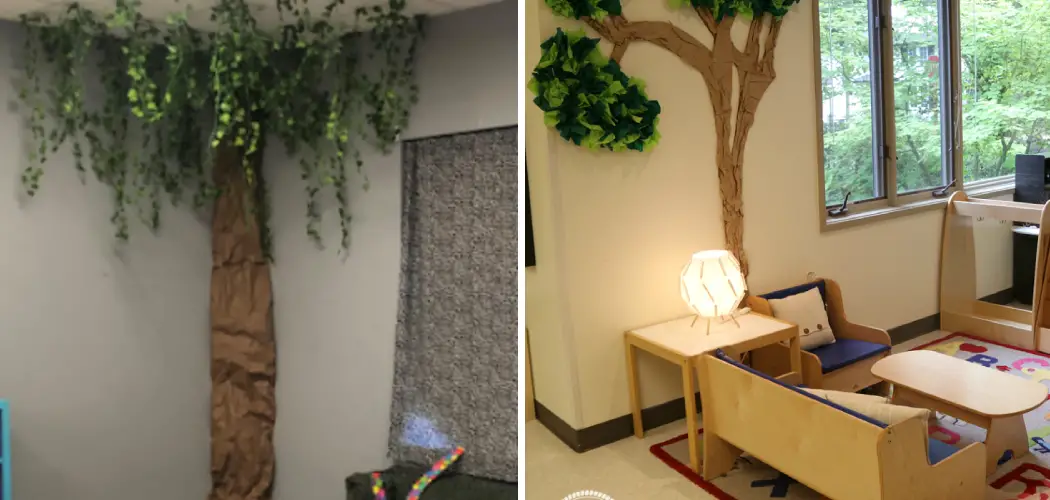
A paper tree is a decorative piece made out of paper that resembles the structure and appearance of a real tree. It can be used for various purposes, such as classroom decoration, stage backdrops, or even as props for plays and performances. Making a paper tree is an inexpensive and creative way to add some natural elements to your classroom’s walls. With just a few materials and some patience, you can create a beautiful paper tree that will brighten up any room. You can also make it a fun activity for your students and have them help in the process!
Why Do We Need a Paper Tree for Classroom Wall?
Adding a paper tree to your classroom wall has many benefits. Not only does it add visual interest and color, but it also serves as an educational tool. You can use the paper tree to teach your students about different types of trees, their parts, and their functions in nature. It also encourages creativity and imagination among students as they can make their own paper trees and add their personal touch to the classroom’s decor.
You can also use the paper tree as a teaching aid for various subjects, such as science, art, and math. For example, you can have your students label the different parts of the tree and learn about their functions in a science lesson. In an art class, they can create colorful leaves and flowers to add to the tree or even make their own unique paper trees with different techniques and materials. The possibilities are endless!
Tools You Will Need:
Scissors:
A good pair of scissors is a must-have for this project. Make sure they are sharp and easy to handle, as you will be working with different types of paper that may require precise cutting.
Cardstock or Construction Paper:
For the tree trunk and branches, you can use cardstock or construction paper in various colors such as brown, black, or even green if you prefer a more colorful tree.
Tissue Paper:
Tissue paper is perfect for creating the leaves of your paper tree. You can choose different shades of green to give your tree a more realistic look.
Glue or Tape:
To secure the different pieces of paper, you will need some glue or tape. If working with younger students, it may be safer and easier to use tape instead of glue.
Optional Materials:
Pencil:
If you prefer to have a sketch or outline of your tree before cutting and assembling, you may want to have a pencil handy.
Markers or Crayons:
For more detailed and colorful trees, you can use markers or crayons to add texture and shading to the tree trunk and branches.
Types of Trees You Can Make:
- 3D trees – Create a unique tree by folding, cutting, and gluing construction paper. These trees are a great way to make small forests or clusters of trees on the wall.
- Paper cutout trees – Cut out large tree shapes from colored construction paper, then glue them onto a white poster board or foam board to create a flat background. You can also add details such as leaves, branches, and roots with markers or paint.
- Printed tree templates – Print out a template of the type of tree you want to make and cut it out, then glue it onto a white poster board or foam board for a unique and easy way to create your paper tree.
9 Steps Guide on How to Make a Paper Tree for Classroom Wall:
1. Decide the Type of Tree
Making a paper tree for the classroom wall can be an exciting project! First, decide which type of tree you’d like to make. There are many possibilities, from a traditional deciduous tree to something more exotic such as a palm or other tropical plant. From there, gather the materials you need to build it.

Depending on the type of tree picked, supplies may include construction paper in various colors, tape, glue, and markers. It is important to remember that precision and patience will help ensure the final product looks as good as possible! With careful crafting and attention to detail, your paper tree will be an amazing addition to the classroom wall.
2. Cut Out Your Tree Shapes
Creating a paper tree for your classroom wall is an easy and inexpensive way to add some color and dimension to the room! Start by picking the color of paper you would like to use for your paper tree. You can even mix it up, using various colors and prints if you’d like. Cut out your tree shapes from construction paper, either with scissors or as a die-cut shape.
If you are making a 3D paper tree, fold and cut each piece before assembling it. Once all the pieces have been cut, start attaching them, transitioning from flat shapes to 3-dimensional ones – pour a glue mixture into small cups or dishes (with supervision) so that your students can apply glue themselves.
Hang up your paper tree in its designated area and admire the beautiful artwork created by you and your students!
3. Glue the Tree Shapes
Creating a paper tree for the classroom wall is a fun and easy craft project that children can participate in. Before beginning, you will need to gather tree shapes that are cut out of construction paper or card stock, some glue, and a white poster board or foam board. It’s time to glue the tree shapes onto the board.
You can arrange them any way you’d like, providing ample opportunity for creativity! If desired, you could also decorate the trees with sequins or other decorations to add more detail. Once finished, your paper tree craft project can stand proud on your wall as a unique work of art.
4. Add Details
Making a paper tree for the classroom wall can be a fun and creative way for students to express their individuality. All you need is a poster board, markers or paint, glue, and any other materials such as glitter or embellishments, to add dimension. You can start by cutting out a trunk from the poster board, then add branches from there. Cut out curved shapes of various sizes and staple them onto the tree for branches.

For added effect, small details such as leaves, special shapes cut from scrapbook papers, or other craft papers can be glued onto the branches for that extra pop of color and texture.
If adding roots to represent a strong foundation of knowledge is desired, simply draw roots on the bottom of your tree trunk with markers or paint and they will look as if they are growing right out of your wall! This would be a great team-building activity where each student decorates their branch while working together to achieve the same goal. Get creative and have fun!
5. Cut Out a Background Shape
Crafting a colorful paper tree for the classroom wall is an easy and fun way to add decoration. To begin, select a piece of white poster or foam board to serve as the base. Then use construction paper in your favorite colors to cut out a background shape for the tree — such as a circle, square, triangle, or star – and stick it on the poster board with glue or double-sided tape.
Once that’s done, start tearing small pieces of construction paper into green shapes to create foliage. Cut out crazy patterns or colored shapes to decorate the trunk and branches of the tree, and if you like, you can even add a few colorful birds perched on its branches.
This easy project is sure to enliven your classroom walls while offering students the opportunity to hone their creative skills!
6. Trace Around the Shape
You can make a unique decoration to brighten up your classroom wall with just a tree-shaped stencil and some paper. To begin, find a stencil or draw the shape of your tree on a piece of paper. Lay your tree shape on top of construction paper in either one solid color or experiment with different hues for contrast.
Trace around the edges with a pencil and carefully cut it out. Once you have multiple cutouts, glue them together to construct your 3D paper tree – the perfect wall art for any budding artist’s room!
7. Glue the Tree Into the Background
Adding a vibrant paper tree to your classroom wall is sure to make any dull lesson more enjoyable! To begin, simply gather together green construction paper of assorted colors for the leaves and brown for the trunk. Once individual leaf shapes have been cut out and affixed with glue onto a large sheet of white paper, the wooden trunk can be added next.
After the trunk is securely glued, decorate the tree with leaves on its branches and even a few colorful flowers. Once completed, you can then hang it up on the wall using tape or adhesive putty.
8. Encourage Student Participation
Creating a paper tree for the classroom wall is an excellent opportunity to let students participate in art projects that will be proudly displayed. Start by gathering all the necessary supplies–including various colors of construction paper, scissors, glue and markers–and then invite students to start cutting out their tree shapes and gluing them onto a larger sheet of paper.
Encourage students to get creative with their trees by adding unique details such as animals or different types of leaves. This is not only a great way to decorate the classroom but also to promote artistic expression and teamwork among students. Make sure to give each student a chance to contribute and watch as their individual paper trees come together to form one beautiful piece of artwork for everyone to enjoy!
9. Experiment with Different Tree Shapes
Creating a paper tree for your classroom wall is an exciting project that can be customized in countless ways. In addition to traditional tree shapes, you can also experiment with different types of trees such as palm trees, cherry blossom trees, or even a whimsical fantasy tree.
Encourage students to explore their imagination and come up with unique designs for their paper trees. This not only adds variety to your classroom decor but also allows students to think outside the box and exercise their creativity. Who knows, you may even discover a hidden talent for tree sculpting in your classroom!
Be sure that the trunk is either lightly sketched or traced onto the paper beforehand to keep the tree looking neat and orderly. After everything has adhered together, tape your crafty masterpiece to the chosen wall space in your classroom for an eye-catching display that’s sure to inspire creativity among all ages!
Enjoy your beautiful paper tree!

With just a few simple supplies and some creativity, you can create a unique and beautiful paper tree for your classroom wall. Whether you choose to make 3D trees, paper cutouts, or printed templates, these trees are sure to bring some extra life and color into the room!
How Much Will It Cost?
The cost of making a paper tree for your classroom wall will depend on the materials you use and how elaborate you want to make it. However, most supplies can be found at an affordable price at local craft or dollar stores. If you already have some basic crafting supplies on hand, such as scissors and glue, the cost will be even lower.
Overall, making a paper tree is a budget-friendly way to decorate your classroom and engage students in a fun and creative activity. Plus, with proper care and storage, your paper tree can last for multiple school years, making it a cost-effective option for classroom decor. So go ahead and give it a try – you may just discover a new favorite decoration for your classroom! Happy crafting!
Frequently Asked Questions
Q1: How to Make a 3d Paper Tree?
A1: Making a 3D paper tree has never been easier! With just a few supplies and some simple folding, anyone can make an eye-catching 3D paper tree that is perfect for craft projects, decorations, and more.
Start by cutting out eight rectangular pieces of green construction paper – make sure they are all the same size. Divide each of those rectangles into four smaller rectangles by folding them half vertically and then half horizontally.
Unfold the rectangles and then fold each of the outer corners towards the center to create a triangle shape. After you have completed that step for all eight pieces of paper, overlap them to form rings around the base to construct your tree trunk.
Finally, glue or tape each ring together and use scissors or a sharp blade to cut away the excess from the bottom so it stands up straight. Now you have an easy-to-make 3D paper tree!
Q2: How to Make Paper Cutouts for Your Tree?
A2: If you’re looking for a unique way to decorate your Christmas tree this year, why not try making paper cutouts? From angels to snowflakes and stars, adding homemade decorations to your holiday display adds a special touch of joy.
All that you’ll need is a sheet of cardstock or heavy construction paper and some simple craft tools – an X-acto knife, scissors, and markers or paint. Once you’ve drawn the shape you’d like on the paper, using the X-acto knife trace along your outline as closely as possible.
With safety scissors cut along the traced line, then use markers or other creative materials to make your decoration colorful and beautiful! Hang your finished creations on the branches of your tree with a loop of thread or yarn, and bask in the wonderment of all who admire them!

Q3: Can I Use Other Materials Besides Construction Paper?
Yes, you can definitely get creative and use different materials for your paper tree. Some ideas include using fabric, tissue paper, or even recycled materials such as old magazines or newspapers. Just make sure to consider the weight and durability of the material before choosing it for your project.
Conclusion
After you’ve followed these simple steps, you’ll have a bright and cheerful paper tree to liven up your classroom throughout the year! You should carefully determine how to make a paper tree for classroom wall.
These make great gifts for other teachers, too. Be sure to add your personal touch to make each one unique. Do you have any other creative ideas for using construction paper? We’d love to hear them in the comments below!
You Can Check It Out To Make a Paper Cat in the Hat Hat
You Can Check It Out To Make Stars Out of Paper Bags
You Can Check it Out to Make Holes in Fabric for Crochet Edging