
If you’ve ever wanted to add a unique decorative touch to your home or let your creative side fly, then learning how to make a bunny butt might be what you’re looking for!
This easy-to-follow guide will show you how to make an adorable, long-lasting decoration piece that will bring smiles and delight to everyone who sees it. From choosing the right materials, creating the shape with simple tools, and adding personality with paint and extra embellishments, this project is fun for all ages.

Plus, at the end of it, you’ll have a mini bunny sculpture made entirely from scratch – sounds exciting, doesn’t it? So grab some supplies, get crafty, and let’s start making bunnies!
Necessary Items
To make a bunny butt, you will need the following items:
- Styrofoam ball (3 inches in diameter)
- White and light pink craft paint
- Paintbrushes (one medium and one small)
- Adhesive glue
- Scissors
- White pom-pom or cotton balls
- Foam sheets in white, light pink, and light blue
- Black marker or paint
- Craft knife (optional)
- Hot glue gun and glue sticks (optional)
10 Steps on How to Make a Bunny Butt
Step 1: Preparing the Materials
Before getting started, gathering all necessary materials and ensuring you have a clean workspace is important. This will help avoid any unnecessary interruptions during the crafting process. First, choose a styrofoam ball with a diameter of approximately 3 inches. This will be the base for your bunny butt.
Next, make sure you have white and light pink craft paint, as these will be the main colors for this project. If desired, You can also add other pastel colors, such as light blue or purple. Additionally, ensure a medium and small paintbrush, scissors, adhesive glue, and a black marker or paint for adding details.

If you want to add extra embellishments such as flowers or bows, have foam sheets in different colors and a hot glue gun with glue sticks.
Step 2: Painting the Base
Using a medium paintbrush, cover the styrofoam ball with white paint. You may need multiple coats to cover the ball and avoid any visible styrofoam fully.
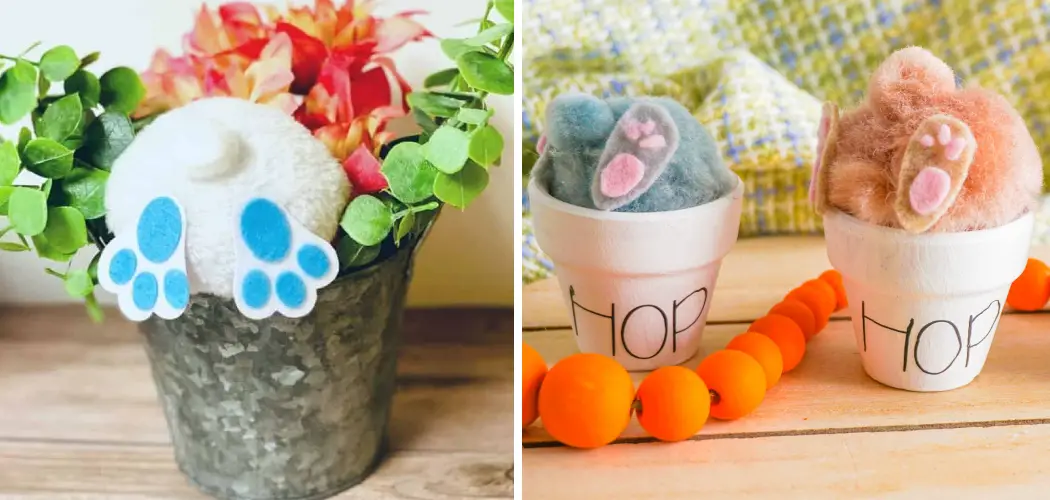
Once the white paint is dry, use the small paintbrush to add a thin layer of light pink paint on the bottom half of the ball. This will create the illusion of bunny feet sticking out from under the fur.
Step 3: Creating Bunny Feet
Cut two small ovals out of white foam sheets and two slightly smaller ovals out of light pink foam sheets to make the bunny feet. These will be the pads of the bunny’s feet.
Attach the pink ovals on top of the white ovals using adhesive glue or a hot glue gun. Then, use scissors to round off one end of each oval to create the shape of bunny feet.
Step 4: Adding Details to Bunny Feet
Using a black marker or paint, draw small dots on the pink ovals to create the look of paw pads. You can also add small lines on the white oval to give the appearance of fur.
Next, attach the bunny feet to the bottom of the styrofoam ball using adhesive glue or a hot glue gun. Make sure to position them at the bottom of the ball, with the pink part facing outward.

Step 5: Making Bunny Ears
To make the bunny ears, cut two long ovals out of white foam sheets and two smaller ovals out of light pink foam sheets.
Attach the pink ovals on top of the white ovals using adhesive glue or a hot glue gun. Then, use scissors to round off one end of each oval to create the shape of bunny ears.
Step 6: Adding Details to Bunny Ears
Using a black marker or paint, draw small dots on the pink ovals to create the look of inner ear coloration. You can also add small lines on the white ovals to give the appearance of fur.
Next, attach the bunny ears to the top of the styrofoam ball using adhesive glue or a hot glue gun. Make sure to position them near each other and slightly bend forward.
Step 7: Making a Tail
To make the tail, use either a white pom-pom or a small cluster of cotton balls. Attach it to the back of the styrofoam ball using adhesive glue or a hot glue gun.
Step 8: Adding Personality
Now that the basic bunny butt shape is complete, it’s time to add some personality! You can use paint, markers, or foam sheets to create eyes, cheeks, and mouth features. Get creative and make each bunny unique!
Step 9: Optional Details
To add flair to your bunny butt, you can create accessories such as a bow tie or flower crown using foam sheets and a hot glue gun.
You can also use a craft knife to carve out small details like the shape of toes on the bunny feet or whiskers on the face.
Step 10: Display and Enjoy!
Once you have completed all the steps, your bunny butt will be displayed. You can place it on a shelf mantle or hang it on a wall using adhesive hooks. It also makes for a cute addition to an Easter basket or as a gift for someone special.
Learning to make a bunny butt is a fun and easy way to add some cuteness and personality to your home decor. It’s also a great activity for kids or anyone looking to explore their creative side. This project can be customized in many ways, making each bunny unique and special. So gather your materials, follow the steps, and make some adorable bunny butts together!

8 Care Tips for Your Bunny Butt Sculpture
Taking care of your bunny butt sculpture will ensure that it stays in good condition and lasts for years. Here are some tips on how to properly care for your cute creation:
1. Avoid Direct Sunlight
Avoid placing your bunny butt in direct sunlight, which can cause the paint to fade over time. If you want to display it near a window, use curtains or blinds to block out direct sunlight.
2. Use Gentle Cleaning Methods
If your bunny butt gets dusty, avoid using harsh cleaning methods such as wiping with a wet cloth. Instead, gently remove dirt or dust from a soft brush or compressed air.
3. Keep Away from Moisture
Moisture can cause damage to your sculpture, so make sure it is kept in a dry area. If you live in a humid climate, consider using a dehumidifier to prevent moisture from affecting your bunny butt.
4. Handle with Care
Do so gently when moving or handling your bunny butt, and avoid using excessive force. This will help prevent any accidental damage.
5. Store in a Safe Place
If you need to store your bunny butt for a while, wrap it in tissue paper or bubble wrap and place it in a sturdy box. Store it in a dry area away from any potential hazards.
6. Avoid Extreme Temperatures
Extreme temperatures can also cause damage to your sculpture, so avoid placing it near sources of heat or cold. This includes fireplaces, heaters, and air conditioners.

7. Use Protective Covering
Consider using a protective covering such as a display case or glass dome to keep your bunny butt safe from dust and potential accidents.
8. Regularly Check for Damage
Make it a habit to regularly check your bunny butt for any signs of damage, such as chipping paint or loose pieces. If you notice anything, make repairs immediately to prevent further damage.
By following these care tips, your bunny butt sculpture will remain in great condition and continue to bring joy and cuteness to your home for a long time.
FAQs About Bunny Butt Sculptures
Can I Use Different Materials to Make a Bunny Butt Sculpture?
Absolutely! While this guide uses foam sheets, you can also use other materials like clay or paper mache. Just make sure to adjust the steps accordingly.
How Long Does It Take to Make a Bunny Butt Sculpture?
The time it takes to make a bunny butt sculpture depends on the individual and their experience level. For beginners, completing all the steps may take around 1-2 hours.
Can I Make Different Sizes of Bunny Butt Sculptures?
Yes, you can make bunny butt sculptures in different sizes by adjusting the size of the styrofoam ball and foam sheets used. This can also be a fun way to create a family of bunnies with varying sizes.
Can I Use Different Colors for My Bunny Butt Sculpture?
Definitely! You can use any colors you like to customize your bunny butt sculpture. Get creative and make it unique to your style or decor.
What Other Accessories Can I Add to My Bunny Butt Sculpture?
The options are endless! You can add accessories such as a bow tie, flower crown, or Easter eggs. Just make sure not to overload your sculpture and keep it balanced.
Conclusion
Bunny butt sculptures are a fun and easy way to add cuteness and personality to your home decor. With just a few materials, you can create adorable and unique bunnies that will bring joy all year round. Remember to take care of your sculpture by following our tips, and don’t be afraid to get creative with different materials and accessories!
Now that you know how to make a bunny butt sculpture and care for it properly, it’s time to get crafting! This adorable decoration is perfect for Easter or as a year-round addition to your home. Have fun exploring different design options, and let your creativity run wild.