
There are many reasons why you should learn how to make a plinko board. First and foremost, it’s a fun and entertaining game that can be enjoyed by people of all ages. Whether you’re hosting a family gathering or throwing a party with friends, having a plinko board will definitely add an element of excitement and laughter.

The main advantage of making a plinko board is that it serves as an entertaining and engaging game for people of all ages. It can be used in various settings such as parties, carnivals, or even in classrooms to teach probability and basic physics principles. Read this blog post to learn how to make plinko board.
Materials You Will Need
- Calculator
- Pen or pencil
- Paper
- Highlighters
- Sticky notes
- Index cards
- Laptop or tablet
- Internet access
- Textbooks or study materials
- Timer
Step-by-Step Processes for How to Make Plinko Board
Step 1: Inspect Materials
Before beginning to make your Plinko board, you will first need to ensure that you have all of the necessary materials. This includes a large sheet of wood (or other material such as cardboard), nails or screws, pegs or dowels, and a variety of small objects for the Plinko chips to bounce off of.
Step 2: Choose a Design
Next, you will need to decide on a design for your Plinko board. This could be something simple like a basic grid, or you can get creative and make a more intricate design. Using a measuring tape and saw, carefully measure and cut the wood to fit your desired size and shape for the Plinko board.

Step 3: Drill Holes
If your design calls for additional holes, use a drill to carefully create them in the wood. These will serve as the starting points for the pegs or dowels that will hold up the Plinko chips. For a more polished look, consider sanding down any rough edges and painting the wood in your desired color or design.
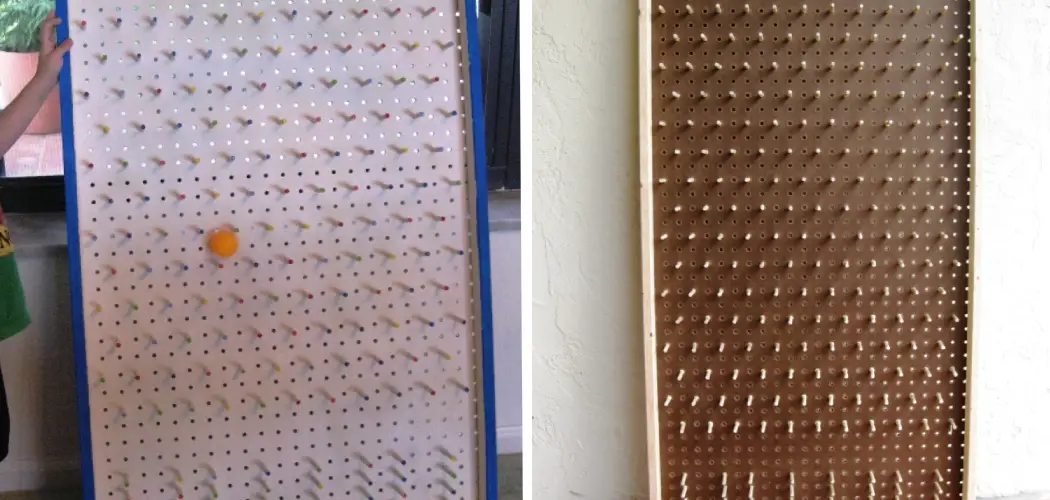
Step 4: Attach Pegs or Dowels
Using a hammer and nails, attach the pegs or dowels to the back of the Plinko board. Make sure they are evenly spaced and securely attached. If you want to make your Plinko board more challenging, you can add obstacles such as ramps or bumpers for the Plinko chips to bounce off of.
Step 5: Place Objects at Bottom
At the bottom of your Plinko board, place a variety of small objects such as beads, marbles, or coins. These will serve as the landing points for the Plinko chips. Before using your Plinko board, take the time to test it out and make any necessary adjustments. This will ensure that the chips bounce properly and the game is fair for all players.
Now that your Plinko board is complete, it’s time to gather some friends and family and start playing! See who can get the most points or come up with fun challenges to add an extra level of excitement.
Precautions for How to Make Plinko Board

- Wear safety goggles when using power tools or handling sharp objects to protect your eyes.
- Use caution when handling nails and screws, as they can cause injury if not handled properly.
- Make sure the surface where you are working is stable and secure to prevent accidents.
- Before painting or sanding, make sure the area is well ventilated to avoid inhaling dangerous fumes.
- Have a first aid kit nearby in case of any minor injuries.
- If involving children in the making or playing of the Plinko board, supervise them at all times and explain safety precautions to them.
- When using power tools, always follow proper safety instructions and guidelines.
By following these precautions, you can ensure that your experience of making a Plinko board is not only fun but also safe. Remember to always prioritize your safety and that of others when working on any DIY project.
How Long Does It Typically Take to Construct a Plinko Board?
The construction time for a Plinko board can vary greatly depending on a variety of factors, such as the size and complexity of the board, the tools and materials available, and the skill level of the person constructing it. On average, however, it can take anywhere from a few hours to several days to construct a basic Plinko board. This includes gathering materials, measuring and cutting the pegs and board, assembling the frame, and adding any additional features or decorations.

For more complex designs or larger boards, it can take even longer – potentially several weeks. This is especially true if the board is being constructed by hand without the use of power tools. Additionally, construction time may also depend on the purpose of the Plinko board.
If it is being used for a school project or as a fun activity, the construction process may be more relaxed and spread out over several days. However, if it is being built for a specific event or competition, the timeline may be much tighter and require more focused effort to complete in a timely manner.
Are There Any Common Mistakes to Avoid While Constructing a Plinko Board?
Yes, there are several common mistakes that should be avoided when constructing a Plinko board. These include:
1. Using the Wrong Type of Materials
Plinko boards require specific materials to function properly, such as acrylic or plexiglass for the playing surface and pegs made of plastic or metal. Using the wrong type of materials can affect the movement of the chip and result in an inaccurate game.
2. Improper Placement of Pegs
The spacing between pegs is crucial for creating a fair and balanced game. If the pegs are placed too close together or too far apart, it can affect the trajectory of the chip and lead to biased results.
3. Using Incorrect Measurements
Properly measuring and cutting materials is essential for constructing a Plinko board. Any errors in measurement can result in an uneven playing surface, which can greatly impact the outcome of the game.

4. Neglecting to Add Bonus Slots
Bonus slots are an important aspect of Plinko boards as they provide players with additional opportunities to win prizes. Forgetting to include these bonus slots can significantly decrease the excitement and appeal of the game.
5. Not Considering Safety Precautions
Plinko boards involve the use of heavy materials and moving objects, so it’s important to take proper safety precautions during construction. This includes wearing protective gear and ensuring that all parts are securely attached to avoid any accidents or injuries.
To ensure a successful and enjoyable game, it’s important to carefully plan and construct your Plinko board, avoiding these common mistakes. So, it is always recommended to double-check measurements, use the correct materials, and follow safety protocols while building a Plinko board.
Are There Any Recommended Techniques for Painting and Decorating the Plinko Board?
Yes, there are various techniques that can be used for painting and decorating a Plinko board to make it more visually appealing. Some popular options include:
1. Using Stencils
Stencils allow for precise and consistent designs to be painted onto the board. This is a great option if you want to incorporate logos or specific images onto your Plinko board.

2. Adding Color Gradients
Using different shades of the same color can create a gradient effect on the board, making it more visually interesting. This technique is also great for creating depth and dimension on the board.
3. Incorporating Patterns or Textures
Adding patterns or textures to the playing surface can add an extra element of fun to your Plinko board. This could be achieved through the use of stickers, decals, or even sanding down parts of the board for a unique texture.
4. Experimenting with Different Painting Techniques
Using different techniques such as splatter painting, sponge painting, or layering can create unique and eye-catching designs on your Plinko board.
5. Adding Lights
Incorporating LED lights onto your Plinko board can make it stand out and add a fun element to the game. This is especially effective if you plan on using your Plinko board for events or parties.
When decorating your Plinko board, it’s also important to consider the overall theme or purpose of the board. Whether it’s for a specific event or just for personal use, incorporating elements that tie into the theme can make your Plinko board even more special and memorable.
Are There Any Maintenance Tips for Keeping the Plinko Board in Good Condition?
Yes, there are a few maintenance tips that can help keep your Plinko board in good condition and ensure it lasts for many games to come. These include:
1. Regularly cleaning the playing surface
Over time, dust and debris can accumulate on the playing surface of the Plinko board, affecting the movement of the chip. It’s important to regularly clean the board with a soft cloth to keep it in top condition.

2. Inspecting and Replacing Pegs When Necessary
The pegs on the Plinko board can wear down over time, especially if they are made of plastic. It’s important to inspect them regularly and replace any worn or broken ones to maintain a fair game.
3. Storing the Board Properly
When not in use, it’s important to store the Plinko board in a safe and dry location. This will help prevent any damage from occurring, such as warping or cracking of the playing surface.
4. Checking for Loose or Damaged Parts
Before each use, it’s important to check for any loose or damaged parts on the Plinko board. This includes the pegs, frame, and any bonus slots. Tightening or repairing these parts will ensure a smooth and safe game.
By following these maintenance tips, you can extend the lifespan of your Plinko board and continue to enjoy it for years to come. So, be sure to take care of your Plinko board and regularly check for any necessary repairs or replacements to keep it in top condition.
Conclusion
In conclusion, while making a Plinko board may seem like a fun and easy project, it does have its fair share of disadvantages. One major disadvantage is the potential for the game to become repetitive and lose its excitement after playing multiple times. Additionally, building a Plinko board requires some skill and precision, which may be challenging for those who are not experienced in woodworking or DIY projects.
Furthermore, the materials and tools needed for this project can be expensive and may not be readily available for everyone. This could limit the accessibility of making a Plinko board for some individuals. I hope reading this post has helped you learn how to make plinko board. Make sure the safety precautions are carried out in the order listed.
You Can Check It Out to Knit Checkerboard Pattern