
Are you ready to turn your messy pile of crochet pieces into stunning showpieces? Looking for the best way to showcase all of that hard work put into creating handmade items? Do you want to create a professional-looking finish on your crocheted items?
Look no further than ironing – yes, ironing! Many crocheters know how important blocking is when finishing a project, but if you’re like most newbie stitchers, there’s a good chance that you don’t quite understand just exactly what “ironing” entails.

Whether you’re after a gorgeously smooth fabric for a dress or garment or are simply hoping to neaten up the edges of something like amigurumi projects, pressing will be beneficial.
If you are in need of some direction when it comes to navigating this garment-prep process, then we have fabulous news: staying ahead of those unraveled seams and stiffening up those fraying edges could be easier than ever with these tips on how to expertly iron crochet! In this blog post, we’ll discuss the best way how to iron crochet—so read on! Ready? Let’s get started.
Why Do You Need to Iron Crochet?
1. To have a Polished Look
Ironing is a great way to give your crochet pieces the extra bit of definition, neatness, and shape that can make all the difference in the overall look. It’s also an essential step for making sure that you get the most out of blocking if you’re looking to finish a project.
Ironing will help set stitches in place, provide structure and uniformity when it comes to the size and shape of a piece, and generally give your project the neatest finished look.
2. To Stop Unraveling Edges
Ironing crochet projects can help you prevent unraveled edges. The heat from the iron will help set stitches in place and make them more secure, thus preventing any further unraveling. This is especially important with more delicate projects like lacy shawls or baby blankets.
3. To Make Finishing Easier
If you’re a crocheter who likes to make garments, ironing can help make finishing easier. Ironing will help smooth out the fabric and keep it in place so that when you sew on buttons, zippers, or other closures, the fabric won’t shift around. This will make it easier to finish your project with a professional-looking result!
Choosing the Iron for Crochet Ironing
1. Steam Iron
When it comes to ironing crochet, a normal flat iron simply won’t do the job. You need an iron with steam capabilities for the best results. It is important to select one that has adjustable temperature settings and is suitable for use on delicate fabrics. Look for an iron that has a small head size so you can easily access tight spaces and more intricate pieces of work.

2. Pressing Surface
Having a flat and even pressing surface is important when ironing your crochet pieces. If you are using an iron without steam, you can use a traditional wooden pressing board or simply lay the fabric on top of an ironing board.
When using a steam-iron, however, it is best to use either a specialised pressing cloth or an old cotton sheet, as this will help to create a more even and consistent finish.
3. Start Ironing
Once you’ve chosen your iron and pressing surface, it’s time to start ironing the crochet. Depending on the type of material used in the project, select the most suitable heat setting on the iron. Test the iron on a scrap piece of fabric first to make sure it won’t scorch or damage the yarn
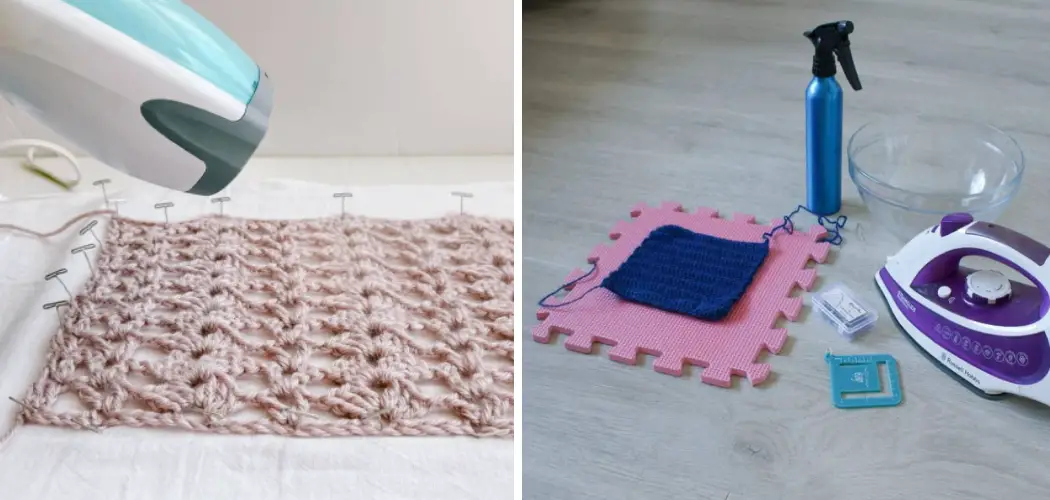
Required Items for Ironing Crochet
When it’s time to iron your crochet pieces, there are a few items you should have on hand before you get started.
- An iron: Non-steam irons are ideal, but steam irons can work as well. Whichever you have available will do the job!
- An ironing board or other flat, heatproof surface: You’ll need a place to press your crochet pieces flat.
- A pressing cloth or sheet: This is optional, but it helps keep your iron clean and your crochet free from scorch marks.
- A needle or blunt object: This is used to help press out stubborn wrinkles in more intricate pieces.
Now that you have all of the necessary items, it’s time to get ironing!
How to Iron Crochet in 10 Steps
Step 1: Prepare the Work Area
Prepare your work area by laying down a pressing cloth or sheet and an ironing board in a clean, well-lit space. Remember to set your iron to the appropriate setting for the type of yarn used (see Yarn Label Guidelines for more information).

Step 2: Pre-heat Iron
Turn on your iron and allow it to preheat. Check the temperature with a thermometer if you have one available. The ideal temperature range is between 250°F and 300°F. Preheating the iron ensures that it is at its hottest when you start pressing.
Step 3: Prep Crochet Piece
Lay your crochet piece flat on the pressing cloth or sheet and smooth out as many wrinkles as possible with your hands. Take extra care to ensure all edges are straightened, and areas of intricate stitching are flattened down.
Step 4: Press Lightly
Press the iron lightly on top of the crochet piece. Do not move it back and forth; instead, lift up and press again in a different area until you have gone over the entire piece. Remember to use an even pressure throughout.
Step 5: Use Steam or Water as Needed
For stubborn wrinkles, add a bit of steam or water to the ironing cloth. Do not use too much, as this can ruin your crochet piece. Using a bit of water can help to relax the fibers for easier pressing.
Step 6: Use a Needle or Blunt Object
For more intricate pieces, use a blunt object such as a knitting needle to press out stubborn wrinkles. Place the needle on top of the area that needs smoothing and lightly press down with your iron. Move it up and down until the area is completely smooth.

Step 7: Let the Crochet Piece Cool Down
Once you are finished ironing, allow your crochet piece to cool down before picking it up or moving it. This helps ensure that all of the wrinkles have set into place and will remain flat after being moved.
Step 8: Repeat as Needed
If you need to, repeat the ironing process until all of the wrinkles have been removed from your crochet piece. Some pieces may require multiple rounds of pressing to get them completely smooth.
Step 9: Starch if Desired
For extra crispness and stiffness, you can add some starch to your finished crochet pieces. Spray starch can be purchased from most craft stores and is easy to apply. Use a light misting motion when spraying, taking care not to saturate the fabric.
Step 10: Enjoy Your Finished Project
Once your crochet piece has been ironed and starched (if desired), it’s time to enjoy your finished project! Ironing your crochet pieces can make a huge difference in the look and feel of your work, so take some time to revel in its beauty.
Ironing crochet is an important part of finishing that often gets overlooked. With these steps and helpful tips on how to iron crochet, you now have all the tools you need to iron your crochet projects with confidence!
8 Common Mistakes to Avoid When Ironing Crocheted Pieces

Ironing a crocheted piece may seem like an easy task, but there are common mistakes you should be aware of so that your project looks its best. Here are 8 tips to keep in mind when ironing your crocheted pieces:
- Don’t use too much heat. You want to press the fabric lightly, not scorch it. Use low or medium-heat settings to avoid damaging your crochet. Using too high of heat can cause your crochet to shrink or burn.
- Don’t iron on the wrong side of the fabric, as this will leave an impression in the crochet. Always make sure you are pressing on the right side of the fabric for a crisp finish. Don’t iron over decorative stitches because the pressure can flatten them.
- Don’t move the iron too quickly or erratically, as this can cause your crochet to stretch out of shape. Move the iron slowly and systematically, so that it evenly distributes heat and presses down on all parts of the project evenly.
- Don’t use an old or worn-out iron. The soleplate of your iron should be clean and smooth, so it won’t snag or pull on the crochet.
- Don’t press too hard with the iron. You don’t want to flatten out any decorative stitches or make any permanent creases in the fabric, so just use a light touch when pressing down on the project.
- Don’t forget to use a pressing cloth. A pressing cloth is essential for protecting and preserving the fibers of your crochet. It also absorbs moisture so that you can crisp up any damp areas quickly and efficiently.
- Don’t press too much in one area. Ironing an area repeatedly or too long can cause the fabric to pucker or become distorted, so make sure to press lightly and move the iron often.
- Don’t forget to let your crochet cool before moving it. This will help set the stitches so that they won’t stretch out of shape while being handled or worn.
By avoiding these common mistakes when pressing your crocheted pieces, you’ll be able to create beautiful projects with a professional-looking finish!
6 Safety Measures You Should Take

To ensure your safety when ironing your crochet projects, here are some tips to keep in mind:
- Set up a safe work area by ensuring the ironing board is stable and on a flat surface with plenty of lighting. Avoid any places that might be flammable. Also, make sure there is enough space to move your arms freely.
- Plug the iron in a secure place away from water sources and always unplug it when not in use. Make sure you are using the appropriate power voltage for your iron, as well as a reliable extension cord.
- Use the correct temperature setting for the fabric you are working with – always refer to the care label on your yarn or pattern instructions. Select a lower heat setting if possible, and keep in mind that too high of heat could damage delicate fibers like cotton, silk, and bamboo.
- Place a towel or pressing cloth between the crochet piece and the iron; this will help to protect the fibers and prevent scorching. Protecting the iron from crochet by using a pressing cloth is also recommended.
- Work in small areas at a time and move the iron slowly to ensure even heat. Be aware of the steam and do not breathe it directly – always keep your face away from the fabric when steaming or pressing.
- Never leave the iron unattended; it is important to stay close and keep an eye on it at all times. Make sure you are aware of your surroundings when handling the hot tool, especially if there are children or animals nearby.
Ironing your crochet projects can be a great way to bring out their beauty, but always take extra precautions for safety. Take your time to make sure the fabric is pressed properly and evenly, and remember to check the care label or any pattern instructions before ironing.
Conclusion
Overall, ironing crochet is a great way to give your projects a neat and professional look. We hope that with these steps on how to iron crochet, you’re now able to take on any project – no matter the stitch – and tackle it with confidence! Don’t forget, if you’re ever in doubt, just consult your pattern for guidance on what temperature setting should be used for that particular yarn.
And finally – don’t forget the importance of pressing as you go; by ironing often between rounds and rows, you’ll be able to maintain control over the finished shape of your project and ensure it turns out exactly how you envision it. So, now that we’ve discussed ways to conquer those crocheted wrinkles, let’s get started ironing our next project!