
Are you looking to flex your creative muscles with a fun DIY project? Why not try crocheting a dragonfly? It is an enjoyable pastime, and you’ll also have the perfect decoration for your home or outdoor space. Plus, this project requires basic crochet skills and materials, making it ideal even if you’re just starting as an amateur crafter.

Whether you’re looking for a unique gift or just want to work on something new, here’s our complete guide for how to crochet a dragonfly.
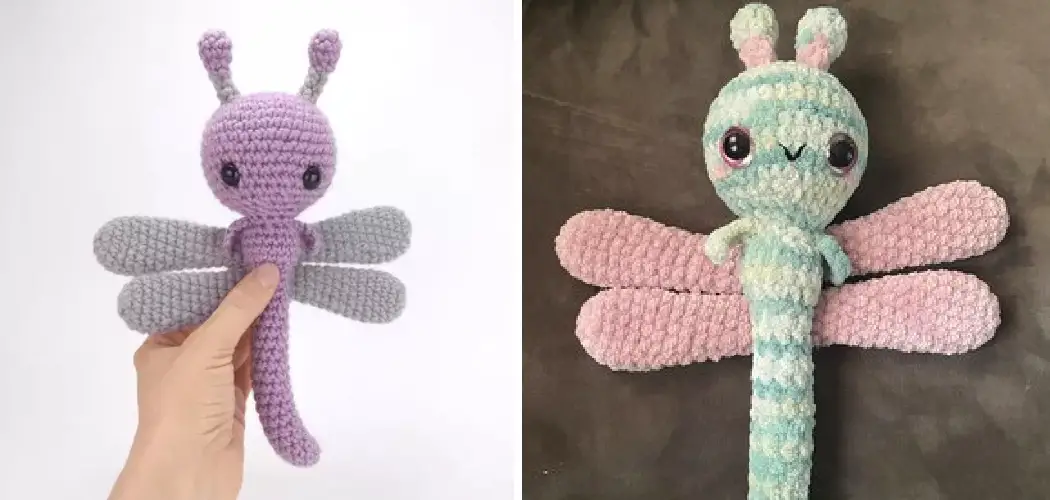
In this blog post, we’ll guide you through all the steps necessary to bring this winged creature to life! So grab some yarn and a crochet hook, and let’s start crafting this charming little dragonfly!
What Will You Need?
Before starting your project, make sure to gather all the necessary materials. Here’s what you’ll need:
- A crochet hook in a size that matches your chosen yarn (this can usually be found on the label of your yarn)
- Yarn in two contrasting colors for the wings and body
- Scissors
- Tapestry needle for weaving in ends
- Polyester fiberfill stuffing
Once you have all the materials collected, it’s time to start crocheting!
10 Easy Steps on How to Crochet a Dragonfly
Step 1: Crochet the Body

Start by chaining 6 stitches and then join them with a slip stitch to form a circle. Next, make 12 single crochet stitches into the center of your ring for a total of 12 stitches. Join these stitches with a slip stitch to form a circle.
Step 2: Crochet the Wings
Now, you’ll start crocheting the wings of your dragonfly. Make 18 single crochet stitches for each wing in two contrasting colors (you will need to do this for both wings). Make sure to leave enough space between the rows so they are easy to attach later.
Step 3: Attach the Wings
Once you have finished crocheting both wings, it’s time to attach them. To do this, use a tapestry needle and yarn in one of your contrasting colors. Sew each wing onto the body so that they are lying flat against the sides of the body.
Step 4: Stuff the Body
After attaching the wings, you will need to stuff the body to give it shape. Take a handful of polyester fiberfill stuffing and gently fill the body of the dragonfly through the opening you left. Make sure not to overstuff, as this may make the dragonfly look bulky. Once you have filled the body to your liking, sew the opening shut using the tapestry needle and matching yarn.
Step 5: Crochet the Eyes
Now it’s time to make the dragonfly’s eyes. Start by creating two small circles using black yarn and a tapestry needle. Typically, you’ll make six single crochet stitches into a magic ring for each eye. Once you finish, secure and cut off the ends. Then, using the tapestry needle and a small piece of the body color yarn, sew each eye onto the front of the dragonfly’s body.
Step 6: Crochet the Antennae
Let’s create some antennae to add realism to your crochet dragonfly. Chain 10 stitches with the body color yarn, then slip stitch it back into the first chain to form one antenna. Repeat this process once more for the second antenna. Attach the antennae to the top of the dragonfly’s head using your tapestry needle and some yarn.
Step 7: Add Details
Now that the crochet dragonfly is starting to take shape, it’s time to add some details. Use your tapestry needle and some yarn in a contrasting color to create two small lines for the veins on each of its wings. You can also use this same yarn to embroider tiny spots onto the sides of the body.
Step 8: Secure the Stitches
Once you are done adding all the details, it’s time to secure the stitches. This will help keep your dragonfly in one piece and ensure that none of its parts unravel over time. To do this, use a tapestry needle and some matching yarn to weave in any loose ends from your project.
Step 9: Add the Final Touches

For a final touch, you can add some beads of your choice to the dragonfly’s eyes. To do this, use the tapestry needle and some yarn in a contrasting color to string on two small beads for each eye. Then, simply knot the ends together so that they are firmly attached.
Step 10: Finalize Your Project
And there you have it! You now have a beautiful crochet dragonfly that’s ready to be displayed and admired. Whether you give it away as a gift or keep it for yourself, this charming little creature will surely bring some joy into your home.
By following this guide, you’ve learned to crochet a dragonfly in 10 easy steps. So grab some yarn and get started on your own project! Who knows—you may even want to make several for extra decoration around the house.
5 Additional Tips and Tricks
- When crocheting your dragonfly, make sure to use a small hook size. The smaller the hook size, the finer and more detailed stitches you can make.
- Don’t be afraid to experiment with colors! Dragonflies come in lots of different shades and patterns, so feel free to mix and match yarns or even combine them with beads for an extra special touch.
- Use a contrasting color for the eyes of your dragonfly to make them stand out and look even more realistic!
- Make sure you use tight stitches to ensure that your dragonfly holds its shape over time.
- For an extra special effect, you can attach long, thin pieces of wire or string to the wings of your dragonfly to make them look like they’re flying.
With these tips and tricks, you’ll be ready to crochet the perfect dragonfly! Whether you’re a beginner or an experienced crocheter, this project will surely bring plenty of joy. Have fun and happy crafting!
5 Things You Should Avoid

- Refrain from using dull or blunt crochet hooks, as they can make your work harder and result in less precise stitching.
- Avoid using too many colors. While dragonflies are colorful, using too many shades might make your crochet work look chaotic.
- Take the tension check. Getting the tension right is essential for your dragonfly to hold its shape.
- Avoid rushing through the project. It’s detailed work and needs patience and precision.
- Pay attention to the yarn label. It provides important information like the recommended crochet hook size and care instructions for the yarn.
By steering clear of these common pitfalls, you can ensure a smoother crocheting experience and end up with a beautiful, hand-crafted dragonfly.
6 Different Design Variations
- For a classic look, crochet an all-white dragonfly with black eyes and a hint of yellow in the wings for contrast.
- Make your dragonfly extra colorful by using multiple shades and hues. A rainbow or pastel color palette can create a very eye-catching effect!
- Create two-toned dragonflies with contrasting colors in the wings, body, and antennas.
- Give your dragonfly an exotic touch by using beads to decorate the wings or even give it a shimmery appearance.
- If you’re feeling creative, try creating 3D dragonflies in which each wing is separated from the body and connected via string or wire. This will give your dragonfly a realistic look and make it appear as if it’s in flight!
- For a unique look, try crocheting dragonflies in different shapes and sizes. You could even make a mini dragonfly by using thinner yarn and smaller crochet hooks!
These are just a few possible variations of how to crochet your own dragonfly. Be creative and have fun with the design – you’ll be surprised by what you can come up with!
What are the Best Types of Yarns for Crocheting Dragonflies?
When choosing yarn for your dragonfly project, opt for lightweight and fine yarns. Examples of popular yarns used are cotton, linen, mohair, or silk. These materials provide a delicate texture that gives the dragonfly an organic shape and look. You can also experiment with different colors to create vibrant patterns that mimic dragonfly wings.
Another option is to use thin wire or string, which can be attached to the wings of your dragonfly to give them an extra special effect. Just make sure you choose a color that complements the yarn and stands out against the background.
No matter which yarn and colors you choose, make sure always to pay attention to the yarn label. It provides important information to help you determine the best type of yarn for your project.
How Can You Make 3D Dragonflies?
For a more realistic look, consider making your dragonflies in 3D! It requires slightly more time and effort than crocheting, but the results are worth it. Here are some steps to get you started:
- Start by creating a 2-dimensional base shape using double crochet stitches. This will be the body of your dragonfly.
- Once the body is complete, add crochet stitches around the sides of your base shape to create a 3-dimensional effect.
- Then, attach wings, antennae, and other details to give your dragonfly a lifelike look.
- Finish off by giving your creation eyes with beads or small crocheted circles.
With this guide, you can create an amazing 3D dragonfly using just a few basic supplies and your own crocheting skills! Have fun crafting your new fuzzy friend!
How Can You Display Your Dragonflies?
Once you’ve completed your crochet dragonfly, the next step is finding the perfect way to display it! Here are some ideas to get you started:

- Mobiles: One of the most popular ways to display crochet dragonflies is by hanging them from a mobile. This can be as simple or as elaborate as you like. You can use a branch, an embroidery hoop, or a wire hanger as the base for your mobile, and then add string or fishing line to hang your dragonflies.
- Wall Art: Consider framing your crochet dragonfly in a shadow box or a clear frame to create a piece of unique wall art. You can also create a collage of several dragonflies in different sizes and colors for a more dramatic effect.
- Garden Decor: If you’ve used yarn suitable for outdoor use, your crochet dragonflies can make beautiful additions to your garden. Attach them to sticks or garden stakes and place them among your flowers and plants.
- Gifts: A crochet dragonfly can make a thoughtful handmade gift. Whether it’s a birthday, anniversary, or just because, a crochet dragonfly is a special way to show someone you care.
- Holiday Decorations: Crochet dragonflies can be used as delicate and beautiful decorations during the holiday season. Attach them to your Christmas tree your holiday wreath, or use them as unique gift tags.
No matter how you display your crochet dragonflies, they will surely bring charm and whimsy to your home or garden. Enjoy the process of creating and displaying your unique art pieces!
Conclusion
Crocheting a dragonfly is a great way to bring a bit of nature into your home or onto your porch. Once you have mastered the technique, you could utilize it for countless projects, from adorning accessories and garments with touches of playfulness to creating artful decorations for the home.
With a little practice, almost anyone can master the skill in no time at all. So what are you waiting for? Treat yourself to an afternoon of crafting and give crochet dragonflies a try! You will be amazed at how beautiful and delicate they can look when embedded within any project or worked up as a standalone piece of art. All that’s left for you to do now is grab some yarn, gather the right supplies, get creative—and enjoy!
Hopefully, the article on how to crochet a dragonfly has helped you gain the confidence to try this craft for yourself. From choosing the right yarn to assembling a unique 3D dragonfly, all the necessary steps have been provided to make mastering this skill as enjoyable and easy as possible. So what are you waiting for? Get crocheting!