
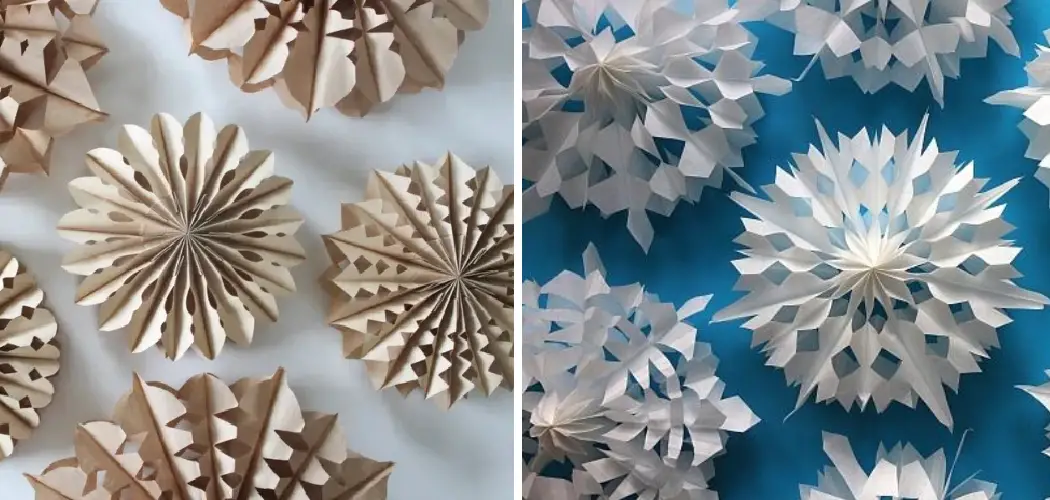
Have you ever been enchanted by the simple beauty of paper bag snowflakes? Whether making them with children or trying to perfect your own craftsmanship, it is a timeless tradition that can be enjoyed year after year. In this blog post on how to hang paper bag snowflakes, I will show you step-by-step how to create beautiful and unique paper bag snowflake decorations!

From picking out the right type of bags to mastering folding techniques, we’ll cover all the basics for crafting stunning snowflakes. So grab some plain white lunch bags and let’s get started creating these magical winter treats!
Needed Materials
Given below are the materials required to make paper bag snowflakes:
- White lunch bags
- Scissors
- Hole punch
- String or ribbon
- Glue
11 Step-by-step Instructions on How to Hang Paper Bag Snowflakes
Step 1: Choose and Prepare Your Bags
The first step to making paper bag snowflakes is selecting the right type of bag. For best results, choose plain white lunch bags that are made from lightweight paper material. You will also want to make sure that each bag has an opening at either end so you can easily fold them up and create your desired shape.
Once you have selected your bags, you will need to prepare them for folding. Start by cutting off the top and bottom of each bag so that they are flat. This will make it easier to create the shape of your snowflake.

Step 2: Fold Your Bags
Next, fold each bag in half lengthwise. To ensure that all of your snowflakes look similar, make sure the crease is even. You can also use a ruler and pen to draw lines on the bag before folding it for extra precision.
At this point, you will also want to mark where the center of the bag is located with a pen or marker. The center point will be necessary when creating your snowflake pattern later on.
Step 3: Create the Star Shape
Now that your bags are folded and ready to go, it’s time to make the star shape. To do this, start by folding one corner of the bag towards the center point you marked earlier. Then, fold in the opposite corner so that it meets in the middle.
Continue folding each side of the bag inward until you have a star shape. You will want to make sure that all of the points are even and symmetrical.
Step 4: Cut Your Snowflake
Once you have created your star shape, it’s time to start cutting out your snowflake! Start by lightly snipping each point of the star with scissors. This will create the basic shape of your snowflake.
Once your star shape is cut, you can start to create the details of your snowflake by cutting out random shapes and patterns. For example, you could make tiny triangles or circles for a more intricate look. Just be careful not to cut too much as this may ruin the overall design of the snowflake.
Step 5: Punch Holes in Your Snowflake
Once your snowflake has been cut to perfection, you will need to punch small holes on the sides of the bag. These holes are necessary for hanging the snowflakes later on.

Using a hole punch or scissors, make two tiny holes at either end of the star shape. Make sure that the holes are evenly spaced and large enough for your string or ribbon to fit through.
Step 6: Open Up Your Snowflake
Now that your snowflake has been cut and punched, it’s time to give it some dimension. Gently open up each of the points of the star shape until you have a full snowflake with detailed edges. You may want to use a pen or pencil to help push the paper out from the center point.
Once you have opened up all of the points, your snowflake should be almost complete!
Step 7: Secure Your Snowflake
To make sure that your snowflake keeps its shape, add a bit of glue to each corner of the star shape. This will help secure the paper together and keep it from unraveling. Once your snowflake is glued, set it aside to dry before moving on to the next step. But be sure to move quickly as the glue can dry fast!
Otherwise, your snowflake may come undone and ruin the entire design.
Step 8: Attach String or Ribbon
Now that your snowflake is dry and secured, it’s time to attach the string or ribbon for hanging. Start by cutting two equal lengths of string or ribbon that are long enough to tie around your snowflake once it is hung up. Next, thread the string through each hole and tie a knot at either end to secure the strings in place.
It’s important to make sure that your strings are evenly spaced and firmly attached so they can hold the snowflake in place when hung.
Step 9: Fluff Your Snowflake
After you have attached the strings, give your snowflake a fluff to add some volume. Starting at the center, gently pull out each point of the star shape so that it is more voluminous and full. Once all of your points are fluffed up, your paper bag snowflake is complete!
It’s now time to hang up your snowflake and admire the beauty of your masterpiece!

Step 10: Hang Your Snowflakes
Now that you have finished making your snowflake, it’s time to hang it up. Start by tying each end of the string or ribbon onto something sturdy and secure. You can hang your snowflakes on a tree, windowsill, doorway or anywhere else that needs some extra festive charm!
However, make sure that the string is tied firmly in place so that your snowflake doesn’t fall off.
Step 11: Enjoy Your Snowflakes
The last step is to simply enjoy your beautiful paper bag snowflakes! You can make a single snowflake or a whole bunch of them to create an enchanting and festive winter display. Always be sure to hang them up somewhere that gets lots of natural light so they can shine and sparkle! You could even string multiple snowflakes together to create a garland or mobile.
Once you have mastered the craft of making paper bag snowflakes, you can even start creating different shapes and sizes for extra fun! Have fun crafting these magical decorations that will bring winter joy to your home.
Following these steps on how to hang paper bag snowflakes, you will be able to make your own paper bag snowflakes right at home with minimal materials and effort. These decorations look great in any setting and are sure to add some extra winter cheer during the holidays. So don’t wait — give it a try today!
Tips and Tricks
- When Creating Your Snowflake Design, Make Sure to Use Sharp Scissor Blades for the Most Precise Cuts.
- To Create More Intricate Patterns on Your Snowflake, Use a Hole Punch or Craft Knife for Extra Detail.
- When Hanging Your Paper Bag Snowflakes, Try to Make Sure That They Are Evenly Spaced and Not Too Close Together. This Will Help Them Look Nice and Best Show Off Their Design!
- If You’re Making a Lot of Snowflakes, Try Alternating the Colors and Patterns for a Unique and Eye-catching Display.
- Have Fun With It! Use Your Imagination to Create Snowflake Designs That Reflect Your Own Style and Personality. The Possibilities Are Endless!
Frequently Asked Questions
Q: How Long Does It Take to Make a Paper Bag Snowflake?
A: It generally takes about 30 minutes to create one paper bag snowflake, depending on how intricate your design is.
Q: Can I Use Other Materials to Make a Paper Bag Snowflake?
A: Yes, you can use other materials such as patterned paper or colored tissue paper to create your snowflakes. However, plain white paper bags tend to work best and give the most traditional look.

Q: What is the Best Way to Hang My Snowflakes?
A: The best way to hang your snowflakes is by attaching a string or ribbon at each end of the star shape and tying it securely around something sturdy. This will ensure that your snowflake stays in place and looks nice for a long time!
Q: Can I Make Bigger Snowflakes?
A: Yes, you can make bigger snowflakes by using larger paper bags. Just remember to use a thicker string or ribbon when attaching the snowflake so that it is able to handle the weight of the larger paper bag. You can also increase the size of your snowflake by cutting out more intricate designs. Have fun experimenting with different sizes and shapes to create your own unique snowflakes!
Happy crafting, and enjoy your beautiful paper bag snowflakes!
Conclusion
Overall, hanging paper bag snowflakes is a fun activity for both kids and adults alike. Not only is it an enjoyable craft to make, but it’s also easy on the wallet and looks just as good as its more expensive counterparts. Depending on your desired aesthetic, you can choose to either use white paper bags or current color ones.
You can also give everyone in the family their own unique snowflake or design together a batch of beautiful ones that represent different members of the family while adding a bit of holiday cheer to your home.
With some creativity and imagination, you can now make a snowflake paper bag that will truly stand out this holiday season! Thanks for reading this article on how to hang paper bag snowflakes.