
Hand stitching binding on a quilt is a satisfying and essential step in the quilting process. Binding not only provides a neat and finished edge to the quilt but also adds durability and stability. While machine stitching is a common method, hand stitching allows for more control and precision, resulting in a beautiful and professional finish.

In this article, we will guide you through the process of how to hand stitch binding on a quilt.
From preparing the binding strips and attaching them to the quilt to meticulously sewing the binding by hand, we’ll provide you with step-by-step instructions and useful tips to achieve a flawless and long-lasting binding. Get ready to enhance the beauty and longevity of your quilt as we explore the art of hand stitching binding.
The Final Step of Binding a Quilt as a Crucial Part of Finishing the Edges
Once you have completed the quilt top, batting and backing layer of your quilt, it is time to attach the binding. This helps secure all three layers and gives the edges a neat finish. Hand stitching binding can seem daunting for some people but with a few tips it will be easy to achieve beautiful results!
The first step in hand stitching binding is to prepare the binding. Cut 2 1/2 inch strips of fabric from your quilt backing material and sew them together using a diagonal seam. Press all of the seams open then fold the binding in half lengthwise, wrong sides together and press again.
Once you have your binding ready, attach it to your quilt. You can start anywhere along an edge but make sure that you leave enough extra fabric at each end so that you will be able to join it together neatly at the end.
Sew the binding to one side of the quilt with right sides facing up and use a scant quarter inch seam allowance for best results. Carefully clip any excess batting or backing material away from the edges about 4-5 inches apart.
The Beauty and Durability of Hand-Stitched Binding
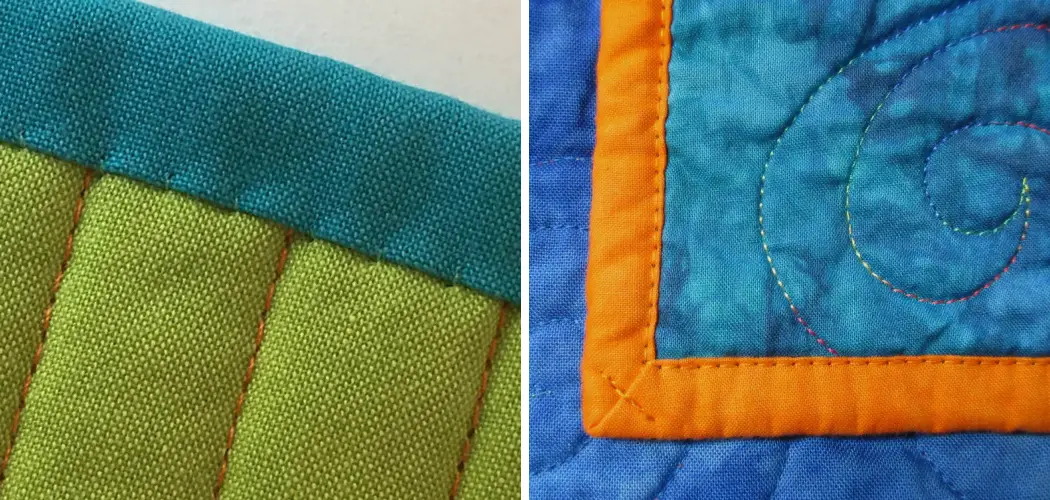
Hand-stitched binding is one of the most popular finishes for quilts. It gives a beautiful, finished look and adds durability to your quilt. Hand-stitched binding also provides an opportunity for personalization as you can choose from a variety of techniques and colors to complete the edge of your quilt. With just a few steps, you’ll be ready to add this special touch to your quilting project!

Begin by preparing the raw edges of the quilt top and backing fabric with an overcast stitch or zigzag stitch before attaching the binding strips. This will help secure all layers together smoothly and prevent any fraying on the edges when handling or washing your quilt. After that, position the binding around the edge of your quilt top and pin or baste in place to hold it securely.
Next, you’ll need to begin stitching the binding onto the quilt using a slip stitch. This is done by folding the binding over so that the raw edges of both sides are touching each other, then bringing your needle up through all layers at one corner and pulling it back down through just one layer on the opposite side.
Keep this same pattern as you work around the corners of your quilt and towards its center. Once you reach where you began, trim any excess off from both sides before folding back over again and stitching a few more stitches to secure into place.
You can also choose to hand stitch the binding to the quilt with a whip stitch. This is done by making small stitches traveling back and forth, from one side of the fabric to the other. It may take more time than a slip stitch but can give a decorative edge that will be sure to make your quilt stand out!
Ensure that the Quilt Top, Batting, and Backing Are Properly Aligned and Trimmed
Before beginning the hand stitching process, it is important to ensure that all three layers of a quilt — the top, batting and backing — are properly aligned with each other. Start by laying the quilt out on a flat surface and smooth out any wrinkles or puckers.
Make sure that the edges are square and even; if necessary, trim any excess material away with scissors. Once you’ve ensured that everything is properly aligned, pin the three layers together along the edges using safety pins. This will help keep everything in place while you’re stitching.
Although binding is traditionally done with cotton batting, you can also use polyester which will make the quilt slightly more durable.
Now that you’ve aligned and pinned everything together, it’s time to start stitching! Start by threading a needle with strong thread, such as cotton or nylon. Place the needle at one corner of the quilt top and begin stitching across the edge in a straight line towards the opposite corner.
Make sure to stitch through all three layers securely — pay particular attention when stitching through thick parts of material such as corners or seams. Continue this process until you have stitched around all four sides of the quilt.

10 Methods How to Hand Stitch Binding on a Quilt
Method 1: Prepare the Binding
Cut fabric strips for the binding, ensuring they are wide enough to cover the quilt’s edges with some extra for folding. Join the strips together by sewing them diagonally to create a continuous length. Press the seams open for a smooth finish. Fold the binding in half lengthwise and press it to create a neat crease.
Method 2: Attach the Binding to the Quilt
Place the binding along one edge of the quilt, aligning the raw edges. Leave a few inches of binding free at the beginning, as this will be used to join the ends later. Pin the binding in place, and start sewing with a ¼ inch seam allowance, leaving the starting tail free.
Method 3: Miter the Corners
When you approach a corner, stop stitching ¼ inch before reaching the edge. Fold the binding up at a 45-degree angle, creating a mitered corner. Then fold it back down, aligning the binding with the next edge of the quilt. Continue stitching, starting at the corner and securing the fold in place.
Method 4: Join the Binding Ends
When you reach the starting point, stop stitching a few inches away. Trim the excess binding, leaving a few inches of overlap. Open both binding ends and place them right sides together. Sew a diagonal line from corner to corner to join them. Trim the excess and press the seam open.
Method 5: Finish Sewing the Binding
Continue stitching until you reach the starting point. Backstitch to secure the stitches, and remove the quilt from the machine. Gently fold the binding over the quilt’s edge, covering the raw seam. Pin it in place, ensuring the folded edge extends slightly beyond the stitching line.

Method 6: Thread the Needle
Thread a hand-sewing needle with a thread that matches the binding. Knot the thread, leaving a tail. Insert the needle into the folded edge of the binding, hiding the knot between the layers. Bring the needle out through the binding and quilt layers, starting a few inches away from the joining seam.
Method 7: Blind Stitch the Binding
Take small stitches through the folded edge of the binding and the quilt, about ¼ inch apart. Insert the needle back into the binding fold, angling it towards the quilt’s edge to keep the stitches invisible. Repeat this blind stitch along the entire length of the binding.
Method 8: Secure the Corners
When you reach a corner, fold the binding neatly around the mitered corner. Take a few extra stitches in the corner to secure it firmly. Ensure the stitches are hidden within the binding’s folded edge.
Method 9: Hide Thread Ends
To secure the thread ends, take a few small stitches close to the last stitch. Insert the needle through the quilt’s layers, coming out a short distance away. Gently pull the thread to bury the end within the layers. Trim any excess thread close to the fabric.
Method 10: Press and Enjoy
Once the binding is fully stitched, press the quilt to set the stitches and give it a finished look. Check for any loose areas or missed spots and fix them as needed. Finally, step back and admire your beautifully hand-stitched binding on the quilt, knowing it will add durability and charm for years to come.

Conclusion
Whether you are a first-time quilter or an experienced crafter, take the time to master hand stitching binding and you will be rewarded with beautiful and lasting quilt edges. With the power of the stitch in your hands, nothing can stop your creative side! Hand stitching binding around your quilts takes patience and dedication, but the results are totally worth it.
For each and every quilt project you complete, feel proud that you’ve put so much craftsmanship in creating a treasured piece! Now that you have all the tips on how to hand stitch binding on a quilt, go forth and spread your creative energy: use this skill to make beautiful pieces for yourself or as gifts for others. The options are endless – let’s get started!