
Picking up stitches for borders can help create beautiful, consistent edges on all of your knitting projects. Whether you are adding a border to sweaters and hats or edging blankets and shawls, the ability to perfectly place these stitches makes all the difference. With practice, picking up stitches along an edge can become second nature.

Picking up stitches for borders is an easy and efficient way to add a finished edge to any knitting project, such as afghans, sweaters, or scarves. It can provide additional stability and durability to the project and give it more dimension and visual appeal.
Picking up stitches for borders is also an excellent way to hide the cast-on and bind-off edges of the project for a more polished look. You can find step-by-step instructions on how to pick up stitches for border in this blog article.
How Often Should You Check Your Work as You’re Picking Up Stitches?
It is important to periodically check your work as you pick up stitches for a border. This will ensure that the edges of the border line up correctly and that there are no errors in the pattern.
You can use a ruler or tape measure to check each stitch or count the number of stitches between each edge to ensure it is correct. Additionally, it is important to check the tension of each stitch; if the stitches are too loose or too tight, it can throw off the entire pattern.
Once your stitches are picked up correctly, and you have checked them over for errors, you can move on to the next step in finishing your project. Overall, regularly checking your work is a key step in ensuring that your project turns out the way it should. Taking the time to check each stitch and ensure they are even will go a long way toward producing a beautifully finished piece.
Step-by-step Instructions for How to Pick Up Stitches for Border
Step 1: Inspect the Edge
Take a look at the edge of your knitted fabric to determine how many stitches you need to pick up. Using a crochet hook, cast an equal number of stitches onto the right needle as needed for the border.
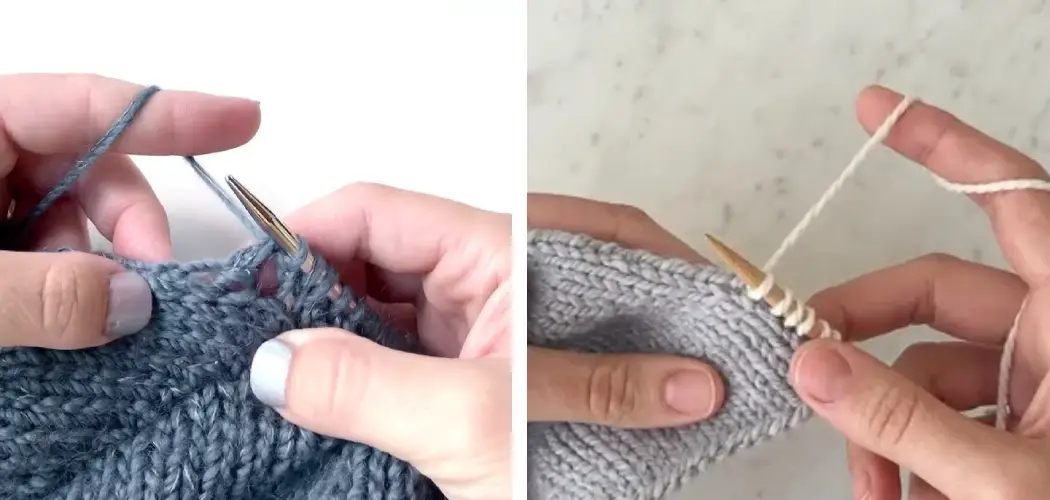
Step 2: Align the Needles
Place the right needle alongside the edge of the fabric, with both tips pointing in the same direction. Ensure that all your stitches line up correctly and that you haven’t skipped any of them.
Wrap the yarn around the tip of your right needle, from back to front. Bring the tip of the needle onto the inside edge of two stitches. Insert the needle between these two stitches and wrap it around again to pull a loop on through.

Step 3: Pull Up a Stitch
Pull up an entire stitch one by one. Ensure that the stitches don’t bunch up as you continue to pick up more of them. Once all your picked-up stitches are on the needle, use a yarn needle to secure each stitch in place. This will prevent them from becoming loose and slipping off your knitting needles.
Step 4: Match the Stitches
You should have picked up an equal number of stitches on both sides of the border. Make sure that all these stitches match in size and tension as well. To finish off, weave in all your yarn ends using a tapestry needle. This will ensure that all the picked-up stitches stay firmly in place on the border of your fabric.
Step 5: Check for Tension
Pull gently on your knitting needles to check that none of the stitches are too tight or loose. You should be able to pull them out easily, but they shouldn’t be too loose, either. Once all the stitches are secure, take a few knitting rounds to ensure they don’t come undone during use. This will also help with creating an even border.
When finished, you should have an even border that looks neat and tidy. With practice, picking up stitches for knitting borders will become second nature.
Tips for How to Pick Up Stitches for Border
- Make sure to use the correct size needle and the appropriate yarn for the project.
- Gently pull your working yarn until you have a loop of yarn that is long enough to pick up one stitch.
- Use the tip of the right needle to pick up each stitch, ensuring that you slide it through loops properly.
- Avoid pulling too tightly when picking up a stitch, or it may cause the fabric to bunch.
- Counting stitches is important when picking up stitches for a border, so you know how many stitches have been picked up and how many are left to be done.
- Make sure that your tension remains even when picking up stitches by holding both needles together.
- Use a stitch marker to track where you are in the pattern.
- Review your work after picking up stitches for the border to ensure that all stitches have been picked up correctly and evenly.

How Many Times Should You Go Around the Edge of Your Project When Picking Up Stitches?
When working on a knitting project that requires picking up stitches along the edge of your work, it is important to know how many times you need to go around the edge. This number will vary depending on the pattern and size of your project.
Generally speaking, you should aim to pick up one stitch for every stitch along the edge and one stitch in the seam between stitches. When picking up your stitches, it’s best to use a crochet hook or tapestry needle, depending on the yarn you’re working with and how easy it is to slip them through.
It is important to pick up your stitches evenly, making sure each stitch appears similar to the one before and after. This will ensure that your border looks neat even when you finish your project. It may take some practice to learn how to pick up the right number of stitches, but with a bit of patience, you should be able to get the hang of it.
How Do You Determine the Best Way to Pick Up Stitches Along Different Edges?
When picking up stitches for a border, you will need to determine the best way to pick them up based on the type of edge that you are working with. If you are working along a straight edge, then it’s generally considered best practice to pick up the same number of stitches as there are rows or columns in the fabric. This will ensure that the border has a neat, even look.

If you are working along an uneven edge, such as when following the shape of armholes or necklines, then it’s often best to pick up stitches in each row at regular intervals until the desired width is reached. This is known as “bar-tacking,” and it allows the border to outline the shape of the fabric without creating bulges or points.
When picking up any type of stitch along a curved edge, such as when working along the neckline or hemline of a garment, it is best to use an even smaller needle size than usual. This will help to ensure that the stitches lie smoothly along the edge while still being tight enough to provide a neat finish.
How Do You Avoid Picking Up Too Many or Too Few Stitches?
In order to avoid picking up too many or too few stitches for your border, it is important that you count the number of stitches carefully. Before picking up any stitches, do a test swatch by knitting a gauge swatch with the same yarn and needles you plan on using for your project.
This will help you determine how many stitches you will use per inch. Once you know this number, use a stitch marker to mark off the stitches per inch in your project so that you can easily count how many stitches total you need for your border.
It is also important to keep track of the direction of your stitch pattern when picking up stitches for a border. If you are working in stockinette, you will need to ensure that the “V” of each stitch is facing towards you so that your border looks neat and even.
If you are working on a more complex pattern, it is important to keep track of the direction of the stitches to ensure that the pattern remains consistent throughout your project.
Finally, when picking up stitches for a border, make sure to use a knitting needle that is the same size or slightly smaller than the one you used to knit the project. This will help ensure that your order doesn’t look too large or bulky.

Conclusion
In conclusion, picking up stitches for a border can be an intimidating task. However, it can be a simple and enjoyable experience with the right tools and techniques.
You can easily achieve success by understanding what type of stitch to pick up, how much yarn is needed, and where to place the needle when picking up the stitches. I hope this article has been beneficial for learning how to pick up stitches for border. Make Sure the precautionary measures are followed chronologically.
You Can Check It Out to How to Embroider on Denim