
Are you ready to take your sewing skills to the next level? Learning how to do the buttonhole stitch can elevate any project and help you create beautiful garments with perfect details. This classic hand-stitching technique has been passed down through generations, allowing people around the world to sew functional pieces of clothing and home decor.

In this article, we’ll provide an easy step-by-step guide on how to perform a buttonhole stitch correctly so that you can add a professional touch to all your textile projects. So get ready – by the end of this post, hand stitching may soon become one of your favorite activities!
Needed Materials
Given below are the materials you will need to get started with the buttonhole stitch:
- A Needle
- Embroidery Thread or Floss in a Color of Your Choice
- Scissors
- A Piece of Fabric for Practice (You Can Use Scraps or Test Out the Stitch on a Garment You Don’t Mind Damaging)
- A Buttonhole Foot for Your Sewing Machine (Optional)
10 Simple Step-by-step Guidelines on How to Do the Buttonhole Stitch
Step 1: Preparing the Needle and Thread
To start off, you will need to cut a length of thread or floss that is about 18 inches long. This should give you enough thread to complete several stitches without having to rethread your needle. Once you have your desired length, thread it through the needle and tie a knot at the end. You can also use a double or triple thread for added strength.
Step 2: Positioning Your Fabric
Next, fold your fabric in half to create a crease in the middle. This will serve as a guide for where your buttonhole stitch should start and end. You can also mark this line with a fabric pencil if needed. But for practice purposes, the fold should suffice. It’s important to have a clear and straight line for your buttonhole stitch. This will ensure that your stitches are even and uniform.

Step 3: Bringing the Needle Through the Fabric
Begin by poking the needle through one layer of fabric at the starting point of your crease. Leave a tail of thread on the wrong side of the fabric, which will be secured when you begin your first stitch. The right side should show a small knot where the thread enters the fabric. You can choose to start from the top or bottom, whichever is more comfortable for you.
Step 4: Making Your First Stitch
Once your needle is through the fabric, it’s time to make your first stitch. Insert the needle back into the same hole but above the crease on the other side of your fabric. This will create a loop around the fold, securing the thread in place. Make sure not to pull your thread too tight, as it might cause puckering or distortion of the fabric. Otherwise, your buttonhole stitch will not sit flat.
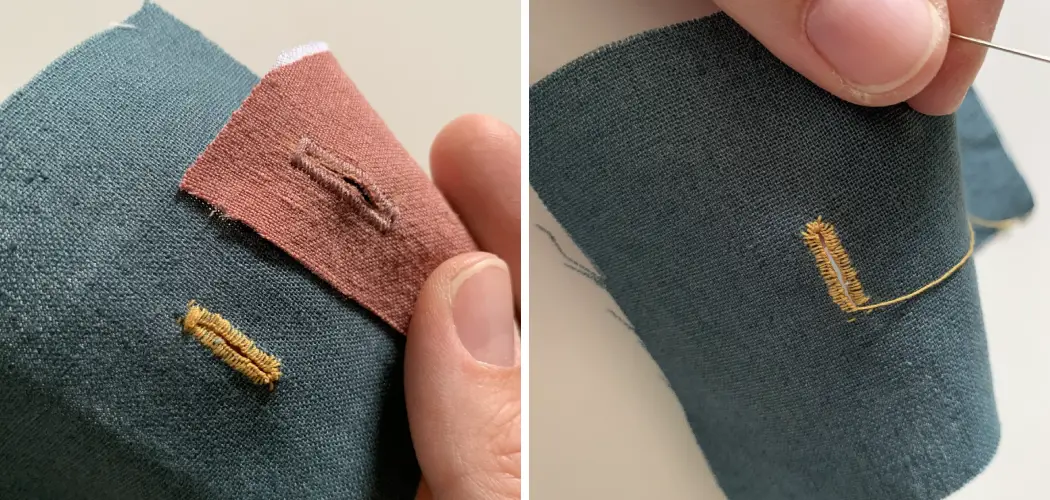
Step 5: The Buttonhole Stitch
To continue with the buttonhole stitch, bring your needle back to where you poke your first stitch through the fabric. This time, insert it above the initial thread line and pull the needle through to create a loop. Keep in mind that this loop should be smaller than your previous one. It’s important to maintain consistency in the size of your loops. However, if you prefer a more decorative look, you can vary the size of your loops to create a unique pattern.
Step 6: Repeating the Process
Repeat step 5 by bringing your needle back up through both layers of fabric, keeping your stitches as close together as possible. Remember to keep your thread slightly taut, but not tight, and to make smaller loops each time you insert the needle back into the fabric. You can experiment with different thread colors and materials to add a unique touch to your buttonhole stitch.
Step 7: Securing the Stitch
As you continue with your buttonhole stitch, make sure to pull the thread slightly at the end of each loop to create a tight and secure stitch. This will ensure that your buttonhole is strong and durable, able to withstand frequent use. It’s essential to maintain tension throughout the process. It may take some practice, but soon enough, you’ll find your rhythm and get into the flow of creating beautiful stitches.

Step 8: Finishing Your Stitch
Once you have completed your desired number of stitches, it’s time to secure the end of your thread. To do this, simply bring your needle through a loop at the back of your fabric and pull tight. Cut off any excess thread and tuck it into the loops at the back of your work to hide it. Although it may seem like a small detail, this step adds a professional touch to your buttonhole stitch.
Step 9: Using a Sewing Machine (Optional)
If you have a sewing machine with a buttonhole foot, you can easily create a buttonhole stitch with the press of a button. Simply place your fabric under the foot, select the buttonhole setting, and let your machine do the work for you. This is particularly useful if you are creating multiple buttonholes or want to add them to thicker fabrics.
Step 10: Practice Makes Perfect
As with any skill, practice makes perfect when it comes to the buttonhole stitch. Don’t be discouraged if your first few attempts do not turn out as expected. Take your time, follow the steps, and soon enough, you’ll become an expert at this classic hand-stitching technique. And remember, you can add a unique touch to your projects by experimenting with different thread colors and materials.
Following this simple step-by-step guide, you can now confidently create buttonholes for all your sewing projects. Whether you are a beginner or an experienced sewer, knowing how to do the buttonhole stitch is an essential skill that will add a professional touch to your work. So grab your materials and get stitching – who knows, it may just become your new favorite technique!
Tips
- Always Start and End Your Buttonhole Stitch With a Small Knot to Secure the Thread.
- It’s Important to Maintain Consistency in the Size of Your Loops for a Clean and Uniform Look.
- Practice on Scrap Fabric Before Attempting to Add Buttonholes to Your Garment.
- Experiment With Different Thread Colors and Textures to Add a Unique Touch to Your Projects.
- If Using a Sewing Machine, Make Sure to Test the Buttonhole Setting on Scrap Fabric First Before Using It on Your Project.
- Have Fun and Enjoy the Process of Creating Beautiful Buttonholes!

Keep in mind that the steps provided are just a guideline, and you can adjust them to fit your style and preferences. With practice, you’ll find what works best for you and develop your own techniques for creating the perfect buttonhole stitch. So keep on stitching and have fun!
Frequently Asked Questions
Q: Do I Need a Special Needle or Thread for the Buttonhole Stitch?
A: No, you can use any regular needle and embroidery floss or thread of your choice. It’s all about personal preference and the look you want to achieve. However, using a sharp needle is recommended for easier insertion through thicker fabrics.
Q: Can I Use This Stitch on All Types of Fabric?
A: Yes, the buttonhole stitch can be used on most fabric types, including cotton, denim, wool, and more. Just make sure to adjust your tension and stitch size accordingly to ensure a neat and even finish.
Q: Is the Buttonhole Stitch Only Used for Sewing Buttons?
A: While its primary use is for creating buttonholes, the buttonhole stitch can also be used for decorative purposes. It’s commonly seen on hand embroidery projects, adding texture and detail to designs. So go ahead and get creative with your stitching! Remember, practice makes perfect.

Q: Can I Use a Sewing Machine for the Buttonhole Stitch?
A: Yes, if you have a sewing machine with a buttonhole foot, you can use it to create buttonholes quickly and easily. However, if you prefer a hand-stitched look or don’t have access to a machine, the traditional method of doing the buttonhole stitch is just as effective. So whether you prefer the convenience of a machine or the beauty of hand-stitching, there’s no wrong way to create a buttonhole stitch.
Conclusion
So whether you’re a beginner seeking to learn more about how to do the buttonhole stitch, or a seasoned professional wanting to refine your skills further – you now have the foundations of the craft at your disposal. Don’t be afraid to ask for help if you need it or add some of your own creative flair into the process.
With just a bit of patience and practice, you can hone any complex skill until it becomes second nature. It’s time to get stitching! Keep practicing and experimenting, and soon you’ll be creating beautiful, precise buttonholes with ease.