
If you have ever wanted to upgrade your curtains but don’t feel confident enough to buy a new pair, why not give hemming them yourself with a sewing machine a go? Hemmed curtains can add a more polished and professional look to any room they adorn, but the process doesn’t have to be intimidating – we’ll show you how easy it can be.

With just some basic equipment like fabric shears and iron alongside your sewing machine and our helpful step-by-step guide on how to hem curtains with sewing machine below, you’ll soon have beautiful custom hemmed curtains ready for installation.
Necessary Materials
Given below are the materials that you will need to complete this task:
- Curtain Fabric
- Sewing Machine and Thread
- Iron and Ironing Board
- Scissors or Fabric Shears
11 Step-by-step Instructions on How to Hem Curtains With Sewing Machine
Step 1: Measure the Length
Start by measuring the length of the curtains. Measure from the top edge of the curtain fabric to where you want it to finish at the bottom, plus an additional five inches (or however long you’d like the hem to be). But take care when trying to guess measurements – always use a tape measure. If you don’t do this, it’s possible the curtains won’t fit correctly afterward.
Step 2: Cut the Fabric
Using your fabric shears, cut off any excess fabric from the bottom hem. If the fabric is wide enough, you can cut two or more panels at a time. Just make sure that all of your curtains are of equal length before you move on. But take care when cutting; if you cut too much off, your curtains won’t fit the window. It’s best to take it slow and check your measurements twice before you cut.
Step 3: Iron
Lay the curtains on a flat surface and use an iron to press down the edges where you have just made your cuts. This will make it easier to sew later on.
However, if the fabric is delicate or prone to shrinking, you can opt for steam-pressing instead. It’s important to treat the fabric correctly when working with it to ensure that your curtains look their best. It’s also a good idea to put a cloth over the fabric when you are ironing, just in case.
Step 4: Mark Your Hem Line
Using a ruler or tape measure and a marking chalk pencil, mark a line at the five-inch mark that will form the top of your hem. This is the line that you will use for sewing. Make sure that the line is straight and even, as this will affect how good your curtains look when finished.

Although it may seem like a lot of work, taking the time to make sure that your hemline is correct will save you from having to redo any of your work.
Step 5: Fold Fabric Under
Fold the fabric under so that this line is now running along the bottom edge of your curtain panel. Make sure it is folded evenly all along its length as this will create a clean looking finish when you have finished sewing. It’s also important to leave some extra fabric just in case you need it. If the fabric is not folded neatly, it may cause problems later on.
Step 6: Iron Again
Use the iron to press the fold you just made. This will hold it in place and make it easier to sew. When ironing, a light press is best to avoid any damage to the fabric. It’s best to use a pressing cloth if the fabric is delicate. But if you’re in a hurry, you can just lay the curtains on an ironing board and use the steam setting. Otherwise, you can use a clothes steamer for quicker results.
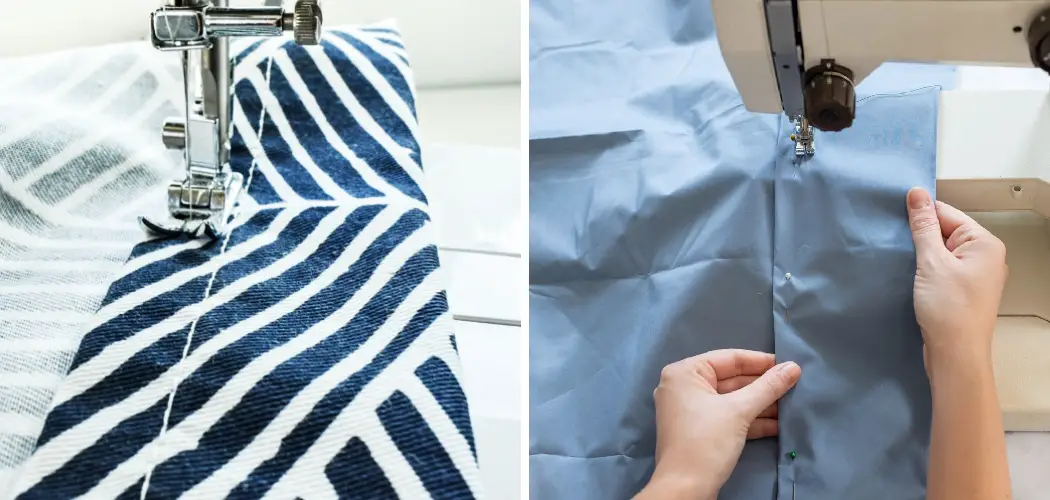
Step 7: Sew a Straight Line
Place your curtain panel under the presser foot of your sewing machine, lining up the bottom edge of your material with the line that you have marked on the hem. Make sure to keep this line straight as you sew along its length – any irregularities can be seen when hung up.
It’s best to use a straight stitch for this, as it will be the most durable. But if you want to add some extra detail, a zigzag stitch can look great too.
Step 8: Add Topstitching
Starting from one end of your hemline, use a topstitch stitch setting on your sewing machine to sew next to where you just sewed (about one-eighth of an inch away). This will give a clean finish to the hem. If you are using a zigzag stitch on your hemline, this topstitch should use the same pattern. Again, make sure to keep it straight and even. This will give a professional look to the hem.
Step 9: Test Your Results
Test out your finished hem by hanging up the curtains and seeing how they look in the room they are destined for. If you’re not happy with them, it’s easy enough to make minor alterations at this stage. It’s best to check them now rather than when they are already installed.

But if everything looks good, you can move on to the next step. It’s important to check your work so that you won’t be disappointed later on. If you are using a heavier fabric like velvet, this is especially important.
Step 10: Final Ironing
Once you’re happy with the length and positioning of your hems, use the iron one last time to press down any creases or seams created during sewing. It’s important to do this as it will help to keep the hem in place and ensure that your curtains look their best.
But be careful not to iron over any of the stitching, as this could cause it to come undone. This is also a good time to check for any loose threads and snip them away.
Step 11: Hang Up
Finally, hang up your freshly-hemmed curtains – they should fit perfectly and add a touch of elegance to any window! Always do a final check to make sure that the curtains are even and straight before you fix them in place. If they’re not, it may be necessary to go back and adjust the hem or even start over. This will avoid any unevenness and give a professional look to your finished product.
Now you know how to hem curtains with sewing machine, it’s time to get creative and make some beautiful custom-made designs! With the right tools and our step-by-step guide, it’s easier than ever to upgrade your home with a professional finish. Enjoy!
Do You Need to Hire a Professional?
Hemming curtains with a sewing machine is not overly difficult, but if you’re still feeling daunted by the process it may be worth investing in the services of a professional. They can make sure that your curtains are hemmed correctly and to your exact specifications, so you won’t have to worry about any costly mistakes.

Plus, they can also be a great source of advice and knowledge if you need it. In the end, it may cost you more to hire a professional, but it could save you time and money in the long run. Make sure to shop around and get quotes from a few professionals before making your decision.
Frequently Asked Questions
Q: What Tools Do I Need to Hem Curtains With a Sewing Machine?
A: You will need a sewing machine, fabric shears, an iron, measuring tape, and a marking chalk pencil. It’s also helpful to have a ruler or straight edge. But don’t forget that you will also need the curtain fabric itself!
Q: How Long Should the Hem on My Curtains Be?
A: This is entirely up to you – just make sure that when you measure and cut the excess fabric off, you leave an additional five inches or however long you’d like the hem to be. But always use a tape measure to get accurate measurements.
Q: Can I Make Alterations After I’ve Sewn the Hem?
A: Yes – it’s easy enough to make minor alterations at this stage. Just hang them up and see how they look in your room before making any changes. If you’re unhappy with the length or positioning, just iron out any creases or seams created during sewing and start again.
Q: What is the Best Stitch for Hemming Curtains?
A: We recommend using a topstitch stitch setting on your sewing machine to give a clean finish to the hem. This will also make them look professional and polished. It’s also useful to have a ruler or straight edge when doing this, as it will help you keep the line of stitching straight.

Conclusion
In conclusion on how to hem curtains with sewing machine, curtains are a great way to elevate any space, and hemming them yourself with a sewing machine can help you achieve a more professional look. However, it is important to be mindful when hemming that you take the right measurements and use the appropriate materials to ensure that your curtains fit perfectly in your home.
Additionally, if you are looking to maximize the heat retained by your fireplace, taking into account where hot air escapes through holes and cracks is also important. Learning how to properly position and measure drapery panels will ensure functionality as well as comfort within any room.
With this information under your belt, you are now ready to take on the challenge of creating beautiful yet functional curtains for your home!