
Are you looking for a creative way to add texture and excitement to your crocheting projects? Try the bobble stitch! Bobble stitches create much-needed pops of color, shape, and dimension. Not only do they bring amazing visual effects to projects, but they also make them look more complicated than they really are.

Take the intimidation out of mastering this technique – learn how to do a bobble stitch crochet today! Read on for step-by-step instructions so that you can start creating beautiful project pieces with ease.
11 Step-by-step Guidelines on How to Do a Bobble Stitch Crochet
Step 1: Prepare Your Materials and Tools
Before you begin your bobble stitch crochet project, make sure that you are prepared. Gather the materials and tools you need, including a crochet hook of the appropriate size for your yarn choice, various colors of yarn (optional), scissors, and a tapestry needle. It also helps to have a pattern chosen and ready to follow. But you can also make up your own pattern if you prefer.
Step 2: Create Your Yarn Ball
Start by creating a slip knot and then chain a few stitches. This will serve as the foundation of your project and act as an anchor point for your yarn ball. Create several more chains depending on how big you would like each bobble to be, then join them in a circle using a slip stitch. It’s important to make sure that the chain is not twisted. But, if it is, just untwist it until the circle is straight.
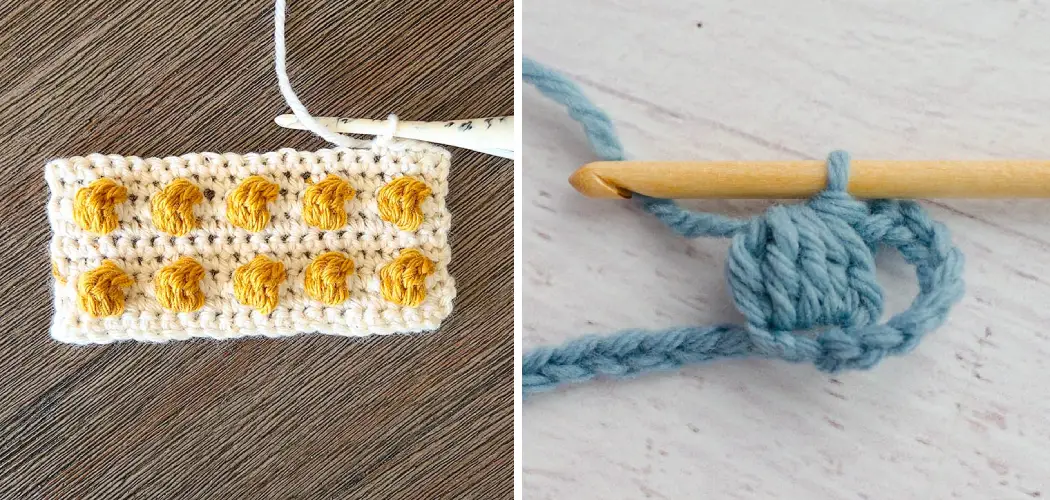
Step 3: Make Your Bobble Stitch
Next, it’s time to make your bobble stitch! Begin by inserting your hook into the middle of the circle and yarn over it. Pull up a loop, then yarn over again and pull through two loops on your hook. Repeat this process five more times until you have six loops on your hook. This is known as a bobble stitch. It’s important to make sure that you pull the loops snugly on your hook.
Step 4: Secure Your Bobble Stitch

Once you have six loops on your hook, yarn over and pull through all of the loops. This will close up your bobble stitch and secure it in place. It is important to make sure that your bobble stitch is secure and tightly stitched. This will ensure that the bobble doesn’t come undone. It also helps make it look more even in the end.
Step 5: Chain a Few Stitches
After you’ve secured your bobble stitch, chain a few stitches to create space between each one. This helps give your project its shape and texture. If you want to make your bobbles bigger, just chain more stitches. This will create a longer chain space and give you larger bobbles. It’s important to make sure that your chains are not twisted.
Step 6: Create Your Next Bobble Stitch
Once you’ve chained a few stitches, repeat the process of making a bobble stitch until you reach the end of your project piece. It’s important to make sure that each bobble stitch is evenly spaced and secured tightly. This will ensure that your project looks consistent throughout.
Step 7: Finish Off Your Project Piece
When you’ve reached the end of your project piece, finish off by cutting the yarn and tying it in a knot. This will secure all of your stitches together and complete your project piece. Although it may seem intimidating, mastering the bobble stitch technique will help you create beautiful project pieces with ease.
Step 8: Weave It Together
Once you’ve finished off, use a tapestry needle to weave the tail of yarn through each stitch. This will further secure all of your stitches together. This step is important for making sure that your project piece looks neat and tidy.

It also helps to prevent any loose ends from popping out. If you’d like, you can also add a few strands of yarn in different colors to give your project piece more depth and texture.
Step 9: Secure the Weave
Secure the tail by knotting it around a stitch, then trim off any remaining yarn. It is important to make sure that the tail is securely tied and not left dangling. This will ensure that it doesn’t come undone or unravel over time. But, if you want to leave the tail for a decorative element, that’s perfectly fine too!
Step 10: Add Different Colors
For added effect, you can incorporate different colors into your project piece. Do this by changing colors between bobble stitches and chains. This will give your project more depth and make it stand out. It’s also an effective way to add contrast and texture. Feel free to use any color combination that you like – the possibilities are endless!
Step 11: Enjoy Your Bobble Stitch Crochet Project!
And there you have it – you’re now ready to show off your beautiful bobble stitch crochet project! From adding color and texture to giving your projects a unique 3D effect, the bobble stitch is a great way to take your crocheting skills to the next level. Enjoy your completed project and have fun with crafting!
Following these steps can help you master the bobble stitch in no time! There are also various online tutorials and video lessons available to give you more tips on how to do a bobble stitch crochet. With enough practice, you’re sure to make great-looking projects that your friends and family members will love. So get creative and have fun with crocheting!
Do You Need to Hire a Professional?
If you’re new to crocheting and find the bobble stitch intimidating, don’t worry! Crochet professionals are available to help you out with any project. Just search online for local crochet professionals or craft stores that offer classes on beginner-level crochet techniques.

You can also contact them to get advice on what materials, tools, and techniques you need for your project. With the help of a professional, you can easily learn how to do a bobble stitch crochet and show off your beautiful projects in no time!
So what are you waiting for? Get started on creating unique and interesting projects with the bobble stitch today!
How Much Could It Cost?
The cost of hiring a professional crochet specialist or taking classes at a craft store varies from place to place. It’s important to research your options and compare prices before making a decision. The cost may also depend on the length and complexity of the project you need help with, as well as the materials and tools required. Keep in mind that purchasing your own materials and tools will be an additional cost.
Once you’ve chosen a professional or craft store that best suits your needs, make sure to set up an appointment with them so that you can get started on your bobble stitch crochet project right away!
Frequently Asked Questions
Q: Is the Bobble Stitch Difficult to Do?
A: The bobble stitch may seem daunting at first, but with enough practice and patience, you’ll eventually get the hang of it. There are also various online tutorials available that can help walk you through the process. With the right guidance, mastering this technique won’t be too hard!
Q: Can I Use Any Type of Yarn?
A: It’s best to use yarn that is specifically created for crochet projects such as worsted-weight yarn. This type of yarn works well with the bobble stitch and creates beautiful, fluffy results. However, you can also experiment with other types to see which one produces the best results for your project.

Q: What Are Some Creative Ways to Use Bobble Stitch Crochet?
A: Bobble stitches can be used in a variety of creative ways. For instance, you can use them to create texture and dimension in blankets and sweaters. You can also make colorful accessories such as hats, scarves, and gloves. The possibilities are endless – get creative and have fun with the bobble stitch!
Q: What Are Some Tips for Making Bobble Stitches?
A: Here are some helpful tips to keep in mind when making bobble stitches:
- Start With the Right Crochet Hook Size for Your Yarn Choice. This Will Help Make Sure That You Achieve the Best Results Possible.
- Take It Slow and Be Patient With Yourself as You Learn How to Do a Bobble Stitch Crochet.
- Create a Slip Knot Before Starting Your Project and Use It as an Anchor Point for Your Yarn Ball.
- Secure Each Bobble Stitch by Weaving the Tail of Yarn Through Each Stitch With a Tapestry Needle.
- Experiment With Different Colors to Create Unique Effects in Your Finished Project Piece!
With these tips, you’re sure to have great success with your bobble stitch crochet projects! Have fun creating beautiful pieces that are all your own.
Conclusion
After reading this blog post, you should now have the information necessary to begin making your own bobble stitch crochet projects. You will be shocked by how easy it can be to create fascinating pieces of work with a simple bobble pattern.
Don’t forget to make sure and choose the materials best suited for your project, such as the correct type of yarn or hook size to ensure that you complete everything correctly.
Now that you know how to do a bobble stitch crochet, go ahead and get your supplies in order and try it out for yourself! Show off your hard work and creativity by proudly wearing or displaying the finished product. Happy Crocheting!