
Embark on a delightful crochet journey as we delve into the whimsical world of creating your very own crocheted Hello Kitty. This beloved and iconic character has captured hearts worldwide with her charm and simplicity. In this article, we’ll guide you through the enchanting process of how to crochet hello kitty, transforming yarn and a crochet hook into a beloved and timeless friend.

Whether you’re a seasoned crochet enthusiast or a beginner eager to embark on a creative adventure, crocheting Hello Kitty is a rewarding project that combines craftsmanship with affection for this beloved character.
Join us as we explore the materials, techniques, and step-by-step instructions required to bring the magic of Hello Kitty to life in the form of an adorable crochet creation that will undoubtedly delight enthusiasts of all ages.
Overview of Hello Kitty as a Popular Character
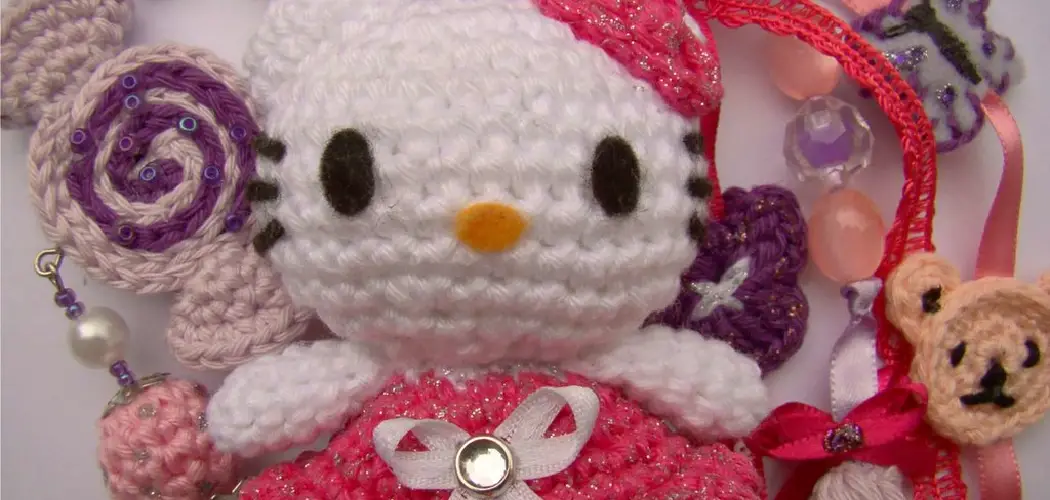
Hello Kitty is a beloved character around the world, and crocheting your own version of her has never been easier. With some creative skills and a few basic supplies, you can craft an adorable Hello Kitty plush doll that’s perfect for any occasion! In this guide, we’ll walk you through the steps to create your very own Hello Kitty amigurumi crochet project.

The first step is to get all of the supplies you’ll need for your project. You will need a crochet hook, yarn in the colors of white and pink, an embroidery needle, stuffing material, scissors, and fabric glue. Additionally, you may want to pick up some googly eyes if you would like to give your Hello Kitty some added personality.
Once you have all of your supplies, it’s time to start crocheting! Start with the head and body by crocheting in a spiral pattern until you reach about 4 ½ inches in diameter. Make sure to keep track of how many rounds you have done because this will be important later on when you attach the arms and legs.
Once you have created the head and body, it’s time to move on to the face. Embroider Hello Kitty’s iconic facial features such as her eyes, nose, mouth and whiskers using the black yarn. You can use simple stitches like running stitches or backstitches for this part of the project.
The Crochet Project and Its Complexity
TheHello Kitty crochet project is a great way to get your hands dirty and learn the art of crocheting. It’s not as difficult as it looks, but there are definitely some challenging aspects that you need to consider.
You’ll need to know about different types of crochet stitches, colors, yarn weights, and hook sizes in order to make a successful Hello Kitty. With some patience and practice, you will be able to create a beautiful Hello Kitty that will bring joy to others!

First things first, you’ll need the right supplies for your project. You should have the following items ready before starting: crochet hook, yarn of desired color, embroidery needle, scissors, and stitch markers (optional). You also need to familiarize yourself with the different crochet stitches such as single crochet, double crochet, slip stitch, and more.
Next, you’ll need to choose a pattern for your Hello Kitty. There are many patterns out there that you can use. You should choose one that is suitable for your skill level and desired size of Hello Kitty. For beginners, it’s best to start with a simple pattern as it will be easier to follow.
Now that you have the supplies and pattern ready, it’s time to start crocheting! Start by chaining the desired number of stitches according to your pattern. Then, work rows or rounds of single crochet or double crochet until you reach the desired size. Remember, when crocheting in the round, you need to keep track of your stitches.
10 Steps How to Crochet Hello Kitty
Step 1: Gather Your Materials
Before diving into the crochet adventure, gather the necessary materials. You’ll need various colors of yarn for Hello Kitty’s body, clothing, and accessories, a crochet hook suitable for your chosen yarn weight, safety eyes or embroidery thread for the eyes, fiberfill stuffing, a tapestry needle for weaving in ends, and scissors.
Step 2: Choose a Hello Kitty Pattern
Select a Hello Kitty crochet pattern that aligns with your skill level and desired size. Patterns range from simple designs suitable for beginners to more intricate patterns for advanced crocheters. If you’re a beginner, it is important to select a pattern that has easy-to-follow instructions. Once you have selected your desired Hello Kitty pattern, print off the instructions and materials list for reference.
Step 3: Start with the Head
Begin crocheting Hello Kitty by creating her head. Typically, you’ll start with a magic ring and work in continuous rounds to form the head’s spherical shape. Remember to stuff the head with fiberfill as you progress to achieve a three-dimensional appearance. You should also use a smaller hook to create the facial features and ears. Once your head is complete, fasten off the yarn.

Step 4: Crochet the Body
Continue crocheting Hello Kitty’s body, transitioning from the head to the torso. Follow the pattern instructions to shape the body and create a seamless transition. Make sure to keep the yarn tension even as you work your way down. You may need to re-adjust the loops if they are too tight or loose. When the body is complete, weave in any remaining ends and cut off excess yarn.
Step 5: Add the Arms and Legs
Crochet the arms and legs separately, paying attention to any color changes or details specified in the pattern. Attach the arms and legs securely to Hello Kitty’s body, ensuring they are evenly positioned. Though you might have to do some adjustments for the limbs, they should generally hang down in a relaxed position.
For extra character, you can attach small bows to Hello Kitty’s arms and legs or clothes. To do this, use the same yarn color as your chosen dress for best results. Attach the bow securely with thread or sewing needle and voila!
Step 6: Craft the Clothing and Accessories
Hello Kitty is known for her signature clothing and accessories. Crochet her dress, bow, and any other details as outlined in the pattern. These elements contribute to Hello Kitty’s distinctive appearance.
Once you complete the clothing, it’s time to attach them to Kitty’s body. Sew each of the pieces onto the body securely in place with a yarn needle and matching colored thread. Make sure everything is firmly attached before you move on to stuffing.
Step 7: Attach Safety Eyes or Embroider Eyes
Attach safety eyes to Hello Kitty’s face according to the pattern instructions. Alternatively, embroider eyes using embroidery thread for a handmade touch. Position the eyes carefully to capture Hello Kitty’s iconic expression. Make sure the eyes are securely attached to prevent them from coming undone.
Step 8: Add Facial Features
Using embroidery thread, carefully embroider Hello Kitty’s nose, mouth, and whiskers. Pay attention to the pattern or reference images to capture her adorable face accurately.
You may also choose to add additional features, such as a bow or freckles, if you’d like. Although embroidery takes a bit of practice and patience, it’s worth taking the time to get it right. Once complete, you have now finished your Hello Kitty crochet project!
Step 9: Weave in Ends and Shape
Once all the components are crocheted and attached, weave in any loose ends using a tapestry needle. Gently shape Hello Kitty’s body and limbs to ensure a polished appearance. You have now created your very own Hello Kitty amigurumi. Show it off to friends and family, or give it as a special gift. With some creativity, you can even customize your Hello Kitty with different colors and patterns.

Step 10: Finishing Touches
Once you’re satisfied with the appearance of your crocheted Hello Kitty, your creation is complete! Display her as a decorative piece, give her as a heartfelt gift, or incorporate her into other craft projects. Regardless of what you choose to do with your Hello Kitty, she’ll always be a precious reminder of the fun you had crocheting her.
Why not take it one step further and crochet other popular characters from Japanese anime and manga? With just a few basic materials and some practice, the possibilities are nearly endless!
Conclusion
Crocheting is an enjoyable pastime that can reward you with a lasting keepsake and a wonderful feeling of accomplishment! Once you’ve mastered the basics, it’s just a matter of finding the right pattern or coming up with your own creative design.
With practice and patience, you’ll discover all the possibilities crocheting has to offer, including learning how to crochet Hello Kitty! If this post has inspired you to take on this darling project, then please share your tips and tricks in the comments section below. We’d love to hear from you and learn more about your beloved completed Hello Kitty creations!