
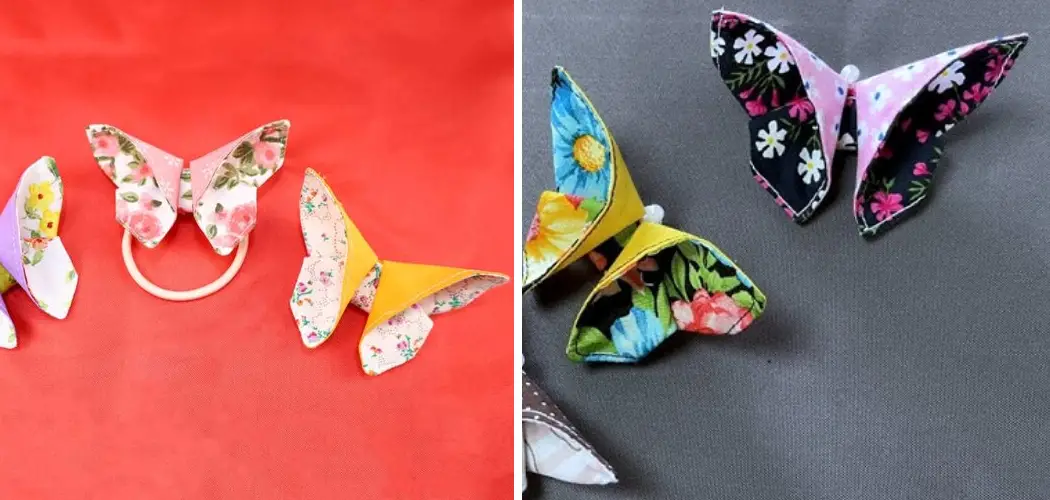
Do you love DIY crafts but constantly feel overwhelmed when looking at the endless list of ideas? Well, here is one craft idea that won’t take much preparation or materials – fabric butterflies! With simple sewing skills and a few scraps of fabric, you can create adorable little butterflies as décor for your home.
Whether it be on your wall, in a flowerpot, or even used to decorate a birthday card like any other paper crafting embellishment – this handmade project is guaranteed to impress. So let’s get started learning how to make a fabric butterfly!

Why Do You Need to Learn How to Make a Fabric Butterfly?
A fabric butterfly is both beautiful and practical. It will last longer than paper butterflies due to its resilient nature and can be kept for years as a special reminder of the time spent making it. Plus, they look amazing in any room! It’s a perfect craft project to do with kids and can be used to decorate gifts, home décor pieces, or children’s bedrooms.
What Materials Do You Need?
Not much is needed to make fabric butterflies:
Fabric Scraps
Choose any kind of lightweight fabric such as cotton, silk, or even felt. The fabric pieces should be no larger than 10 inches in both length and width. You can make one butterfly with two different colors of fabric if you like, or just use a single color – the possibilities are endless!
Ribbon
For the antennae, use any kind of ribbon you have on hand. You’ll need about 4-6 inches of ribbon for each butterfly.
Sewing Supplies
You will also need basic sewing supplies such as a needle, thread, scissors and pins to help hold the fabric pieces together.
Other Materials
You may also need a hot glue gun and some craft wire if you want to attach the butterflies to other decorations or frames.

10 Step-by-step Instructions on How to Make a Fabric Butterfly
Step 1: Prepare the Fabric
Cut two fabric pieces of the same size and shape. If you want to make a butterfly with two different colors, cut one piece from each color. It’s best to use fabric scraps that are no larger than 10 inches in both length and width. But feel free to experiment with different shapes and sizes. It’s a great way to make your butterfly unique!
Step 2: Place the Fabric Pieces Together
Place one piece of fabric on top of the other, with the wrong side facing up. This will ensure that the finished product looks neat and tidy. If you want to use two different colors, make sure they are placed in an alternating pattern. It’s best to use pins to hold the fabric in place. But you can also use a few drops of fabric glue.
Step 3: Pin the Pieces Together
Secure the pieces together with pins and set aside. This will help keep the pieces in place while you sew. You can also use basting stitches or fabric glue if you prefer. But be sure to remove the pins or stitches before you proceed with the next step. Otherwise, it will be more difficult to work with the fabric. It is also important to make sure that the pins or stitches are even and secure.
Step 4: Sew the Pieces Together
Using a sewing machine, stitch around the edges of the fabric pieces in a straight line. If you don’t have access to a sewing machine, you can hand-stitch them together instead. Be sure to leave a small opening in the center of the fabric so that you can stuff it with cotton later. But make sure the stitches are tight and secure.

Step 5: Cut Out the Butterfly Shape
Now is the fun part! Take your scissors and cut out a butterfly shape from the sewn pieces. Make sure to leave about half an inch of seam allowance around the edges for added durability. It’s also important to leave the center intact, as this will be used for stuffing. This is where you can let your creativity shine! You can make any kind of butterfly shape that you want.
Step 6: Turn Inside Out
Carefully turn the fabric inside out and make sure to push out all of the corners. This will give your butterfly a neat and tidy look. Now you can stuff it with cotton or any other stuffing material you prefer. It’s best to use a chopstick or pen to help push out the stuffing. You can also use a pencil to help shape the wings.
Step 7: Add the Antennae
Take a piece of ribbon and attach it to the top of the butterfly with a few stitches. This will serve as its antennae. You can also use craft wire if you prefer. It’s important to make sure that the antennae are secure, as it will help keep the butterfly in place. But if you want to be extra sure, use hot glue.
Step 8: Add Decorations
To make your butterfly look even more beautiful, you can add decorations such as buttons, beads, sequins or any other embellishments. This is where your imagination can really shine! Make sure to use hot glue or a few stitches to attach the decorations, as this will ensure that they stay in place for years to come.
Step 9: Close the Opening
Once you’re done adding decorations, carefully close the opening with a few stitches or fabric glue. Be sure to make them secure so that your butterfly won’t unravel. However, you can also leave the opening open if you prefer. It’s up to you! This is also a great opportunity to make your butterfly even more unique by adding a special message or quote.

Step 10: Enjoy Your Fabric Butterfly!
Congratulations, you’ve just finished making a fabric butterfly! Now you can display it wherever you want – in your room, living room or even outside. You can also use it to decorate gifts for friends and family or attach it to cards and letters. Have fun experimenting with different colors and patterns of fabric to make unique butterflies every time!
Following these simple steps, you can easily learn how to make a fabric butterfly. Get creative and have fun with this project! Who knows, maybe it’ll become your new hobby.
How Much Will It Cost?
Making a fabric butterfly is an inexpensive craft project that won’t cost much. Most of the materials you will need are probably already in your home. All you need to buy are fabric scraps, ribbon and other decorations – all of these can be found at any craft store for a very low price. So why not give it a try? You might even find yourself enjoying it more than you thought!
Tips and Tricks
- Before cutting out the butterfly shape, draw a template on the fabric first. This will make the process much easier.
- If you want to make several butterflies, try using different sizes and shapes of fabric for each one.
- Feel free to get creative and add any decorations you want to make your butterfly unique.
- Don’t be afraid to experiment with different fabrics, ribbons or decorations. The possibilities are endless!
- Have fun and enjoy the process of making fabric butterflies – they’re sure to bring a smile to everyone who sees them!
Making fabric butterflies is an easy and fun way to bring a bit of nature into your home. With just a few supplies and a bit of creativity, you can make beautiful fabric butterflies that will brighten up any room. So what are you waiting for? Get started now!

Frequently Asked Questions
Q1: What Kind of Fabric Should I Use?
A1: You can use any lightweight fabric you have on hand. Cotton, organza, chiffon or even felt will work well for this project. It’s best to use fabric scraps that are no larger than 10 inches in both length and width.
Q2: Do I Need to Sew the Pieces Together?
A2: Yes, you will need to sew the pieces together in order for the butterfly to hold its shape. If you don’t have a sewing machine, you can hand-stitch them together instead. You can also use basting stitches or fabric glue if you prefer.
Q3: How Long Does It Take to Make a Fabric Butterfly?
A3: It should take about 30 minutes depending on your skill level and the complexity of the design. But don’t worry – it’s a fun and simple project that even beginners can tackle!
Making a fabric butterfly is an easy project that the whole family can enjoy. With a few simple steps and supplies, you can create beautiful butterflies that will bring a bit of nature into your home. So get creative and start making fabric butterflies today – you won’t regret it!
Conclusion
So there you have it – everything you need to know to show your creative spirit and make a beautiful fabric butterfly! Your finished craft will be a guaranteed conversation-starter, and an original, eye-catching piece of artwork to hang proudly in your home. Plus, this project requires minimal resources and only simple techniques so it’s perfect for even the most inexperienced crafters.
And if you get stuck or want more detailed instructions feel free to comment or drop us an email we would love to come up with some more ideas together. In any case, why not get started right now? Grab your thread and fabric pieces, fire up those scissors and assemble that beautiful butterfly. Thanks for reading this article on how to make a fabric butterfly.