
Are you looking for a quick and easy way to add personality to your handmade knit or crocheted projects? Safety eyes are the perfect solution! Whether you’re making an amigurumi bunny, or simply giving a stuffed animal some extra character, safety eyes can help make your project unique.

But attaching them properly isn’t always straightforward; if done wrong, these charming little accessories could become detached from the project down the line. That’s why we’ve put together this guide: so that you can learn how to attach safety eyes correctly and keep your cuddly critters safe at all times.
Tools and Materials You Will Need to Attach Safety Eyes
- Safety eyes of your choice
- A crochet hook or a sharp needle
- Thread or yarn that matches the color of the project
- Scissors
- Optional: Clear fabric glue (if needed)
Step-by-Step Guidelines on How to Attach Safety Eyes
Step 1: Determine Where to Place Your Safety Eyes
The first step in attaching safety eyes is determining where you want them to go. Depending on the project, this could be anywhere from the sides of a stuffed animal’s head to the wings of an amigurumi butterfly. Once you’ve chosen where to place your safety eyes, use a marker (or something similar) to mark the spots.
Step 2: Make Holes for Your Safety Eyes
Now that you know where your safety eyes will go, it’s time to make the holes in the work. To do this, take your needle or crochet hook and poke through the fabric at each marked spot. If you’re having trouble making a hole, try cutting an X with your scissors instead. While making a hole this way will leave behind some visible stitches, they can easily be disguised with embroidery thread of matching color.

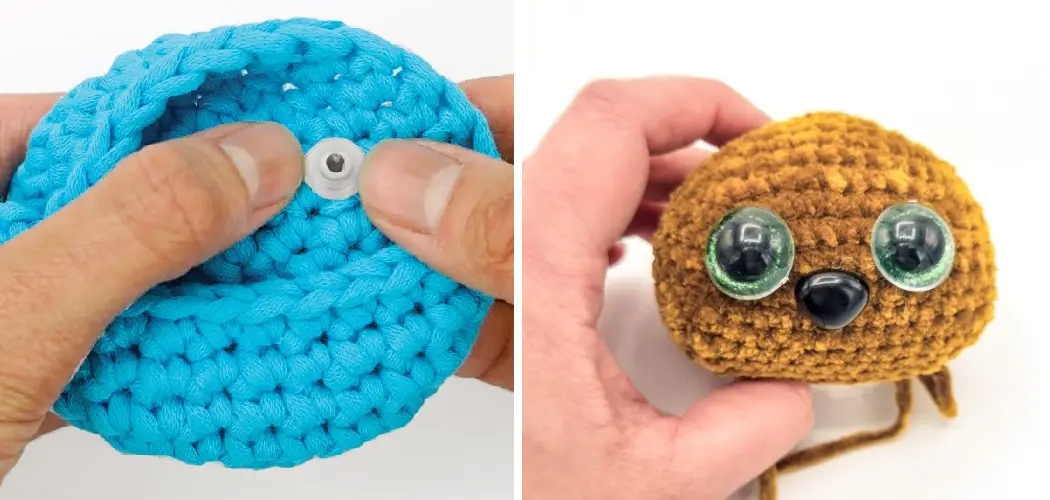
Step 3: Insert the Safety Eyes
After you’ve made the holes, it’s time to insert the safety eyes! Take each eyepiece and insert the locking washer into the back first. Then place the post through the hole from the front side, and twist the washer until it’s tight. Once that’s done, secure the safety eyes by tying a knot with thread around both posts.
Step 4: Secure the Safety Eyes
For an extra layer of security, you can use clear fabric glue to keep your safety eyes in place. Simply squeeze a small amount onto the back of each eyepiece and allow it to dry completely. This will help ensure that your safety eyes stay put, even after vigorous play!
Congratulations – you now know how to attach safety eyes properly! With this knowledge, you can give any stuffed animal or amigurumi project a unique character that is sure to bring hours of fun and joy. Now go forth and make all the cuddly critters your heart desires!
Additional Tips and Tricks to Attach Safety Eyes
1. Use a thick and sturdy thread when attaching safety eyes to ensure that it is securely held in place. A thin thread will not provide enough support and may unravel with time.
2. If the eyes become loose, try reinforcing them with a dab of hot glue on either side to hold them in place more securely.
3. When installing plastic safety eyes on a delicate material like fabric, try making small stitches to attach the washers to the back of the fabric rather than using thread.
4. For a more permanent attachment, use epoxy glue instead of thread or hot glue. This will create an even stronger bond and help keep your safety eyes in place for longer.
5. Be careful to avoid getting any glue or thread on the face of the safety eyes. This can make them look dirty and reduce their overall appeal.
6. If you are using a special type of material, like vinyl or leather, use special eyelets instead of safety eyes for extra security. This will help ensure that your craft project remains secure and attractive.

7. If you are attaching safety eyes to a stuffed animal or other item with a moving part, make sure to insert the eyelet into the seam of the fabric so it does not move around too much when in use. This will help keep your craft looking its best for longer.
Following these tips and tricks will help you achieve the perfect look when attaching safety eyes to your craft projects. With a little bit of practice and patience, you can create beautiful handmade items that are sure to be admired by all! Good luck!
Things You Should Consider to Attach Safety Eyes
1. Check the size of the safety eyes that you need for your project. Choose the right size so your project looks attractive and proportional.
2. Consider the placement of the safety eyes too. Place them in such a way that they look symmetrical and aesthetically pleasing to the eye, so they don’t detract from your craft project’s overall appearance.
3. You should also think about the type of safety eyes you want to use, such as ones with plastic washers, metal or plastic pupils, etc. Making sure that they are appropriate for the project is essential.
4. Determine if you need to attach a backing material (such as felt) behind the eyes in order to make them more secure and durable.
5. Choose the right adhesive for attaching the safety eyes. Most craft stores sell special glues and adhesives meant specifically for use with safety eyes, so make sure to get the right one!
6. Be careful when attaching your safety eyes — you don’t want to accidentally poke yourself or damage the project while doing so. Take your time and double-check your work when finished.
7. Finally, it’s important to test the attachment after you have completed it. Make sure that the eyes are secure and won’t come loose with everyday wear and tear!
Following these considerations will help you attach safety eyes effectively and securely. Have fun crafting!

Safety Precautions Need to Follow for Attaching Safety Eyes
- Make sure that the eyes are securely fastened and cannot easily be pulled off to prevent a choking hazard.
- Ensure that the eyes do not have any sharp edges which could cause irritation or injury to children.
- Do not use glue, staples, or other adhesives which may be toxic if ingested by a child.
- To ensure that the eyes stay in place, it is best to sew them on or use a special type of safety eye attachment tool.
- Be sure to read and follow all instructions provided with the safety eyes before attaching them to any toy or stuffed animal.
- If needed, use stuffing around the eye area after attaching the eyes to make sure that they stay securely in place.
- Always inspect the safety eyes after attaching them to make sure that they are still secure and will not pose a choking hazard.
By taking appropriate safety precautions when attaching safety eyes, you can ensure that your toys remain safe for children of all ages!
Frequently Asked Questions
What Are Safety Eyes?
Safety eyes are plastic eyes used to create stuffed animals, plush toys, and other craft projects. They come in a variety of sizes, colors, and styles, making them a great way to add character and personality to any project.
How Do I Attach Safety Eyes?
Attaching safety eyes to your project is easy. Start by using a pencil or marker to mark where you want the eyes to go. Then, use a small drill bit or needle to make a hole for the eye on each side of the fabric.
Push the back part of the eye through one of the holes and secure it with a nut or washer, depending on the type of eye you’re using. For larger safety eyes, use pliers to tighten the nut or washer. For smaller safety eyes, use a dab of hot glue to keep them in place.

How Do I Secure Safety Eyes?
Depending on the size and style of your safety eyes, you may need to secure them in place with a nut or washer. For larger safety eyes, use pliers to tighten the nut or washer. For smaller safety eyes, use a dab of hot glue to keep them in place.
Do I Need to Use Special Tools for Attaching Safety Eyes?
No, you do not need any special tools. You can use a drill or needle to make the holes for your safety eyes, and pliers and hot glue to secure them in place. However, if you’re working with larger safety eyes, it may be easier to use an eyeglass screwdriver or other tool specifically designed for attaching safety eyes.
Conclusion
Knowing how to attach safety eyes is an important skill for those looking to create craft projects with stuffed animals, plush toys, and other items.
By following the steps outlined above, you will be able to easily attach your safety eyes and give your project a unique look. With the right tools and some patience, you can make sure that your project is safe and secure.