
If you’re an experienced crocheter, you know that crocheting around a ring is no small feat. It looks easy enough from the outside, but it can seem overwhelming if you’re actually trying to do it yourself.

But fear not! This guide will walk you through the process step by step so that you can easily crochet around any type of ring. So keep reading to learn more about how to crochet around a ring.
Can You Crochet Around a Ring?
Crafting with crochet is a fun and creative way to make beautiful pieces. Crochet around a ring is an interesting variation, providing an opportunity to create something unique that stands out. Working crochet stitches along the ring’s circumference produce various patterns, resulting in stunning accessories.
The trickiest aspect of this type of project is keeping the stitches even and smooth as you move along the inner and outer sides of the circle. With practice, however, this technique can become both enjoyable and rewarding!
Why Should You Crochet Around a Ring?
Crocheting around a ring is an excellent way to add creativity and pizzazz to any piece you are working on. By crocheting around a ring, you can create interesting shapes and textures with your work that other methods couldn’t achieve.
This classic technique also takes stress off your material, making it ideal for wearables such as hats, scarves, and more. Many intriguing patterns are available for free online, which provide tons of creative ideas for you to use when crocheting around a ring! With some practice and imagination, you’ll be able to use this simple yet powerful technique on any project in no time!
7 Steps to Follow on How to Crochet Around a Ring
Step One: Preparing Your Supplies
Before starting, make sure that you have all of your supplies ready and close at hand. You’ll need yarn, a crochet hook (the size will depend on the type of yarn and your desired finished product), scissors, and some stitch markers or safety pins.
Step Two: Attaching the Yarn to the Ring
Once your supplies are within reach, start by attaching the yarn to the ring. To do this, put one end of the yarn through the center of the ring and then pull it back up and over itself, so both ends face up.
Then tie a simple knot with both ends and cinch it tight against the top of the ring. Make sure that there’s enough slack in your knot so that when you begin crocheting around it, your stitches have enough room to fit in neatly.

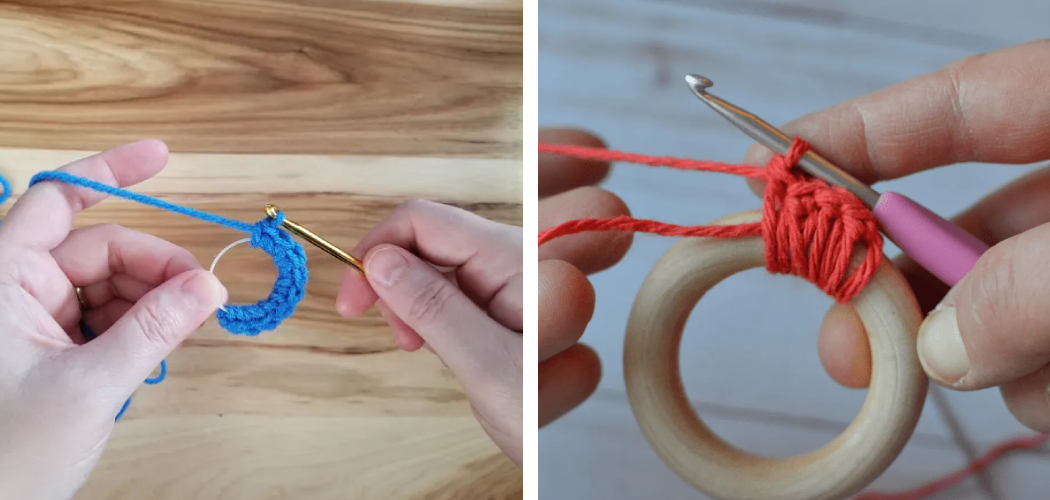
Step Three: Begin Crocheting Around The Ring
Now comes the fun part—crocheting! Start by inserting your hook into either side of your looped knot on top of the ring (it doesn’t matter which side). Once inserted, grab onto one end of your yarn and make a single chain stitch (which is just a slipknot).
After making this first chain stitch, work single crochet stitches around each side of the ring until they meet in between each other—this should create a tube-like shape around the ring.
Step Four: Working in the Round
Once you’ve reached the middle of the ring, it’s time to start working in rounds. To do this, insert your hook into both sides of the looped knot on top of the ring and make a single chain stitch.
Then grab onto one end of your yarn and make single crochet stitches around the entire circle, creating a tube-like shape. Keep in mind that you’ll need to count your stitches as you go since this is what will determine how big or small your finished product is.
Step Five: Keeping Track of Your Rounds
As you crochet around the ring, it’s important to keep track of where one round ends and the next begins so that your work remains uniform and even.
To do this, simply make a stitch marker (or use a safety pin) after each completed round and insert it into the last stitch made on that particular round before moving on to the next one. This will help you keep track of which row/round you are currently on.
Step Six: Finishing Off
Once you reach the end of your last round, it’s time to finish off. To do this, cut your yarn and insert the tail into the last stitch made. Then pull it tight and snip any excess string with a pair of scissors.
Step Seven: Weaving in the Ends
The final step is to weave in all loose strings (tail ends) so that they are secure and hidden from sight. To do this, grab onto one end of the yarn and thread it through each stitch until you reach the knot that started everything off at the beginning—this should cover up any visible gaps or holes on either side of your work.
Lastly, use a crochet hook or needle to tuck away any ends securely, ensuring that everything is nice and neat.

And there you have it! You’ve just learned how to crochet around a ring in seven easy steps—congratulations! With a bit of practice, you’ll be able to create beautiful homemade crafts in no time. Have fun!
Things You Need to Know Before Crochet Around a Ring
Before tackling a crochet project around a ring, there are some essential things to know. First and foremost, the ring should be closed and not adjustable. This will help keep your stitches uniform and also provide added support to the project.
It is important that you choose an appropriate yarn; metal rings can be unforgiving if using thick or stiff fibers. When determining the size of also, when yarn, try to make sure it is no smaller than 1 mm because small yarn can be labor-intensive when working around a ring. It’s also recommended to use two strands together for a stronger look.
Lastly, do not pull on the initial chain too tightly – crocheting around a ring requires just enough slack, so your stitches don’t get tight. Remembering these tips will help ensure that you have success with your next crochet around-a-ring project!
Benefits of Crochet Around a Ring
Crochet around a ring can be a great way to add texture and color to any project. Not only is it an easy craft, but it also provides numerous benefits. For starters, crocheting around rings allows for more intricate crochet designs with plenty of room for creativity.
By making items such as amigurumi (a type of Japanese stuffed toy) and garments, the addition of color and texture helps make them truly unique pieces. Lastly, the greatest benefit of crocheting around a ring is that it is easy enough for beginners but capable of producing stunning results with practice.
Whether you’re creating art pieces to display in your home or gifts for friends and family, this craft’s possibilities are endless!
6 Common Mistakes People Make When Trying to Crochet Around a Ring
1. Not Crocheting Tightly Enough
One of the most common mistakes people make when crocheting around a ring is not crocheting tightly enough. This can cause your work to look sloppy and can make it difficult to keep your stitches even. To avoid this, make sure to crochet each stitch as tightly as possible.
2. Not Crocheting in the Same Direction
Another common mistake is not crocheting in the same direction. When you crochet around a ring, you should always start in the same direction and continue going in that direction. This will help keep your work neat and prevent your stitches from becoming twisted.
3. Using the Wrong Size Hook
Using the wrong size hook is also a common mistake people make when crocheting around a ring. The size of the hook you use will determine the size of your stitches, so it’s important to use a hook that is appropriate for the yarn you are using. If you use a thicker yarn, you will need to use a larger hook, and vice versa.

4. Not Inserting Your Hook Into the Correct Stitch
When crocheting around a ring, you will need to insert your hook into the correct stitch to create a new one. The most common mistake people make is inserting their hook into the wrong stitch, which can result in an uneven or incorrect number of stitches. To avoid this, take care to insert your hook into the correct stitch each time.
5. Dropping Stitches
Dropping stitches is another common mistake people make when crocheting around a ring. This can happen if you accidentally let go of your work or if you are not paying close attention to your stitching. If you drop a stitch, it is important to pick it up as soon as possible so that your work does not unravel.
6. Not Finishing Off Properly
Not finishing off properly is another mistake people often make when crocheting around a ring. This can happen if you do not cut your yarn correctly or if you do not weave in your ends properly. Both of these things can cause your work to come undone, so it is important to be careful when finishing it.
You Can Check it Out to Pick Up Stitches for Border

Conclusion
Crocheting around a ring may look intimidating at first glance, but once broken down into steps, it’s quite easy to understand! With these following tips in mind—preparing supplies, attaching yarn to rings, and beginning crocheting—you’ll be able to successfully complete any project involving crocheting around rings quickly and efficiently!
So go ahead–give it a try today! You won’t regret it! Thanks for reading our post about how to crochet around a ring.
You Can Check it Out to Embroider Leaves