
Have you ever wanted to make a beautiful crocheted magic ring but felt intimidated by the idea of having to learn how to make a magic ring crochet left handed? If so, you’re not alone.

Many left-handed crocheters find learning basic crochet stitches and techniques difficult since most instructions assume that you are using your right hand. But don’t worry—it is possible to make a magic ring with your left hand! Here’s how to do it.
Can You Make a Magic Ring Crochet Left Handed?
Making a crochet magic ring can be quite challenging for a left-handed person, but it is not impossible! The right technique is just as easy as making one with your right hand. The key to success relies on using the correct tension and proper fixation of the yarn loop.
If you are having difficulty with your initial stitches, try each step in slow motion to ensure that you do not miss a stitch or make any mistakes while stitching. Further guidance can easily be found online if needed, providing simple instructions and tips that enable even hesitant beginners to create this impressive crochet piece confidently.
Why Should You Make a Magic Ring Crochet Left Handed?
There are many reasons that left-handed crocheters might choose to create a magic ring when starting a project. Since the loops in the tension ring form a permanent and secure closure, it is very simple for the left-handed user to remove or close when finished.
It also helps give projects an even tension, making it easier to fit the pieces together and giving them a smoother, more even look. Additionally, it creates an element of surprise as you can easily hide your starting chain within the better-looking closure of the tensile ring.
Most importantly, though, forming this type of closure can help left-handers prevent tangling and twisting of their yarn which has been known to happen with chains made by right-handers. So if you want to ensure your crochet projects look amazing every time, making a magic ring left-handed is definitely something you should consider!

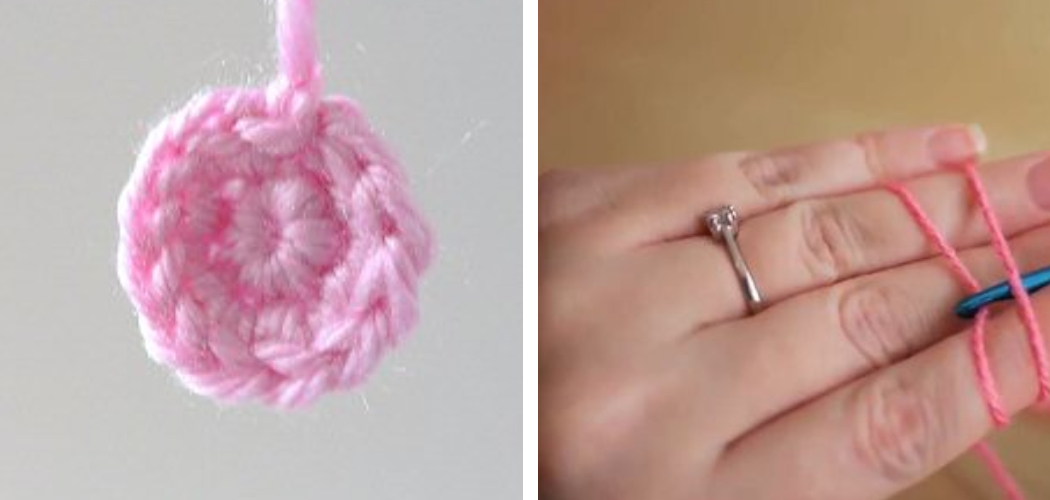
7 Steps to Follow on How to Make a Magic Ring Crochet Left Handed
Step 1: Make a Slip Knot on Your Hook
To begin, make a slip knot on your hook just like you would with your right hand. Next, take the yarn in your left hand, loop it around your fingers, and then pull one end through the loop and tighten it with your hook. You should now have an open loop of yarn at the end of your hook that looks like a mini noose.
Step 2: Hold Your Yarn Tautly Between Your Index Finger and Thumb
Now, hold the long tail of yarn behind the slip knot between your index finger and thumb (like you might if you were making a regular chain stitch). This helps keep tension on the yarn while you work. You should also hold onto the short tail of yarn at this point as well—this will help keep everything in place as you work.
Step 3: Insert Hook into Loop & Draw Up Yarn
Next, insert your hook into the center of the slip knot loop and draw up some of the working yarn so that there is a loop of yarn on top of your hook. Make sure that both tails are still held firmly between your index finger and thumb, so they don’t get tangled up in each other or come undone from their respective loops!

Step 4: Create Stitches Around the Loop & Pull the Closed
Now the tricky part for left-handers is creating stitches around this small loop! It may be helpful to use what is known as “thumb counting,” which means placing one thumb over each side of the loop while counting out loud (or mentally) each stitch that is made around it until all five stitches or rounds are complete.
When done correctly, these five stitches should create an “X” shape inside the original loop, allowing us to pull both tails tight enough to close off our magic ring completely! Once pulled completely tight, we can continue working our pattern as usual within this newly closed space!
Step 5: Pull the Remaining Tail Through the Loop
The final step is to pull the remaining tail through the center of both loops created in step 4. By doing this, we will be able to ensure that our magic ring is completely closed off and secure. We can then use this as a foundation for any type of crochet pattern!
Step 6: Remove the Hook
Once the remaining tail has been pulled through the loops and knotted off, you may remove your hook from the yarn. Now your magic ring is ready to be worked into your pattern!
Step 7: Use Your Magic Ring
Now that you have a secure closed loop of yarn, you can use this as the foundation for any number of crochet patterns. To do so, simply insert your hook into the center of the magic ring, draw up a loop, and start crocheting from there! Enjoy creating beautiful projects with your left-handed magic ring crochet!
Now that you know how to make a magic ring crochet left handed, you can begin creating all sorts of projects with ease! This simple technique is a great way to start off any pattern and will ensure that your stitches are kept secure and even. So grab some yarn and a crochet hook, and get started on your next masterpiece!

Things You Need to Know Before Making a Magic Ring Crochet Left Handed
Before attempting to crochet a magic ring with the left hand, you must familiarize yourself with the altered yarn management technique. In addition, some basic stitches and tools such as the slip stitch, single crochet, and an appropriate-sized crochet hook are also required.
Additionally, understanding how to increase and decrease your stitch count will be extremely useful as you create your ring. Therefore, it is important to remain patient, deliberate, and precise in your motions as you practice this new approach to crocheting.
There is a learning curve involved, but by taking time and investing effort into mastering the crocheting methods for a left-handed magic ring, you can create beautiful projects!
Benefits of Making a Magic Ring Crochet Left Handed
If you crochet left-handed, making a magic ring can be a great new skill to add to your craft box. A magic ring is an important technique when crocheting in the round; it creates an adjustable beginning, so there are no gaps at the center when working with well-known stitches such as single, half double, double, and treble crochet.
Working this stitch left-handed will help unlock deeper design possibilities previously locked away by traditional methods of creating a “center.” With practice and patience, you’ll soon be able to achieve beautiful results that draw admiration from all around.
Not only does it add new creative solutions for left-handers, but designing with this method can also save time on the traditional slip knot start – allowing more opportunities for intricate patterns and color arrangements without sacrificing efficiency.
4 Common Mistakes People Make When Trying to Make a Magic Ring Crochet Left Handed
1. Not Following the Instructions
One of the most common mistakes people make when making a magic ring crochet left hand is not following the instructions. There are a few different ways to make a magic ring, and it is important to follow the specific instructions for how you are doing it. You may have a too-loose or tight ring if you do not follow the instructions.
2. Not Making the Ring Tight Enough
Another common mistake people make when making a magic ring is not making the ring tight enough. It is important to make sure that the ring is pulled tight so that there are no gaps in the stitches. If there are gaps in the stitches, your finished project will not look as nice.
3. Not Crocheting Over the Tail
Another mistake people make when making a magic ring is not crocheting over the tail. The tail is the end of the yarn that is left after you have made your slip knot. It is important to crochet over the tail so that it does not come undone.

4. Pulling Too Tight
The last mistake people often make when making a magic ring is pulling too tight. Pulling the ring tight enough so there are no gaps in the stitches is important, but you do not want to pull it so tight that it hurts your fingers.
You Can Check It Out to Crochet a Pumpkin Leaf
Conclusion
Making a crochet magic ring with your left hand might seem intimidating at first, but with some practice, it can become second nature! By following these steps carefully and using some “thumb counting” techniques along the way, any left-hander can learn how to create beautiful crochet projects that start off with perfectly formed magic rings every time!
With just a little bit of patience and practice, you’ll soon be creating beautiful crochet pieces that everyone will admire – even if they can’t tell which hand you used! Thanks for reading our post about how to make a magic ring crochet left handed.
You Can Check It Out to Fasten off Crochet