
Are you a knitting enthusiast looking for help mastering the tricky art of blocking? Blocking can play a huge part in bringing your knitted items to life, and it’s often considered one of the key expectations if you want to complete professional-looking projects.
Fortunately, there are easy ways to apply correct blocking techniques that will have pronounced effects without taking too much time or effort. In this blog post, we’ll take an in-depth look at what blocking is and discuss some top tips on how to block knitting project!

Blocking can be intimidating, but with the right tips and techniques, it doesn’t have to be! In this post, we will walk you through the processes of blocking in detail so that you can feel more comfortable about tackling bigger and better knitting projects.
Don’t be shy – with our guidance, even novice knitters will quickly become experts at blocking pieces successfully every time. Get ready for beautiful finished products- let’s get started!
Why May You Want to Block Knitting Project?
1 . To Enhance Appearance
Knitted projects can often benefit from blocking to give them a more polished look. Blocking opens up stitch patterns and evens out fabric texture, making it look much neater. By blocking a project you can also make sure that the finished item is of the correct size and shape for the pattern.
This is especially important if you have made something like a shawl or garment which needs to fit the person you are making it for.
2 . To Even Out Tension Differences
Sometimes, if a knitter has lots of tension differences in their work, blocking can help even them out and make the finished project look more professional. For example, if one side of a scarf has pulled in more than the other side, blocking can help to even it out and make it look more symmetrical.
3 . To Make Sure Your Projects Last
Blocking also helps projects to last by making sure they are accurately sized. If you don’t block a project then over time the fabric may stretch out of shape or distort due to tension differences between different sections of the project. Blocking also helps to protect projects from damage by helping the fabric hold its shape over time.

4 . To Make Projects Look Professional
Finally, blocking your finished projects will make them look much more professional and polished than if they weren’t blocked at all. This is especially important if you are planning to give your finished project as a gift, or if you’re selling them. Blocking will really help to make your projects stand out and look their best.
How to Block Knitting Project in 5 Easy Steps
Step 1: Gather All The Tools
The very first step is to gather all the tools you’ll need for blocking your knitting project. You will need a flat surface, such as an ironing board or blocking mats; some pins; and something to steam with. If you are using blocking mats then make sure they are large enough to fit the entire project.
Step 2: Measure The Project
The next step is to measure your project. Measure the width and length of the project, and take note of any parts of the pattern which need to be blocked a certain way (for example, a neckline or cuffs). Once you have measured your project you can move on to the next step.
Step 3: Wet The Project
Next, you will need to wet the project. This can be done with either water or steam – but make sure that whatever you use is not too hot and does not contain any detergents (such as fabric softener). You want to make sure that your project is damp, but not soaking wet.

Step 4: Blocking The Project
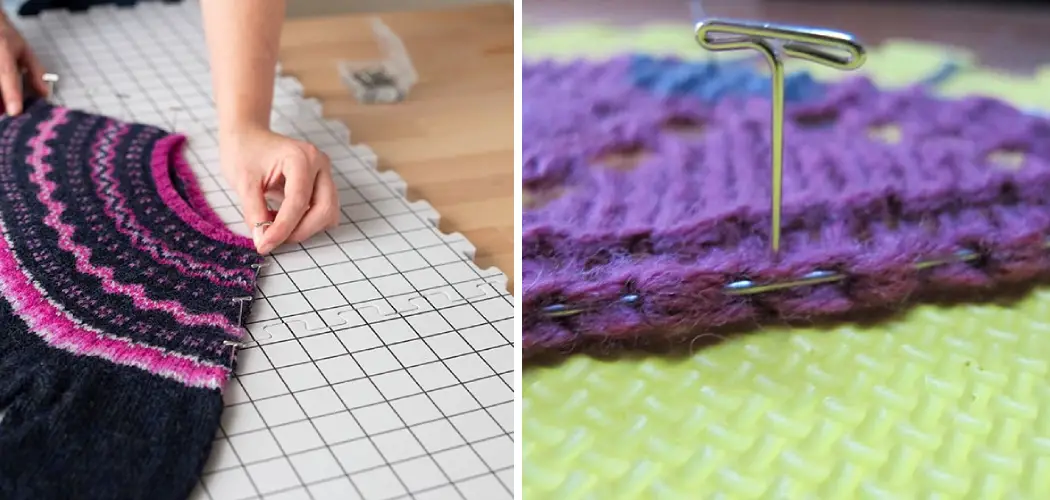
It’s time to start blocking! Lay the project out on your flat surface and use pins to secure it in place. Make sure you are pinning along pattern lines and measurements, as this will ensure that the finished product is the correct size and shape.
Step 5: Allow To Dry
Once you’ve pinned your project in place, you need to allow it to dry. This can take anywhere from a few hours to several days depending on the size of the project and how wet it is.
Some Extra Tips to Block Knitting Project
1 . Use Plenty of Blocking Wires
When blocking your knitting project, it is important to use plenty of blocking wires. These blocking wires are flexible and can be used to help shape the finished pieces. The more you use, the better the final results will be!
2 . Soak Your Pieces in Lukewarm Water
Before you start to block your project, be sure to soak your pieces in lukewarm water for a few minutes. This will help the fibers relax and make it easier to shape your project. Be sure not to use too hot of water as this can damage the fibers.
3 . Use a Blocking Board or Towel
Once you’ve soaked your pieces in water, you’ll need to lay them out on a blocking board or towel. This will provide the perfect surface for getting the pieces to the desired shape and dimension. If you don’t have a blocking board, an old towel will work just as well!

4 . Pin Your Pieces
Once your pieces are laid out on a blocking board or towel, it is important to pin them. This will ensure that the pieces stay in place while you work and get them to their desired shape. Make sure not to use pins that are too sharp as this can damage the fibers.
5 . Let Dry Thoroughly
After you’ve pinned your pieces in place, the last step is to let them dry thoroughly. Make sure to leave plenty of time for this process as it can take quite a bit of time depending on how damp the pieces are. Once they are completely dry, they should be ready for wearing or displaying!
6 . Block Regularly
Once you’ve mastered the basics of blocking, it is important to block your knitted pieces regularly. This will ensure that they always look their best and stay in top condition for years to come. Blocking doesn’t need to be a tedious task—with just a few simple steps, you can make sure your projects look perfect every time!
Frequently Asked Questions
What Precautions Do I Need to Take When Blocking My Knitting Project?
When blocking a knitting project, it is important to use caution and take proper precautions to ensure the best possible outcome. The following are some tips on how to properly block a knitting project Use surface protection such as carpeting or towels when applying pins to avoid damaging your floor.
To secure the pins in place, use pins with a flat head or that have been covered with a small cloth. Make sure to insert the pins into the edges of the fabric so that it is not likely to stretch out too much. Also, take extra care when inserting and removing pins so as not to snag any of the stitches.
Finally, be sure to check your tension regularly while blocking and adjust the pins accordingly. With these precautions, your knit projects will be sure to come out looking beautiful!

How Do I Know If My Project Needs Blocking?
Blocking is an important step in finishing a knitting project for best results. Generally speaking, if you have completed a lace or cabled pattern that has intricate shapes and edges, it is best to block your project. The same goes for items that have been worked in stockinette or garter stitch as the blocking will help even out their shape.
Additionally, if you are planning on wearing an item of clothing you’ve knitted, blocking can provide a more comfortable fit and ensure that the garment hangs properly on your body.
What Supplies Do I Need for Blocking?
For blocking knitting projects, you will need a few basic supplies. These include a spray bottle of clean water; pins or blocking wires; a blocking mat; and possibly some detergent or wool wash.
It is also helpful to have scissors and measuring tape on-hand in order to measure your project before and after blocking. Additionally, you may want to have an ironing board or a flat surface such as a bed that is large enough for blocking larger projects.
What Is the Best Way to Block My Knitting Project?
The best way to block a knitting project is by spraying it with clean water until it is damp but not soaked. Then, carefully reshape and arrange the project according to the pattern instructions and pin it in place with pins or blocking wires.
If using pins, be sure that they are secure so as not to stretch out your knitting too much. Once the project is pinned into place, allow it to dry completely before removing the pins or wires.
Conclusion
Blocking is an essential part of any finished knitting project. While it can be a time consuming process, the results are always worth the effort. Not only does blocking improve the overall look and feel of your knitted items, but it ensures that your hard work lasts for many years to come.
It’s important to choose carefully when selecting a blocking surface and method, as these will impact how your knitwear turns out in the end. Making mistakes at this point could ruin all of your hard work!
Following this advice on how to block knitting project can help make sure that you secure stunning results with minimal effort whenever you decide to tackle a new knitting project.