
Tired of mundane home decor? Spice up your living spaces with a pouf – a versatile and colorful piece of furniture that can be tailored to any space! Whether it’s adding extra seating in the living room or providing an inviting spot to relax in your bedroom, poufs are the perfect way to add modern flair.

But before getting lost in beautiful fabrics and stitched designs, let’s talk about how to stuff one – it’s not quite as straightforward as you might think!
In this blog post on how to stuff a pouf, we’ll cover everything you need to know about filling a puff – from selecting the right material to proper stuffing techniques. So grab some pillows, batting, and fabric of your choice; we’ve got everything else covered here!
What is Pouf?
A pouf is a type of furniture that offers comfortable seating options in both modern and traditional spaces. It’s usually placed at the side of chairs or sofas, as an accent piece that brings added texture and visual interest to the room. It can also be used as a footstool or extra seat if needed! Poufs come in various shapes, sizes, and fabrics, allowing for a great degree of customization.
Needed Materials
Given below are the materials that you will need to fill a pouf:
- Pillows or Polystyrene Beads/pellets, Depending on the Desired Firmness of Your Pouf
- Batting
- Fabric, Ideally With a Good Tight Weave and Durable Material
- Needle and Thread, or Sewing Machine
- Scissors
- Stuffing Tool (Optional but Recommended)
10 Step-by-step Guidelines on How to Stuff a Pouf
Step 1: Measure and Cut the Batting
To begin, measure the size of your pouf and cut the batting accordingly. It’s important to use a fabric that is thin enough to fit into seams. It should also be strong and durable enough so that it won’t easily tear or rip when being stuffed. But remember, if you’re using a patterned fabric, it should have a tight weave in order for the stuffing to stay in place.

Step 2: Cut the Fabric
Take your chosen fabric and measure it according to the size of your pouf. Depending on what kind of look you are going for, you can either cut two pieces that fit the same size as your pouf or one piece that is slightly larger than the circumference of the pouf. Once you have cut out your pieces, sew them together around the edges to form a pouch for stuffing later on.
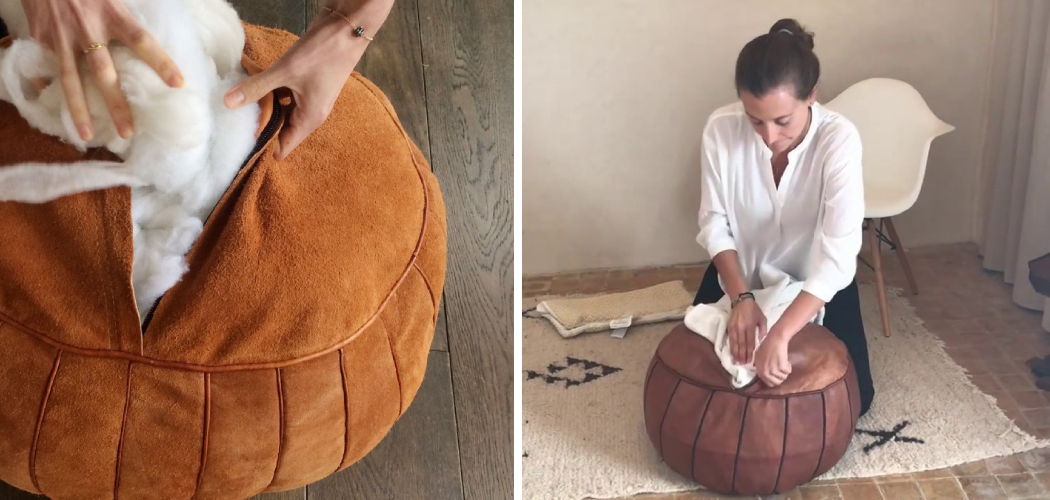
Step 3: Fill With Pillows or Polystyrene Beads/Pellets
Now it’s time to fill your pouf! The amount of stuffing you put will depend on how firm or soft you want the final product to be. If you prefer a softer puff, opt for filling it with pillows or batting. On the other hand, if you’re looking for something more supportive and dense, polystyrene beads/pellets are a great choice.
Step 4: Sew the Pouch and Shut
Once you are done adding the filling, it’s time to close up the pouch by sewing it shut. Make sure to use a strong thread or machine that can handle heavy materials like polystyrene beads/pellets. However, if you want to make sure that the stuffing won’t fall out, it is recommended to use a stuffer tool to push the filling down before sewing.

Step 5: Stuff the Fabric into the Pouf
Now that the pouch is securely shut, it’s time to stuff your fabric into the pouf. This may be a bit challenging as the material should fit snugly inside without any lumps or bulges. If you have a stuffing tool, this can help make the job easier and faster. Otherwise, use your hands to push and pull until the material is evenly distributed throughout the pouf.
Step 6: Sew the Fabric to the Outer Shell
Once you’ve successfully stuffed your fabric into the pouf, it’s time to sew it to the outer shell using a thick thread or machine needle. Make sure that all of your seams are secure and tight before moving on to the next step! You may also need to sew around any corners or edges that don’t have a seam.
Step 7: Place the Remaining Batting Inside
Now it’s time to place the remaining batting inside of your pouf. This will provide added insulation and protection for the filling. Make sure to spread out the batting evenly throughout the interior so that it’s not lumpy or uneven. Otherwise, you may end up with an uneven pouf that looks unappealing.
Step 8: Sew Up Any Openings
Once you have filled your pouf, it’s time to sew up any openings that may have been left after stuffing the fabric. This will ensure a tight seal and prevent any of the fillings from falling out. It’s important to be thorough as any gaps may weaken the structure of your pouf in the long run.

Step 9: Stuff Any Remaining Clumps
lumps and make sure everything is evenly distributed throughout the pouf. This should help with any remaining bumps or irregularities in the fabric. But keep in mind that the stuffing should not be too tight as this can make your pouf uncomfortable to sit on. This step may require a few tries to get it just right!
Step 10: Enjoy Your New Pouf!
You did it! Now all that’s left to do is enjoy your new pouf. Sit back, relax, and bask in the modern elegance of your living space. With a little bit of effort and knowledge, you can create a beautiful piece of furniture that will last for many years to come! Always make sure to take care of your pouf by vacuuming it regularly and spot-cleaning as needed.
Following these steps on how to stuff a pouf, stuffing a pouf is easy and fun! All it takes is a little bit of patience and creativity to create your own modern masterpiece. So don’t be afraid to get creative and start experimenting with different fabrics, shapes, and colors – you’ll be surprised at the unique results that come from customizing your very own pouf!
Tips & Tricks
- If You’re Using Polystyrene Beads/pellets, Make Sure to Use a Stuffing Tool or Vacuum Cleaner Hose With Nozzle Attachment to Avoid Spilling.
- When Stuffing the Fabric Into the Pouf, Try to Use a Rolling Motion as Much as Possible So That Everything Fits Snugly.
- If You’re Having Trouble With Lumps and Bumps, Try Adding an Extra Layer of Batting Over Them. This Will Help to Smooth Out Any Irregularities in the Fabric.
Frequently Asked Questions
Q: What is the Best Material to Use for Stuffing a Pouf?
A: The best material to use for stuffing a pouf will depend on how far or soft you would like your pouf to be. If you prefer a softer puff, opt for filling it with pillows or batting. On the other hand, if you’re looking for something more supportive and dense, polystyrene beads/pellets are a great choice.
Q: How Do I Make Sure My Pouf Does Not Lose Its Shape?
A: To ensure your pouf does not lose its shape, make sure to use a fabric that is thin enough to fit into seams and strong and durable enough so that it won’t easily tear or rip when being stuffed. Additionally, you can add an extra layer of batting over any lumps and bumps to help smooth out the fabric.
Finally, make sure to sew up any openings that may have been left after stuffing the fabric, to ensure a tight seal and prevent any of the filling from falling out.

Q: How Did the Pouf Become a Popular Piece of Furniture?
A: The pouf has been around in various forms since ancient times, but it wasn’t until the mid-19th century that it became popular as a piece of furniture. It gained popularity due to its versatility and comfort.
Today, poufs are still being used in many modern homes and interiors as an accent piece, footstool, or extra seating. They are also popular in outdoor spaces such as patios and decks.
Q: How Do I Keep My Pouf Clean?
A: To keep your pouf clean, it is best to spot clean with a mild detergent if needed. Additionally, you can use a vacuum cleaner with a nozzle attachment to get rid of any dirt and dust that may have accumulated over time. Avoid using strong chemicals or abrasive cleaners as they could damage the fabric or cause fading.
Additionally, it is best to avoid direct sunlight exposure as it can also cause fading. Finally, make sure to keep your pouf out of damp areas, such as basements, to avoid mildew growth.
Conclusion
With this comprehensive guide, you now have the ability to efficiently and effectively stuff a pouf of your own. Making a pouf is more than just a fun project — it’s also a great way to introduce yourself to the joys of upcycling!
Get creative with colors and prints; there are endless possibilities when it comes to decorating your pouf. Whatever material you choose, make sure you enjoy the process of creating something both unique and useful.
Not only will DIY-ing your own pouf make your home look gorgeous, but it will also make you feel accomplished for taking creative matters into your own hands. So show off that beautiful creation and take pride in all the hard work you did after reading this article on how to stuff a pouf!