
Are you ready to add a beautiful and unique touch to your wardrobe? Macrame earrings are the perfect way to do just that! Learn how to make these handmade earrings in no time, even if you’re new to crafting. I will provide easy-to-follow instructions on how to make macrame earrings, so you can create two different styles of macrame earrings: woven V shapes and fringed rounds.

With just some colorful yarn and simple jewelry findings, you can quickly make wonderful accessories for yourself or give them as meaningful gifts. Let’s get started on this exciting project!
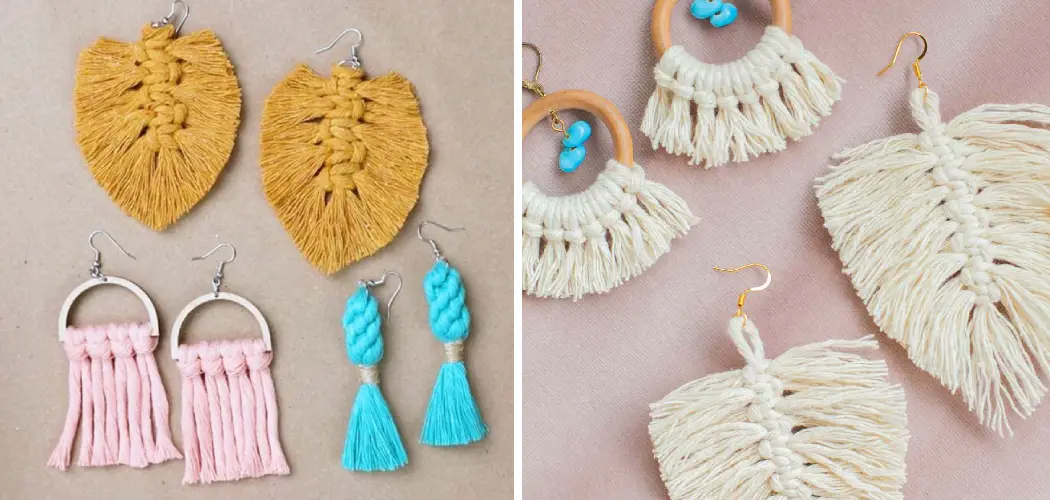
What are Macrame Earrings?
Macrame earrings are handmade pieces of jewelry made out of colorful yarn. The process of making macrame earrings involves knotting and braiding the yarn in order to create various patterns or shapes, such as fringed rounds and woven V shapes. Macrame earrings come in a variety of styles and can be customized with color combinations to make them truly unique.
11 Step-by-step Guides on How to Make Macrame Earrings
Step 1: Gather All the Necessary Supplies
You will need:
- Two Colors of Yarn, Such as Worsted-weight Cotton or Acrylic Yarn (at Least 8 Yards of Each Color)
- Jewelry Findings Such as Earring Hooks, Jump Rings, and Earring Backs
- Scissors
- A Tape Measure
- Optional: Needle Nose Pliers (to Crimp the Jump Rings)
Step 2: Cut Two Pieces of Yarn for Each Earring
You will need two strands of yarn for each earring: one in your main color and one in your accent color. Begin by measuring out 8 yards of each color and cutting the yarn with scissors. If you’d like your earrings to be longer, add a few more yards of yarn. But keep in mind that you will need 8 yards of each color for one complete earring.
Step 3: Tie a Knot at One End
Start by tying a knot at one end of both strands of yarn for each earring. If you’re making woven V shape earrings, tie the two strands together. For fringed round earrings, tie them separately. This will keep your knot from coming undone as you start to tie the macrame knots. However, try not to tie the knot too tightly as this will make it difficult to pass the yarn through when creating the earrings.

Step 4: Begin Weaving the Yarn in a V Shape (for Woven V Shape Earrings)
Take one strand of yarn and make a loop around the other strand. Then pull the loop through itself to make a knot. Alternate between weaving each strand over and under each other until you have reached the desired length.
Make sure to keep the weave tight and even as you go. For a more decorative look, try adding beads into your macrame knots! It’s best to add the beads before you start weaving, as inserting them afterwards can be difficult.
Step 5: Tie Off the End (for Woven V Shape Earrings)
When you’ve finished weaving, tie off the end with a knot. To make sure your knot is secure, pull on each strand of yarn. This will also help the knot to lay flat. It might be helpful to use needle nose pliers to help pull the knot tight.
Once you’ve finished, cut off any excess yarn with scissors. But make sure to leave a bit of extra yarn in case you need it later. This will come in handy when you’re attaching the earring findings.
Step 6: Make a Loop at One End (for Fringed Round Earrings)
Take one strand of yarn and tie it in a loop by making a knot. Then take the other strand and wrap it around the center of the loop several times to create the desired shape.
When you’re finished, tie off the end with a knot. It might be helpful to use needle nose pliers or a crochet hook to help pull the knot tight. Again, make sure to leave some extra yarn in case you need it later for attaching the earring findings.

Step 7: Begin Fringing the Yarn (for Fringed Round Earrings)
From one end of your loop, begin fringing by taking each strand of yarn and wrapping it around the center several times, then pulling it through so that it creates a tassel. Alternate between the two colors of yarn to create a unique and colorful pattern. Keep going until you reach your desired length. But if your earrings are too long, you can always shorten them by trimming the tassels with scissors.
Step 8: Tie Off the End (for Fringed Round Earrings)
When you’ve finished fringing, tie off the end with a knot. To make sure your knot is secure, pull on each strand of yarn. You can also use needle nose pliers or a crochet hook to help pull the knot tight. Once you’ve finished, cut off any excess yarn with scissors. But make sure to leave a bit of extra yarn in case you need it later.
Step 9: Attach the Jewelry Findings to Your Earrings
Cut two pieces of jewelry findings for each earring (e.g. an earring hook and a jump ring). Then attach them to your macramé earrings by opening the jump rings with needle nose pliers and slipping them onto the knotted ends of your earrings.
It’s best to attach the jewelry findings before you start fringing or weaving because it will be difficult to insert them afterward. Once you’ve attached the jewelry findings, use needle nose pliers to crimp the jump rings shut for extra security.

Step 10: Crimp the Jump Rings (Optional)
If desired, you may crimp the jump rings by using needle nose pliers to gently wrap them around themselves, creating a secure loop. This is an optional step, but it will add extra durability and security to your earrings. You can also use jewelry glue to adhere the jump ring in place if you don’t have access to needle nose pliers.
Step 11: Put the Earrings on and Enjoy!
Your beautiful macramé earrings are finished! All that’s left to do is put them on and enjoy your handmade creations. With just a few supplies, you can make unique and stylish accessories that will last for years to come. Have fun crafting your own macramé earrings and don’t forget to share them with friends!
If you enjoyed making these earrings, why not try out some more DIY jewelry projects? Learn how to make a simple beaded necklace or dangle earrings using beads and findings – the possibilities are endless! Have fun crafting and creating unique accessories for yourself and others
Following the same simple steps on how to make macrame earrings, you can easily make many different styles of macramé earrings. Try using more than two colors of yarn and beads for a fun twist on the classic design. Or, try out other shapes like stars or hearts. The possibilities are endless with macrame!
Do You Need to Hire Professionals?
If you’re looking for professional help with creating macrame earrings, there are many experienced artisans out there who can help. You could find someone in your local area or online who specializes in crafting handmade accessories. Working with a skilled artisan can ensure that your jewelry is made to the highest of standards and will last for years to come.
Frequently Asked Questions
Q: What Kind of Yarn Should I Use for Making Macrame Earrings?
A: Any kind of yarn can be used, such as worsted-weight cotton or acrylic yarn. You can also mix and match different colors and weights of yarn to create unique textures and styles.
Q: What Type of Jewelry Findings Should I Use?
A: Most jewelry findings should work, such as earring hooks, jump rings, and earring backs. However, be sure to double-check the size and weight of your jewelry findings to ensure they are compatible with your yarn and design.

Q: How Long Do Macrame Earrings Last?
A: With proper care, macrame earrings can last for years! Be sure to store them in a dry place away from direct light when not in use. Additionally, make sure to clean the metal jewelry findings regularly with a jewelry cloth or mild dish soap and water. With just a little bit of effort, your macrame earrings will stay looking beautiful for years to come!
Q: What Other DIY Jewelry Projects Can I Try?
A: The possibilities are endless! From beaded necklaces and bracelets to dangle earrings, there are so many different jewelry projects you can try. You could also learn how to crochet or knit jewelry pieces for a unique look. With just a few supplies and a little bit of creativity, the possibilities are endless!
Conclusion
Making macrame earrings is a great way to get creative and add something unique to your outfit! With a few simple supplies and this tutorial on how to make macrame earrings, you’ll be able to make all sorts of beautiful macrame earrings. Why not take it a step further by creating dyed yarn or bright-colored tassels to add more color and texture?
Crafting can be an incredibly rewarding experience, so don’t forget to enjoy the process of designing and creating your very own unique piece of jewelry. Whether you give them as gifts or keep them for yourself, with just a bit of practice the possibilities for design are endless. Rock your handmade creation with flair and confidence!