
In the age of digital communication, receiving a handwritten letter or card in the mail can be a heartwarming and cherished experience. Adding a personal touch to your envelopes not only elevates the aesthetics of your correspondence but also shows thoughtfulness and care.
Thanks to modern technology, such as the Cricut cutting machine, you can now easily transform plain envelopes into beautifully customized pieces of art. In this article, we’ll dive into the creative world of envelope embellishment with Cricut, providing you with step-by-step instructions on how to write on envelopes with cricut, tips, and ideas on how to write on envelopes with precision and style.

Whether you’re sending out wedding invitations, holiday cards, or simply want to make your everyday mail more delightful, this guide will help you harness the power of your Cricut machine to create stunning, personalized envelopes that leave a lasting impression on the recipients. Say goodbye to ordinary envelopes and get ready to explore the limitless possibilities of envelope decoration with Cricut.
The Art of Writing on Envelopes with a Cricut Machine
Writing on envelopes with a Cricut machine is an art form. With the right technique, you can add a special touch to your stationery and make it stand out from the rest. No matter if you’re writing for business or pleasure, here are some tips to help you get started with Cricut envelope writing.
The Versatility and Convenience of Using Cricut to Write on Envelopes
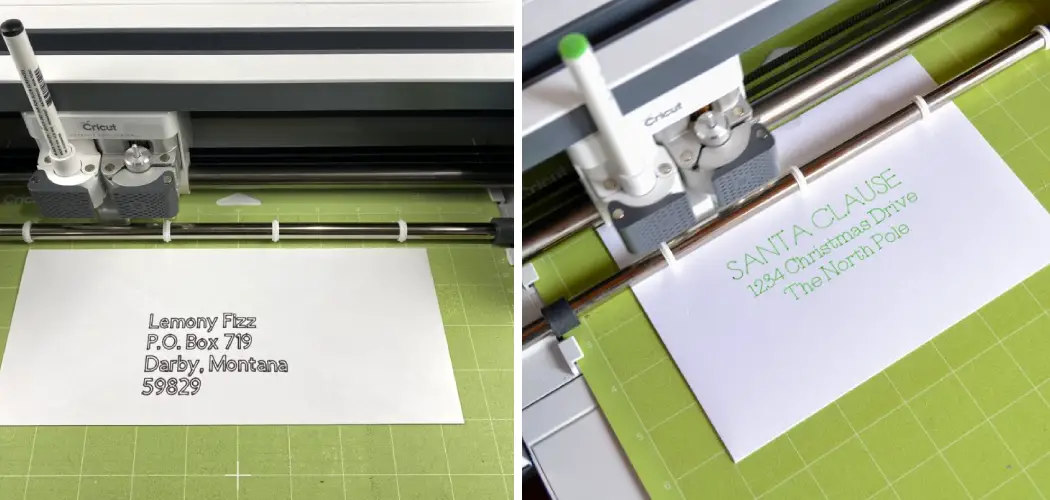
Cricut is an incredibly versatile and convenient tool for creating beautiful designs on a variety of mediums. From paper crafts and fabric projects, to personalized home decor, Cricut allows you to create stunning projects with relative ease. One of the greatest features of Cricut is its ability to write on envelopes! Writing your own addresses and messages is a great way to make your envelopes stand out.
Choosing the Envelope Size and Type
When it comes to writing on envelopes with Cricut, the size and type of envelope you choose will be crucial. The most common types of envelopes are A2, A6, A7, and Square Flap sizes. Depending on the design you’re creating and what you plan to write on your envelope, some of these sizes may not work for you.
If you’re unsure which size would work best, it is always a good idea to start with the larger ones and trim down from there if needed.

In terms of the material of the envelope, your options are plentiful. Cricut has an array of envelopes crafted from different materials, such as cardstock, metallic paper, and vellum. Depending on the look you’re aiming for, it is important to choose the right type of material so that your envelope looks professional and aesthetically pleasing.
Once you have chosen the size and type of envelope you would like, prepare it for writing by adding Cricut’s LightGrip Machine Mat on its back. This will hold the envelope in place while you write.
10 Steps How to Write on Envelopes with Cricut
Step 1: Gather Your Supplies
Before you start writing on envelopes with your Cricut, it’s essential to gather all the necessary supplies. You’ll need:
- Cricut cutting machine
- Computer with Cricut Design Space software installed
- Standard Grip or LightGrip Cricut cutting mat
- Envelopes
- Cricut pens or markers compatible with your machine
- Internet connection (for accessing fonts and designs)
Step 2: Prepare Your Design in Cricut Design Space
Open Cricut Design Space on your computer and create a new project. Determine the size and style of the text you want on your envelopes. You can use various fonts, shapes, and designs available in Design Space to customize your envelope writing. Experiment with different styles until you’re satisfied with the design.

Once you’re happy with how your design looks, select the “Text” tool and type in the text you want to appear on your envelopes. Then click on the “Edit” tab at the top of Design Space, and adjust the size and color of your design as desired.
Step 3: Set Up Your Envelopes
Place your envelopes on the Cricut cutting mat. Make sure they are positioned squarely and securely so they won’t shift during the cutting and writing process. Use a ruler or guides to ensure proper alignment.
If you’re cutting a custom size envelope, make sure to adjust your Cricut settings accordingly. You can also use the Cricut maker or explore machines to write on envelopes that are already cut to size.
Step 4: Load the Cutting Mat
Turn on your Cricut machine and load the cutting mat with the envelopes into the machine. Make sure it’s well-aligned with the machine’s guides. The machine should be ready to go.
Once the mat is loaded, select the type of writing you’d like to do on the envelopes. You can choose from classic calligraphy, handwriting features, or even a font that is close to your own handwriting. Choose one and then you’ll be ready to start writing on the envelopes!
Step 5: Choose the Appropriate Pen Settings
In Cricut Design Space, select the appropriate pen or marker settings for your project. Ensure that the settings match the type and size of the pens or markers you plan to use. These settings can typically be adjusted in the software to achieve the desired line thickness.
Once you’ve chosen the appropriate settings, click “Go” to transfer your design onto the envelope. This process may take several minutes, depending on how intricate your design is. When your design is complete, remove it from the Cricut and enjoy a unique and personalized envelope!

Step 6: Attach Pens to the Cricut
Insert the chosen Cricut pen or marker into the machine’s pen holder. Ensure it’s securely in place. Depending on your machine model, you may need to follow specific instructions for pen loading. Though newer machines usually come with an automatic pen detection feature, older ones may require you to push the pens in manually.
Step 7: Send the Project to the Cricut
Double-check all settings and make sure everything is in order. Then, click the “Make It” button in Cricut Design Space to send your project to the machine. The Cricut will follow the cutting and writing instructions you’ve set. When done, you can remove the envelope from the cutting mat.
If you made a mistake or need to adjust something with your writing, it’s possible to do so by using an X-Acto knife and slowly peeling away the parts that need to be re-written. Then, just send the project back over to your Cricut machine.
Step 8: Monitor the Process
As your Cricut machine starts working, keep a close eye on it, especially during the writing phase. Ensure that the pens or markers are creating clean, legible lines on the envelopes. If you notice any issues, such as ink smudging or skipping, you may need to adjust your settings or replace the pen. Additionally, pay attention to the amount of pressure that your Cricut is applying to the envelope as it writes.
Step 9: Unload the Cutting Mat
Once the Cricut has completed the writing and cutting process, carefully remove the cutting mat from the machine. Take your time to ensure the envelopes don’t get damaged during this step.
Step 10: Carefully Remove the Envelopes
Gently peel the envelopes from the cutting mat. Be cautious not to bend or crease them. Your beautifully written and decorated envelopes are now ready to be filled with your heartfelt messages or invitations and sent to your recipients.

Additional Tips and Considerations
- Practice on Scrap Paper: Before using your good envelopes, practice writing on scrap paper to fine-tune your design and settings.
- Test Different Fonts and Colors: Experiment with various fonts and colors to achieve the look you desire.
- Check Compatibility: Ensure that the pens or markers you choose are compatible with your Cricut machine model.
- Use High-Quality Envelopes: Invest in high-quality envelopes for a professional finish.
- Adjust Pressure and Speed: If you encounter issues like bleeding ink or paper tearing, you can adjust the pressure and speed settings in Cricut Design Space.
- Save Your Design: Save your envelope design in Cricut Design Space for future use, especially if you plan to write on more envelopes later.
Conclusion
In conclusion, learning how to write on envelopes with cricut is an important skill whether you’re a professional or amateur artist. You can quickly and easily create beautiful handwritten greeting cards and stationery that are perfect for giving to friends, family, or colleagues.
With the right materials and techniques, writing on envelopes with cricut can be a rewarding creative outlet. From personalized thank you cards to unique invitations, there are countless possibilities for making your work stand out and leaving a lasting impression.
Give it a try today – it might just be the creative project that you didn’t know was missing from your life! And if you forget any of the steps outlined here, simply visit our website for more instruction on how to write on envelopes with cricut. Enjoy crafting today!