
Are you looking for an easier way to repair or hem your garments without using a needle and thread? Enter the Speedy Stitcher – the perfect solution for those seeking a speedy, hassle-free approach to completing any project! From fixing torn trousers to attaching leather patches, this handy tool allows you to skip time-consuming sewing sessions without compromising on quality.

With its wide variety of attachments and endless potential applications, it can make life so much simpler – what more could we ask for in a stitching utensil? In this blog post, we’ll cover everything from how to use a speedy stitcher correctly to creating different types of stitches with ease. So come along with us as we explore the wonderful world of stitchers!
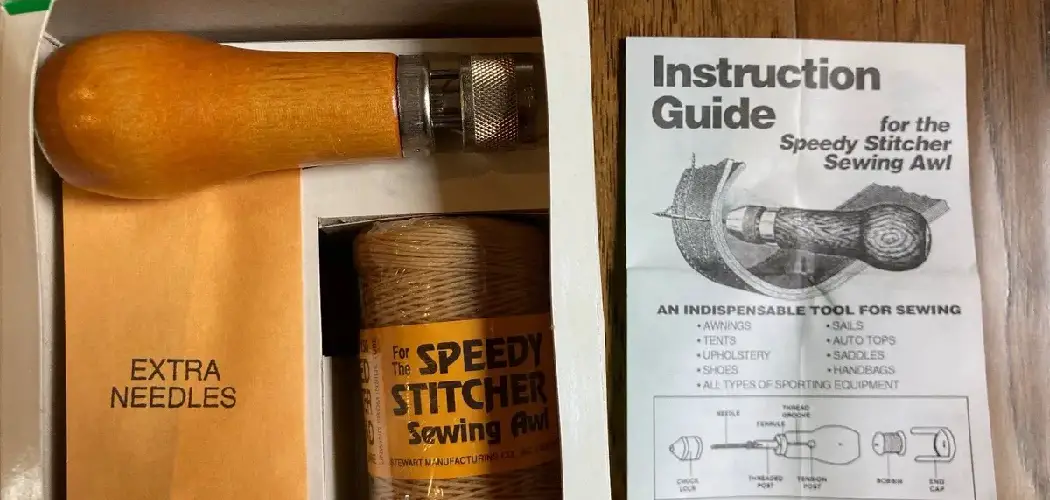
What is a Speedy Stitcher?
The Speedy Stitcher is essentially a sewing tool that consists of a straight needle and two different types of thread – waxed and coarse. The needle can be easily changed, allowing you to switch between lighter material stitching (like cotton) and heavier ones such as leather or denim. It also comes with a bobbin that allows you to adjust the tension of the thread, providing even more versatility.
Necessary Components
Before we dive into how to use a speedy stitcher, let’s get familiar with the necessary components. You will need:
- A Speedy Stitcher
- Waxed Thread or Coarse Thread
- Needle(S)
- Bobbin
- Any Material You Wish to Stitch
Now that we have everything we need let’s get started on using our Speedy Stitcher!
10 Step-by-step Guidelines on How to Use a Speedy Stitcher
Step 1: Thread the Needle
Take your waxed or coarse thread and guide it through the eye of the needle. If you’re having trouble, try wetting the end of the thread or using a needle threader.

You can also use a lighter to melt the end of the thread, creating a sturdier tip for easier threading. It’s essential to ensure the thread is correctly threaded to avoid any complications during stitching.
Step 2: Load the Bobbin
Take your bobbin and load it with the same type of thread you used for threading the needle. Place it onto the bobbin holder, making sure it sits securely on the spindle. Pull out a small length of thread from the bobbin and guide it through the tension washer. Once that’s done, put the bobbin holder back into place to ensure a secure fit.
Step 3: Insert Needle into Stitching Tool
Take your needle and insert it into the stitching tool by pushing the end with the eye of the needle through one of its holes. Leave about an inch or so sticking out on both sides. It’s essential to get the needle in securely and correctly, as this will determine how smoothly your stitching goes. You can always adjust it later if needed.
Step 4: Adjust Bobbin Tension
Before starting to stitch, you may need to adjust the bobbin tension. This will primarily depend on the material you’re stitching and how tight or loose you want your stitches to be. To adjust, turn the knob at the end of the tool towards “+” for tighter tension and “-” for looser tension. A good rule of thumb is to start with a medium tension and make adjustments as needed.
Step 5: Prepare Material for Stitching
Place the material you wish to stitch on a flat surface, making sure it’s secure and won’t move around while stitching. If necessary, use pins or clips to hold it in place. You can also mark the area you want to stitch with a fabric marker or chalk for more precise stitching.

It’s always a good idea to practice on a scrap piece of fabric first before tackling your desired project. Although the Speedy Stitcher makes stitching simple, it may take some time to get used to.
Step 6: Begin Stitching
Hold the stitching tool in one hand and use the other hand to guide it through the material. Start by pushing the needle through the fabric from one end to the other, making sure it passes through both layers evenly.
You can also use your index finger to help push the needle through if needed. Once you reach the end, pull the needle back through, creating a loop on one side of the material. It’s essential to hold the thread taut while pulling the needle through for a tighter stitch.
Step 7: Looping and Securing Stitches
To secure the stitches, take the loop you just created and pass it over the top of the needle, pulling it tight. This will create a knot that will keep your stitches from unraveling.
Continue stitching in this manner, creating evenly spaced stitches as you go along. You can also use the same technique to repair any tears or holes in the fabric by stitching back and forth over the damaged area. It’s essential to keep the stitches consistent and tight for a clean finish.
Step 8: Changing Needles
If you need to switch between different types of needles, simply pull out the needle currently in use from the stitching tool and replace it with a new one. Make sure to adjust the tension accordingly if needed.
You can also change needles midway through a project if you need to switch thread colors or styles. But remember to always secure your stitches before changing needles. This will prevent them from unraveling.

Step 9: Finishing Stitches
When you reach the end of your project, make sure to secure your stitches by creating a knot as we did in step 7. Once you’ve done that, cut off any excess thread and admire your handiwork! You can also use fabric glue or fray check to secure the ends of your stitches for added durability.
It’s always best to finish off your stitches properly to prevent any unraveling or fraying in the future. You can also use this technique to add decorative stitches to your projects.
Step 10: Experiment with Different Stitches
Now that you’ve mastered the basic running stitch using your speedy stitcher, have fun experimenting with different types of stitches! You can try backstitching for a stronger hold, whip stitching for decorative edges, or even zig-zag stitching for more complicated projects. With the Speedy Stitcher, the possibilities are endless!
Following these easy step-by-step guidelines on how to use a speedy stitcher, you can now confidently use your Speedy Stitcher for all your sewing needs. Remember to always practice and experiment with different techniques to improve your skills. Happy stitching!
Frequently Asked Questions
Q: Can I Use the Speedy Stitcher on All Types of Materials?
A: The Speedy Stitcher is suitable for most fabrics such as canvas, leather, denim, and vinyl. It can also be used on softer materials like cotton or silk. However, it may not work well with very thick or delicate fabrics. It’s always best to test it out on a scrap piece of material before stitching on your desired project.
Q: How Do I Change the Thread on the Bobbin?
A: To change the thread on the bobbin, simply use a seam ripper or small scissors to carefully remove any stitches holding the old thread in place. Then, load the bobbin with the new thread and follow the same steps as mentioned in step 2 to adjust the tension and load it onto the bobbin holder.
Q: Can I Use the Speedy Stitcher for Upholstery Repairs?
A: Yes, you can use the Speedy Stitcher for upholstery repairs. It’s perfect for repairing tears or stitching together seams on furniture, car seats, or even tents. However, keep in mind that it may not be suitable for very thick materials or heavy-duty repairs.

Q: Is the Speedy Stitcher Easy to Use?
A: The Speedy Stitcher is straightforward and easy to use once you get the hang of it. It may take some practice to get your stitches consistent and even, but with some patience and experimentation, you’ll be stitching like a pro in no time!
Conclusion
Crafting by hand can be a rewarding experience, and the Speedy Stitcher is a great tool to help you create your own leather projects. Whether you are just getting started with hand stitching or have years of experience, this versatile tool will make any project simpler. So grab your Speedy Stitcher and get creative! With its easy-to-follow instructions and helpful tips, you’ll be able to craft beautiful leather designs in no time at all.
There’s nothing that can compare to the feeling of accomplishment that comes from creating something entirely by hand. So don’t hesitate—get out there and start crafting today! You’ll be pleasantly surprised at how quickly you’ll catch on with just a little practice. And who knows—you may just find yourself becoming the next master leather craftsman! Thanks for reading this article on how to use a speedy stitcher.