
Are you looking for a way to quickly and easily add some extra design elements to your clothes, accessories, or textile projects? Look no further than the versatile outline stitch! This easy-to-learn technique is a great way to add texture and style with just a few simple steps. With this guide, you’ll be able to create an effective outline stitch in no time.

Keep reading through this article on how to do a outline stitch and by the end of it, you will have all the knowledge necessary to start adding beautiful tactile details that make your work stand out from the rest.
Needed Tools and Materials
Given below is a list of materials and tools you will require to start the outline stitch:
- Fabric (Cotton, Linen, or Any Other Lightweight Fabric)
- Embroidery Hoop
- Embroidery Needle
- Embroidery Floss in Desired Colors
- Scissors
10 Step-by-step Guidelines on How to Do a Outline Stitch
Step 1: Prepare Your Fabric
Start by washing, drying, and ironing the fabric to remove any wrinkles or dirt that could affect your stitching. It’s always a good idea to start with clean and well-pressed fabric for any embroidery project. But, if you’re using a fabric that creases easily, perhaps avoid ironing it as the outline stitch requires precise positioning of stitches. You don’t want to spend a lot of time ironing when you can skip it altogether.

Step 2: Choose Your Thread and Needle
While choosing your embroidery floss, keep in mind the thickness of your fabric. If it’s a lightweight fabric, choose a lightweight thread-like six-strand embroidery floss. If your fabric is denser, you can try using thicker threads like perle cotton or wool yarn.
Once you have chosen your thread, make sure to use an appropriate needle size that will easily glide through the fabric’s fibers. However, the needle should not be too thin to avoid creating large holes in the fabric.
Step 3: Secure Your Fabric in the Hoop
Place the inner hoop flat on a table and stretch your fabric over it, making sure it’s centered and taut. Place the outer hoop over your fabric, pushing it down until both hoops are snug against each other.
Tighten the screw to secure your fabric in place. You can now start stitching! It’s also a good idea to have your hoop standing on its own or held in a stand for easier handling. If you’re new to embroidery, this will help free up your hands while stitching.
Step 4: Thread Your Needle
Separate the embroidery floss into two strands and thread one of them through your needle. Tie a knot at the end of the thread and trim off any excess. You can also use a needle threader to make this process easier. But, if you’re using a thicker thread like perle cotton or yarn, you can use the entire strand without separating it. It’s all about personal preference! You can also use multiple strands of different colors to create a unique, multi-colored outline stitch.

Step 5: Start Your First Stitch
Bring your needle up through the back of the fabric, at the starting point of your outline. Make sure to leave a small tail at the back for securing later. Now, poke your needle down through the front of the fabric, about 1/4 inch away from where you came up.
This will be your first stitch. It’s important to keep your stitches consistent in length, so you can either use a ruler or just eyeball it. You can also use a water-soluble pen to draw your outline on the fabric beforehand.
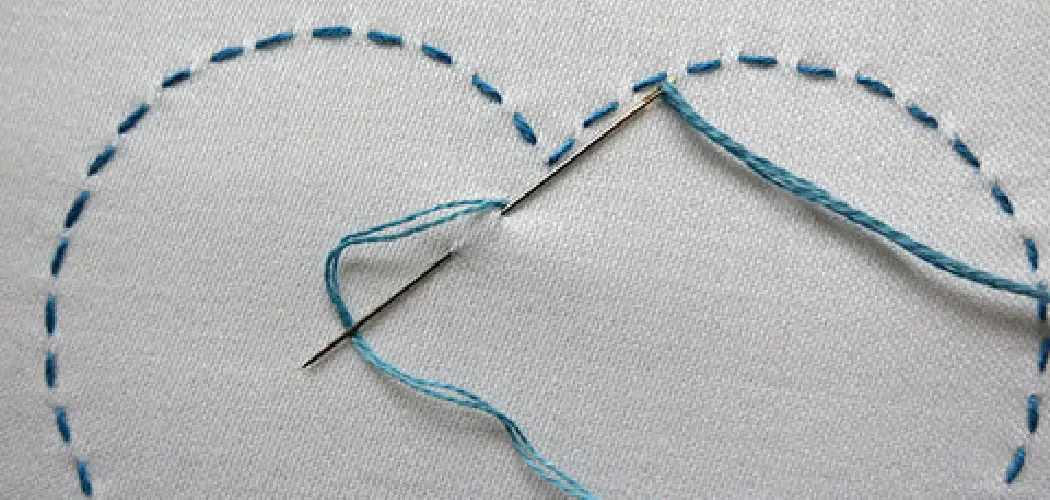
Step 6: Create the Outline
Continue stitching along the outline, making sure each stitch is the same length and evenly spaced. You can stitch using any direction that’s comfortable for you- up, down, diagonally, etc. Just make sure the stitches are close enough to create a solid outline. You can also use different stitching techniques like backstitch, running stitch or chain stitch for your outline.
Step 7: Secure Your Thread
Once you have reached the end of your outline, take your needle down through the back of your fabric and make a small stitch over the previous one. This will secure your thread in place.
You can also add a few more stitches if you want to be extra cautious. It’s always better to have a few extra stitches than your thread coming undone! But, if you’re using a thicker thread, you can simply knot the tail and trim off the excess. It will hold securely in place.
Step 8: Repeat for Inner Details
If you have any inner details on your design, repeat the same steps as before for creating the outline. Just make sure to start and end each detail with a few backstitches or securing stitches. Otherwise, your thread might come loose. It’s also a good idea to use a different color thread for inner details to make them stand out from the outline. You can also use different stitches for inner details to add more texture to your design.

Step 9: Experiment with Colors and Techniques
Don’t be afraid to experiment with different colors, threads, and techniques while doing the outline stitch. It’s a great way to add variety and creativity to your designs. You can also mix and match different stitches within one project, creating a unique and eye-catching piece. It’s all about having fun and being creative! But, make sure to practice and master the basic outline stitch before trying more advanced techniques.
Step 10: Finish Your Project
Once you have completed your outline stitch, remove the fabric from the hoop and trim off any excess threads. If you’re using a lightweight fabric, you can also iron it on low heat to smooth out any creases or wrinkles caused by stitching. Now, your project is ready to be framed, turned into a pillow cover, or used in any other way you like!
Following these ten simple steps on how to do a outline stitch, you can create a beautiful outline stitch that will add interest and texture to any embroidery project.
With practice, you can master this versatile stitching technique and use it in various creative ways to enhance your designs. So go ahead and give it a try! Happy stitching! Keep reading our blog for more fun and useful tips on different embroidery techniques and projects.
Do You Need to Hire a Professional?
No, anyone can learn how to do an outline stitch following these simple steps! It just takes some practice and creativity. But if you prefer to have a professional handle your embroidery project, there are many skilled embroiderers available for hire who can create stunning designs using various stitching techniques, including the outline stitch.
They can also offer expert guidance and advice on creating custom projects for special occasions or gifts. Ultimately, the choice is yours – whether you want to learn and practice embroidery yourself or hire a professional, the outline stitch is a valuable technique to have in your embroidery repertoire. So why wait? Start practicing today and see where your creativity takes you!
Frequently Asked Questions
Q1. What Kind of Fabric is Best for the Outline Stitch?
A1. The outline stitch works well on any lightweight fabric like cotton, linen, or muslin. But you can also experiment with denser fabrics using thicker threads like perle cotton or wool yarn. It’s all about finding the right balance between fabric and thread.

Q2. Can I use Different Colors for the Outline Stitch?
A2. Yes, you can use different colors to create a unique outline stitch. It’s always fun to mix and match colors and experiment with different combinations.
Q3. How Long Should My Stitches Be?
A3. There is no set rule for the length of your stitches, but it’s important to keep them consistent throughout your project. You can use a ruler or just eyeball it to maintain consistency.
Q4. Can I Use Different Stitches for Inner Details?
A4. Yes, you can use different stitches like backstitch, running stitch, or chain stitch for inner details to add more texture to your design. Just make sure to secure each stitch at the beginning and end.
Conclusion
By understanding the basic steps of an outline stitch, you can create many different pieces of handmade fabric art. With time and practice your skills will increase allowing you to use more interesting fabrics and patterns.
Once you determine the type of fabric, thread, and pattern for the project, creating a complete masterpiece is only a few stitches away. You may even want to call upon a friend or family member to help out with larger projects.
Don’t forget to double-check your measurements before starting your project and buy extra supplies in case something goes wrong along the way. So why not start stitching today? Your creativity just might surprise you! Thanks for reading this article on how to do a outline stitch.