
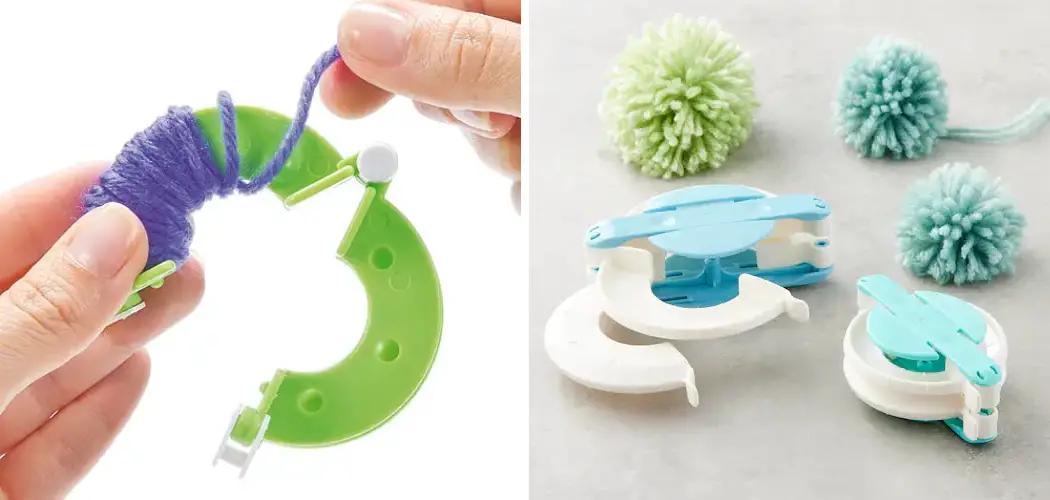
Are you looking for a fun way to create beautiful pom poms for your craft, sewing or home décor projects? If so, then a plastic pom pom maker is the perfect solution! Not only is it an easy and efficient way to make quality pompoms in different sizes and colors, but it also makes crafting enjoyable. In this post, we will discuss what a plastic pom pom maker is and how to use a plastic pom pom maker to make amazing decorations for yourself or as gifts.

So grab your supplies and join us as we show you just how simple it can be to use one of these nifty devices!
What Is the Best Glue for Pom Poms?
Before we get into the instructions on how to use a plastic pom pom maker, let’s discuss the type of glue that works best for attaching the pompoms to your projects. We suggest using white craft glue or hot glue for this task. White craft glue is easy to apply and dries clear, so it won’t be distracting from your finished project. Hot glue is a great option if you need your pompoms to stay in place quickly.
Whichever type of glue you choose, make sure that it is strong enough to hold the pom pom securely after it has been attached.
10 Methods How to Use a Plastic Pom Pom Maker
1. Make a Fuzzy Pom Pom Garland
This project is perfect for using up all those little bits of yarn you have left over from other projects. Simply wind the yarn around the pom pom maker, cut, and tie off. Then, string the pom poms onto some twine or ribbon to create a cute garland for your home. If you want to make a garland with larger pom poms, buy or make a larger-sized maker. Although this project will take longer, the end result is worth it!

2. Make a Furry Dog Collar
Pom poms are the perfect way to add a little personality to your pet’s collar. You can use one color or multiple colors to create a unique look. Simply attach the pom poms to the collar with some hot glue or sewing thread. You can even use different sizes to create a fun and fluffy look. If you’re feeling extra creative, you can even arrange the pom poms in different shapes or patterns.
The possibilities are endless! Once you’ve finished making the collar, your pup will be ready to show off its fashionable accessory.
3. Make a Fluffy Rug
This project is sure to keep your feet warm and cozy all winter long. Start by winding yarn around the pom pom maker, then cut and tie off. Continue until you have enough pom poms to cover the desired area. Sew or glue the pom poms together, then trim any excess yarn. Place the fluffy rug on your floor or over furniture for a cozy winter touch. While the rug is sure to be a fun addition, it’s also important to keep in mind the potential hazards.
Before using this rug, consider how you will handle any potential messes from loose pieces of yarn or when the pom poms get too matted.
4. Make a Cute Hat
Pom poms are a great way to accessorize a plain hat. You can use one color or multiple colors to create a unique look. Simply attach the pom poms to the hat with some hot glue or sewing thread. Vary the sizes and colors to make an interesting look. You can even add a few ribbon bows or other decorations for a festive touch. It’s a simple and easy way to spruce up an old hat and add a little bit of flair.

However, make sure to keep any additions light and fluffy so they don’t overwhelm the look.
5. Make a Faux Fur Coat
Pom poms are a great way to add a touch of luxury to any coat or jacket. You can use one color or multiple colors to create a unique look. Simply attach the pom poms to the coat with some hot glue or sewing thread. If you want to take it up a notch, you could even craft your own faux fur coat with a little help from the pom pom maker. For this project, you will need to purchase some faux fur fabric.
Begin by cutting the fur into strips that are slightly longer than the length of your pom poms. Next, use the pom pom maker to create your faux fur pompoms and attach them to the fabric strips with a sewing needle and thread. Finally, sew the fabric strips together to create a coat with luxurious fur trim.
6. Make a Pom Pom Blanket
This project is perfect for using up all those little bits of yarn you have left over from other projects. Simply wind the yarn around the pom pom maker, cut, and tie off. Then, sew or glue the pom poms together until you have created a cozy blanket for your home. If you have enough different colors, you can even create a pattern or design with your pom poms! The possibilities are endless.
7. Make a Pom Pom Pillow
This project is sure to add some personality to any room in your home. Start by winding yarn around the pom pom maker, then cut and tie off. Continue until you have enough pom poms to cover the desired area. Sew or glue the pom poms together, then trim any excess yarn. Finally, sew a pillow cover and insert your pom pom masterpiece. With the help of a plastic pom pom maker, you can quickly create a fun and unique pillow.

However, if you’d like to take your pillow decoration a step further, try using two or more colors of yarn for your pom poms.
8. Make a Pom Pom Wreath
This project is perfect for holiday decorating or any other occasion when you want to add some cheer to your home. Start by winding yarn around the pom pom maker, then cut and tie off. Continue until you have enough pom poms to cover the desired area. Sew or glue the pom poms together, then trim any excess yarn. Attach a ribbon to the back of your wreath and hang it up! With just a few simple steps, you’ve created a beautiful, festive decoration that’s sure to bring a smile to anyone who sees it.
9. Make a Unique Hair Accessory
Pom poms are a great way to add a little personality to any hairstyle. You can use one color or multiple colors to create a unique look. Simply attach the pom poms to an elastic headband or barrette with some hot glue or sewing thread. This will make a great addition to your outfit and help you stand out from the crowd. However, be sure to use a low-heat glue gun and make sure your hair is away from the hot glue.
You can also add some ribbons or beads to the pom poms to give your accessory a more elaborate look.
10. Make a Pom Pom Bouquet
This project is sure to bring some cheer to any room. Start by winding yarn around the pom pom maker, then cut and tie off. Continue until you have enough pom poms to create your desired bouquet shape. Sew or glue the pom poms together, then trim any excess yarn. Finally, attach a stick or dowel for the stem of your bouquet. Make sure to secure the bouquet tightly with tape or string. Place it in a vase for a lovely, handmade home decor piece!

With these simple instructions on how to use a plastic pom pom maker, you can easily add texture and color to all kinds of different projects! Whether it’s making a garland for your walls or adding some personality to an accessory, these fuzzy little balls can make anything look more special. So get creative and have fun making your own unique creations!
Things to Consider When Using a Plastic Pom Pom Maker
1. Type of Yarn:
The type of yarn you use in a plastic pom pom maker is important. Many types of yarn cannot be used in a plastic pom pom maker because they are too thick or too thin. Thicker yarns can cause the arms of the pom pom maker to break, while thinner yarns may not hold together properly and can create weak poms. Use a lightweight acrylic yarn or mercerized cotton for best results when using a plastic pom pom maker.
2. Number of Wraps:
The number of wraps you make around each arm on the plastic pom pom maker will affect how large your finished product is. The more wraps you make, the fuller your final pomp is likely to be. Start off with about 15-20 wraps per arm and adjust as necessary until desired size is achieved.
3. Tightness of Wraps:
Making sure your wraps are tight is important when using a plastic pom pom maker. If the wraps are too loose, the yarn strands will not hold together as well and could lead to weak or poorly formed poms. Be careful not to pull too hard on the yarn though, as this can cause damage to the arms of your plastic pom pom maker.
4. Cutting Yarn:
When cutting off excess yarn from your finished product, it’s important to make sure you have enough yarn left over so that you can tie a loop in order to hang your pompom up or attach it to another item. Make sure not to cut too close to the arm, as this could cause your pom pom to unravel.

What Can I Do with Mini Pom Poms?
Mini pom poms can be used in a variety of ways. These tiny, fluffy adornments are great for adding a whimsical touch to all kinds of projects, from crafting to decorating. Here are some ideas for using mini pom poms:
- Make wall art with mini pom poms! Attach the fluffy balls to canvas or wood in any pattern you like and hang it on your wall.
- Add mini pom poms to children’s clothing or accessories. Use them as decorations on shirts, hats, scarves, shoes and more!
- Decorate gifts, cards and scrapbook pages with mini pom poms. You can use these fluffy embellishments to add a unique touch to any project.
Conclusion
You can make plastic pom poms of any size and color using a plastic pom pom maker. It’s easy and fun, and the results are perfect little balls of fluff that can be used to decorate all sorts of things. Give it a try!
We hope this guide on how to use a plastic pom pom maker was helpful. Please share it with your friends on social media if you find it useful. And be sure to check back here soon for more informative guides like this one.
You Can Check It Out To Knit a Leaf