
If you’re a sewing enthusiast or aspiring fashion designer, tracing a sewing pattern is a skill you’ll want to master. Sewing patterns are essential tools that guide you through the process of creating garments or other fabric-based projects.
While some patterns can be used directly from the tissue paper they come in, tracing the pattern onto a separate sheet of paper offers several benefits. It allows you to preserve the original pattern for future use, make alterations or adjustments without altering the original, and easily create multiple sizes or variations of the same design.

Tracing a sewing pattern may seem daunting at first, but with a few simple steps and attention to detail, you’ll be able to accurately transfer the pattern onto your desired material and embark on your sewing journey with confidence. In this article, we’ll guide you through the process of how to trace a sewing pattern, providing helpful tips along the way to ensure your success.
The Importance of Tracing Sewing Patterns
Tracing sewing patterns is an important step for any sewer. Not only does it allow you to make sure that the pattern pieces are the correct size and shape, but it also helps you to customize your projects in ways that may not be possible with a pre-made pattern.
By tracing sewing patterns, you can easily add extra length or width to accommodate different body types and sizes, as well as modify shapes, design elements, pockets, and more.
Moreover, tracing sewing patterns allows you to save time when cutting fabrics because all of the pattern pieces have already been traced onto paper or fabric. Therefore, even if you don’t plan on making changes to your project’s original look and fit, tracing sewing patterns can help save time and effort.
Tracing sewing patterns also allows you to save and store them for future projects. By saving the traced pattern pieces, you can easily refer back to them in the future or use them as templates for new designs. This makes it easier to keep track of all the patterns that you have used in the past and helps make sure that your creative ideas don’t go forgotten.
Finally, tracing sewing patterns can help keep your fabric from stretching out of shape while cutting, which is important when trying to achieve a perfect fit for any garment.
In conclusion, tracing sewing patterns is an essential step for any sewer because it not only ensures accuracy but also allows you to customize the design according to personal preferences and sizes. Additionally, it enables you to save time when cutting fabrics and store patterns for future projects.

Finally, tracing sewing patterns helps keep fabric from stretching out of shape while cutting. All of these benefits make tracing sewing patterns an integral part of any sewer’s process.
The Basics of Sewing Patterns
Sewing patterns are highly detailed instructions and templates used to create garments or other textile items. They provide all the necessary measurements as well as step-by-step instructions to make a garment, accessory, or home decor item from scratch. Sewing patterns can be purchased in craft stores or online, and they come in different sizes and levels of difficulty.
Tracing sewing patterns is an important part of creating a perfect piece of clothing. Tracing involves transferring the design from the pattern onto fabric that will become part of your project. This ensures that the pattern pieces fit together correctly when you start stitching them together later on. Additionally, tracing sewing patterns helps to preserve the original pattern for future use.
When you trace a pattern, it is important to be precise and accurate. Start by laying down tracing paper or oversized pieces of parchment paper over the pattern piece that you wish to transfer onto your fabric. Use a pencil or fabric pen to trace around each line on the pattern piece. Make sure that all lines are straight and even and that no details are left out.
If the pattern has markings such as dots or notches, make sure these are included in your traced version as well. Once you have finished tracing, cut out the shape along the outermost line you drew with scissors.
Now that you have a copy of the desired pattern piece, lay it on top of your fabric and pin it in place. Make sure to align the edges of the pattern with the grain line on your fabric for an accurate representation. After that, use a fabric pen or tailor’s chalk to transfer the pattern onto the fabric. When you are finished, carefully remove the pattern piece from the fabric.
10 Ways How to Trace a Sewing Pattern
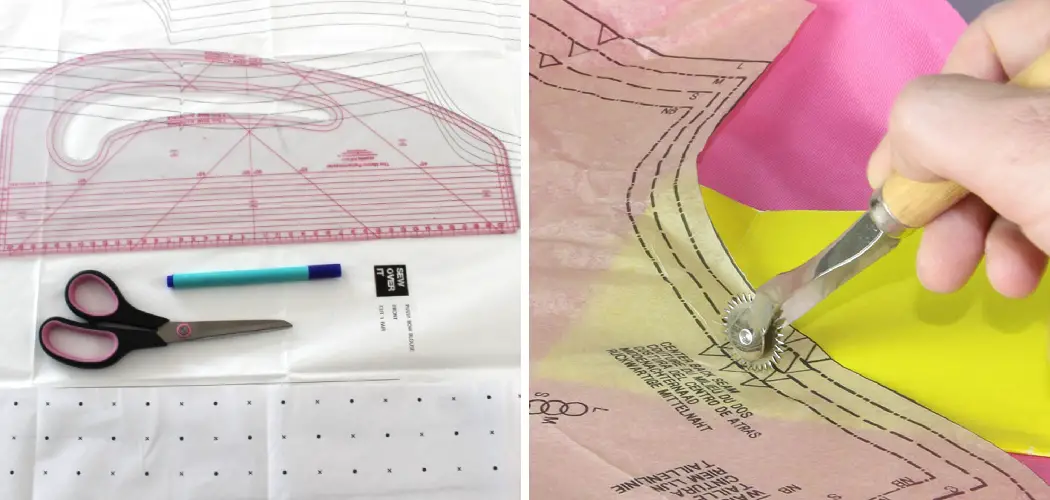
1.Gather Your Materials:
The first step in tracing a sewing pattern is to gather all the necessary materials. Create a dedicated workspace with ample lighting, a clean and sturdy table or cutting mat, and essential tools. Gather tracing paper, transparent pattern paper, or Swedish tracing paper, along with a pencil or fine-tip pen.

Have a ruler or measuring tape, scissors, and a notepad handy for note-taking. Ensuring you have everything you need at the start will streamline the tracing process.
2.Select the Right Tracing Paper:
Choosing the appropriate tracing paper is crucial for accurate pattern transfers. While traditional tracing paper works well, you may consider using Swedish tracing paper, which is more durable and can be sewn together for fitting purposes. Opt for a paper that is transparent enough to clearly see the pattern lines underneath, facilitating precise tracing.
3.Prepare Your Pattern:
Before you begin tracing, take a moment to unfold your sewing pattern and smooth out any wrinkles or creases. If the pattern is printed on tissue paper, stabilize it with weights or pattern weights to prevent shifting during tracing. Ensure that the pattern is completely flat and ready for tracing.
4.Identify the Grainline:
The grainline is a vital element of any sewing pattern as it determines the direction of the fabric’s weave. Locate the grainline arrow on the pattern and mark it clearly. This will help you align the pattern correctly when cutting out your fabric later on. A clear grainline is essential for ensuring the proper drape and fit of your finished garment.
5.Secure the Pattern:
To prevent movement or shifting while tracing, secure the pattern onto the tracing paper using pattern weights or small pieces of tape. Make sure the pattern is taut and firmly in place, avoiding any distortions or misalignments during the tracing process. Securing the pattern will guarantee accurate transfers and save you time and frustration in the long run.
6.Trace Seamlines and Notches:
Begin tracing the main seamlines of the pattern using a pencil or fine-tip pen. Take your time and follow the lines precisely, ensuring that you capture all the curves, angles, and details accurately.
Avoid applying excessive pressure that may damage the original pattern or cause tears in the tracing paper. Remember to mark notches clearly, as they play a crucial role in aligning fabric pieces during construction.
7.Transfer Pattern Markings:
Pay close attention to any markings indicated on the pattern, such as darts, pleats, or gathering points. Using a pencil or fine-tip pen, carefully transfer these markings onto the tracing paper. Accuracy is key, as these markings serve as important guides during the sewing process.

Take the time to ensure they are clearly and accurately transferred, making note of their positions and any measurements provided.
8.Add Grainline and Pattern Information:
Once you have traced the main pattern pieces, it is essential to label them with the pattern name, piece number, size, and any other relevant information. Indicate the grainline arrow clearly, ensuring it aligns with the original pattern.
This step will help you stay organized and avoid confusion during the sewing process. Clear labeling also allows you to easily identify specific pattern pieces when referring back to your traced patterns in the future.
9.Adjust for Alterations:
If you plan to make alterations to the original pattern, now is the time to do so. Utilize additional tracing paper to extend or modify pattern lines, following established pattern-making techniques. Whether it’s adjusting the length, adding or subtracting width, or modifying the shape, take the opportunity to tailor the pattern to your desired fit. As you make alterations, ensure that you keep track of the changes, documenting them on the traced pattern for future reference.
10.Store and Preserve:
Once you have completed tracing your sewing pattern, it is crucial to store it in a safe and organized manner. Consider using pattern storage envelopes or plastic sleeves to protect the traced pattern from damage or loss.
Additionally, make a note of any modifications or alterations you made, ensuring that you have a comprehensive record of your work. A well-organized pattern collection will save you time and effort in the future, allowing you to easily locate and utilize your traced patterns.

Conclusion
Learning how to trace a sewing pattern is an essential skill for any sewer, from beginners to experts. With a few easy steps and some patience, you can easily make your own pattern.
This not only allows you to save money by reusing the same patterns multiple times but also helps you customize them however you like! Trace away, sewers – it’s going to be great! Learning how to trace a pattern is just the beginning of your sewing journey.
Take some time to browse through our library of sewing tutorials! Create your own clothes with personalized designs and patterns tailor-made for you. Have fun exploring and perfecting these new skills. And lastly, remember that practice makes progress!