
Have you ever wondered how our ancestors were able to quilt by hand and create beautiful patterns with their own two hands? Quilting isn’t just an artistic endeavor, it’s a skill that has been passed down through generations – and one that anyone can learn. In this blog post, we’ll explore the fascinating world of handmade quilting and teach you step-by-step how to tie a quilt by hand.

From learning about the materials needed for your quilt project to exploring various traditional techniques used in crafting handmade quilts, this guide will provide readers with tips and tricks used by experienced makers for years – so whether you’re completely new to the craft or looking to brush up on some forgotten skills, this blog post is guaranteed to have something useful for everyone.
Can You Tie a Quilt by Hand?
The answer to this question is a resounding yes! You can absolutely tie a quilt by hand. This task is relatively straightforward and requires little more than some basic hand-sewing knowledge. With the help of this blog post, you’ll have no trouble getting started on your first handmade quilt project.
Materials Needed For Hand-Tied Quilts
Before you can begin learning how to tie a quilt by hand, you’ll need to gather the necessary materials. Fortunately, all of these supplies are easily attainable and won’t cost too much. Here’s what you’ll need:
- Fabric for the top and bottom layers
- Cotton batting or other filler material
- Thread in a color that matches the quilt top
- Needles
- Quilting pins or clips
- A pair of scissors
Choosing Fabric for Your Handmade Quilts
The fabric you choose for your quilt is an important decision as it will ultimately shape the look and feel of the final product. Consider playing with textures, patterns, or colors to create a unique and eye-catching quilt. If you’re not sure where to start, take a look at our post on hand quilting fabric for some tips and advice.
How to Tie a Quilt by Hand in 10 Easy Steps
Now that you have all the necessary materials, it’s time to learn how to tie a quilt by hand. Here’s how it’s done in 10 simple steps:

Step 1: Place the Quilt
Place your quilt top, batting, and bottom layer fabric on a flat surface. Also, make sure that all of the fabrics are lined up properly. Proper alignment is important as it will ensure that the quilt ties are placed in even intervals.
Step 2: Pin the Quilt
Secure the layers of your quilt with pins or clips, making sure the fabric is tight and smooth. Use plenty of pins to ensure the fabric won’t move while you’re tying it together. Also, remember to remove the pins as you go.
Step 3: Mark Your Quilt
Once the quilt is pinned down, mark off sections with a ruler and chalk pencil every 2-4 inches. This will help you keep track of where your ties should be placed. Making sure that all of the sections are even will provide a more professional look for the finished quilt.
Step 4: Thread Your Needle
Thread your needle with thread that matches the quilt top, making sure it is long enough to make several stitches. You can estimate this by measuring out 2-3 inches of thread from the spool and cutting it.
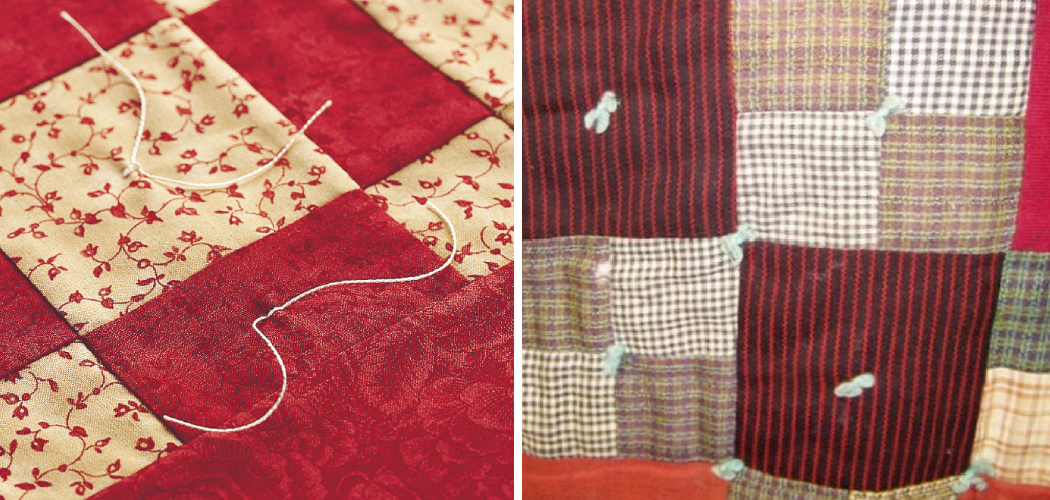
Step 5: Make the Stitches
Place your needle at one of the marked sections and make a loop, leaving a long tail of thread at the end. Pull through and repeat 3-4 times, making sure each loop is slightly larger than the last to create even ties. Knot off by wrapping the long tail around all of the loops and pulling tight.

Step 6: Repeat
Continue making looped stitches along your marked sections, knotting off at each point. Make sure to leave a long tail of thread for easy knotting later on. Repeating this process until the entire quilt is tied with even and consistent stitches.
Step 7: Secure Knots
Once you have finished tying your quilt, secure all of the knots by wrapping each one with a few extra loops of thread and pulling tight. This will prevent them from becoming undone in the future.
Step 8: Trim the Threads
Once you have secured all of the knots, trim off any excess thread. This will give your quilt a clean and professional look. Trimming the threads also helps to avoid any unnecessary bulk.
Step 9: Finishing Touches
You can choose to finish your quilt with a few extra touches, such as adding decorative stitching or blanket binding. These additions will give your handmade quilt an even more professional appearance.
Step 10: Enjoy!
Now that your quilt is all finished, you can enjoy it for years to come! Handmade quilts make excellent family heirlooms that can be passed down through generations.
Following these 10 steps on how to tie a quilt by hand will have you on your way to creating beautiful handmade quilts with ease. Keep experimenting and make sure to practice regularly for the best results. With time, you’ll be able to create amazing pieces that will be cherished by many years down the line.

8 Maintenance Tips for Hand-Tied Quilts
Hand-tied quilts can be a beautiful addition to any home. But, like any textile, they require special care and maintenance in order to look good and last long. Here are some tips that will keep your hand-tied quilt looking its best:
- Vacuum your quilt regularly. Vacuuming your quilt on a low-power setting will help remove any dust and dirt buildup. Also, be sure to vacuum around the edges and in any folds where dirt can accumulate.
- Spot clean spills immediately. If you spill something on your quilt, make sure you spot-clean it as soon as possible using a damp cloth or sponge and mild detergent. Do not rub too hard—this may damage the fabric fibers.
- Use a pressing cloth when ironing. If you need to press your quilt, make sure you place a piece of cotton or linen between the fabric and the iron to avoid any damage from direct heat and steam.
- Protect it from moths and other pests. To keep your quilt safe from moths, vacuum it regularly and store it in a tightly sealed container. You may also want to use moth-repelling sachets and cedar chips when storing your quilt.
- Keep it out of direct sunlight. Direct sunlight can damage the colors of your quilt over time, so make sure to keep it away from windows or other sources of strong light exposure. If you need to hang your quilt on a wall, it’s best to do so in a spot where the sun doesn’t shine.
- Thoroughly dry it after cleaning. If you need to deep clean your quilt, make sure you thoroughly dry it before storing or displaying it again. The best way to do this is by laying it flat and allowing it to air dry.
- Use a quilt cover for protection. If your quilt is going to be stored or displayed in a vulnerable area, it’s best to use a quilt cover for protection. This will help keep dust and dirt out, as well as any potential staining from spills or other accidents.
- Take it to a professional if needed. If you’re not confident in following these steps, or if your quilt is looking particularly worn out, take it to a professional textile cleaner for proper maintenance. They will be able to better restore its original luster and protect it from further wear and tear.
By taking care of your hand-tied quilt, you can enjoy its beauty for years to come. With these maintenance tips on how to tie a quilt by hand, your quilt will remain in pristine condition and bring warmth and comfort to your home for many years to come.

Common Questions about Hand-Tied Quilts
As with any textile, there are often questions that arise when dealing with hand-tied quilts. Here are some of the most common questions and answers that will help you better understand how to care for your quilt:
How often should I vacuum my quilt?
We recommend vacuuming your quilt on low power at least once a month or more frequently if needed. This will help keep dust and dirt from accumulating and ruining the fabric. While washing is an option, it should only be done if absolutely necessary since the fabric may become damaged in the process.
How do I store my quilt?
When storing your quilt, make sure to keep it away from direct sunlight and tightly sealed containers (such as plastic bags). You may also want to use moth-repelling sachets and cedar chips to help protect your quilt from pests.
Can I machine-wash my quilt?
No, we do not recommend machine-washing hand-tied quilts as this can damage the fabric fibers. Spot cleaning with a damp cloth and mild detergent is the best way to clean your quilt if necessary.
What kind of fabric should I use for my hand-tied quilt?
Choosing the right fabric is essential to making a high-quality hand-tied quilt. We recommend using 100% cotton fabrics that are prewashed and preshrunk, as they will be more durable and won’t shrink or fade over time.
How should I press my quilt?
When pressing your quilt, make sure you use a pressing cloth (such as cotton or linen) between the fabric and the iron. This will prevent any damage caused by direct heat and steam. Also, be sure to move the iron often so that it doesn’t stay in one spot for too long.
By following these tips and answering any additional questions you may have, you can ensure that your hand-tied quilt remains in pristine condition for years to come. With proper maintenance and care, your quilt will bring beauty and comfort to your home every single day.

Conclusion
Completing a quilt by hand is an extremely rewarding experience, as it allows you to create a one-of-a-kind work of art that will last for generations to come.
Quilting by hand requires patience, time, and attention to detail, but with practice, you can easily learn how to replicate the intricate patterns and stitches of traditional quilting. It’s the perfect way to mark a special occasion or give someone handmade love that will last a lifetime.
Whether you decide on simple straight-line quilting or more intricate designs, never forget that this is your own unique piece of art – created with your hands and love! With a little practice and dedication and this easy guide on how to tie a quilt by hand, creating something beautiful with your own two hands can be a therapeutic way to spend quality time.