
Crocheting a sweater can be an exciting project, and the results are often beautiful. Learning to sew crochet sweater pieces together is an essential skill that will help you create a garment that looks professional and lasts for many years. The main advantage of learning to sew crochet sweater pieces together is that it allows you to create unique and personalized garments.

When sewing them together, you can easily customize your sweaters’ shape, size, and colors. Additionally, you’ll have more control over the finished product’s fit, making the garment fit better and look nicer.
Sewing is also a great way to customize the design of your sweater, as you can add embellishments and other details that will give it a more finished look. In this blog post, You will learn in detail how to sew crochet sweater pieces together.
Step-by-Step Processes for How to Sew Crochet Sweater Pieces Together
Step 1: Inspect the Pieces
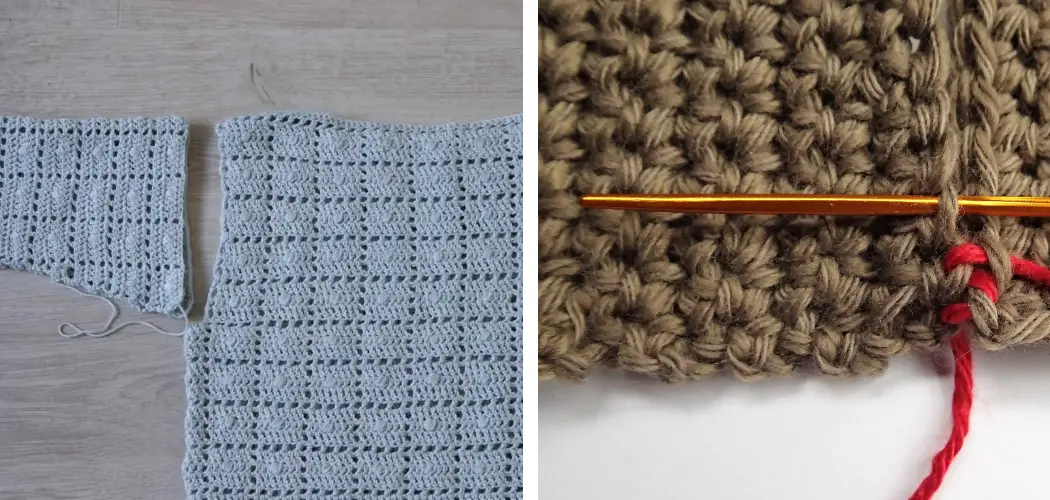
Before beginning, inspect the pieces you have crocheted for any errors or flaws. Make sure all seams and stitches are even and in order. Lay out your pieces on a flat surface with their edges lined up and facing each other. Matching up the pieces will ensure that the finished product is symmetrical.
Step 2: Align the Pieces
Take one piece of the sweater and lay it on top of the other. Make sure that all edges are lined up neatly with each other. Use pins or clips to hold the two pieces together. This will help prevent them from slipping out of position while sewing them together.
Step 3: Sew the Pieces Together
Using the same yarn you used for crocheting, thread your needle and create a whip stitch to join the two pieces. Use small, even stitches to ensure that everything is securely fastened together. Take your time with this step, as it will determine the overall look of your finished product.
Step 4: Add Seams and Trim
Once the pieces are sewn together, you can create more detail by adding seams. Make sure to measure out each seam before sewing it in place. This will help keep your sweater from having an uneven shape or gaping holes. You can also add trim around the edges of the sweater for a more stylish look.
Step 5: Finish the Seams
Once you have added all of the seams and trim, it’s time to finish them off. Using a yarn needle, stitch over the seam allowance once to reinforce it. This will ensure that your pieces stay securely fastened together, even with frequent wear and tear.

Step 6: Add Edging
Add edging around the neckline, cuffs, and hem if you want to take your crochet sweater up a notch. This will give the sweater a more polished look. You can use any type of yarn for this step, as it merely adds decorative detail.
Make sure to weave in all the loose ends of yarn before wearing your newly sewn crochet sweater. Take your time with this step and use a tapestry needle, as it will be much easier than using regular needles. This will ensure that the finished product looks neat and professional.
Step 7: Block the Sweater
Finally, block the sweater. This step is important to ensure that your finished product looks neat and well-crafted. You can block your sweater by either soaking it in water or steaming it with an iron.
By following these steps, you can easily learn to Sew Crochet Sweater Pieces Together in no time. With practice and dedication, you can create many stylish pieces of clothing with your crochet skills.
You Can Check It Out to Crochet a Crescent Moon
Tips for How to Sew Crochet Sweater Pieces Together
- Make sure your work area is well-lit and that you have a comfortable chair not to strain your eyes, neck, or back while sewing.
- Wear gloves when working with sharp needles and scissors to protect your hands from potential injuries.
- Use the proper needle size for the type of fabric you are stitching. A heavy needle can damage delicate fabrics, and a too-small needle may jam or break.
- Work slowly and steadily to ensure that the stitches are evenly placed without any gaps or tension on the fabric.
- Secure all knots carefully after making each stitch to ensure they don’t unravel in future use.
- Check the fabric behind your needle as you stitch to avoid accidentally stitching over any parts of the knit fabric.
- Use a seam ripper to remove mistakes carefully instead of cutting the threads with scissors.
- Test out your stitch on scrap fabric before sewing crochet sweater pieces together, so you can be sure your desired outcome will be achieved.

Following these tips can help you to successfully sew crochet sweater pieces together with ease and accuracy, giving your project a professional finish.
How Can You Avoid Having a Bulky Seam When Stitching Your Two Pieces Together?
- Start by laying the two pieces of your crochet sweater flat on a table or other surface, with the wrong sides facing out.
- Line up the edges you want to join together, so they are even straight.
- Place a few pins along the edges to hold them in place while you stitch them together.
- Using a straight stitch, sew along the edges of the two pieces with a small seam allowance (typically 1/8 inch). This will ensure that your seam does not become bulky when you turn it right side out.
- After you have finished stitching the two pieces together, remove any pins and trim away any excess fabric.
- Turn the pieces right side out and check that your seam is even and not too bulky.
- Lastly, press it flat with an iron if necessary to ensure a neat finish.
By following these steps, you can easily join two pieces of crochet together without dealing with a bulky seam line. With some practice, you will become proficient at stitching together crochet pieces for stylish sweaters and other projects.
How Do You Finish Off the Seam on Your Crochet Sweater Pieces After Connecting Them?
Once the crochet sweater pieces have been connected and sewn together, you need to finish off the seam. This can be done in several ways. The simplest way is to simply sew a couple of stitches across the end of the seam with a yarn needle and matching thread or yarn.
Another method would involve using an additional row of single crochet stitches to create a neat, finished edge. This method is especially useful for complex sweaters with many seams and decorative details.

If you’re working on an item such as a cardigan or hoodie, it may be necessary to add a zipper or button closure to complete the garment. The end result should be neat and professional, no matter your technique.
How Can You Prevent Puckering or Distortion at the Seams of Your Crochet Piece?
- Start by binding off the edges of each crocheted piece evenly, to ensure they are both even in size and weight before you start sewing them together.
- When sewing the pieces together, use a sturdy thread instead of yarn or embroidery floss so that it doesn’t stretch out when pulled tight.
- Be sure to match the edges of each piece precisely, and use pins or basting stitches to secure them in place before you begin.
- Use a whip stitch or an overhand stitch when sewing, making sure to pull the thread as tight as possible.
- When you’re finished with your seam, press it with a warm iron to help flatten out any puckers or distortions.
- Finally, after the seam is sewn and pressed, use a yarn needle to weave in the ends of the thread for extra security.
By following these steps, you can ensure that your crochet sweater pieces are securely sewn together and that there will be no puckering or distortion. With the right supplies, patience, and practice, you’ll have perfect seams every time.
How Do You Determine Whether to Hand Sew or Machine Stitch Your Crochet Project?
It can be difficult to determine whether to hand sew or machine stitch your crochet project. While both methods of stitching have their benefits, it is important to consider the type of yarn and fabric you are using and the complexity of the design to make an informed decision.
The most important factor when deciding between hand sewing and machine stitching is the type of yarn and fabric you use. Hand sewing will be your best option if you have a lightweight, delicate yarn, such as cotton or linen. Hand sewing is also better for pieces with intricate detail that require more precise stitch placement.
In contrast, machine stitching works well on medium-weight fabrics, such as wool and acrylic, which are more durable and can withstand the pressure of a needle. Machine stitching is also fast and efficient, so it’s great for large projects with lots of pieces to sew together.

Conclusion
In conclusion, sewing crochet sweater pieces together is a process that requires careful attention to detail and patience. However, with the right materials, tools, and step-by-step instructions, you can sew your crochet sweater pieces together into a beautifully finished garment.
The process begins with assembling the sweater pieces according to their stitches, then pinning them in place for sewing. Once the pieces are pinned, you can sew them with a simple stitch pattern and add any desired features like cuffs and necklines. I hope reading this post has helped you learn how to sew crochet sweater pieces together. Make sure the safety precautions are carried out in the order listed.
You Can Check It Out to Fasten off Crochet