
Discover the art of adding an elegant finishing touch to your crochet projects with the technique of reverse single crochet, also known as the “crab stitch.” As the name suggests, this method involves working single crochet stitches in the opposite direction, creating a distinctive and beautifully textured edge.

Whether you’re looking to border a blanket, create a polished edge on garments, or add a unique touch to your accessories, mastering the reverse single crochet technique is a valuable skill for crocheters of all levels.
In this article, we’ll unravel the step-by-step process of how to reverse single crochet, providing you with the knowledge and confidence to enhance your creations with a professional and eye-catching edge that sets your work apart.
Definition and Purpose of Reverse Single Crochet
Reverse single crochet (abbreviated as rev sc) is a crochet technique that allows you to work in the opposite direction of normal single crochets. It can be used for decorative edges, in place of slip stitches for decreasing, and also as an outline stitch when working with multiple colors.
With this versatile stitch, it’s easy to make beautiful garments, accessories, and home decor items.When working with reverse single crochet stitches, the yarn is looped through the fabric in the opposite direction to create an attractive edging.
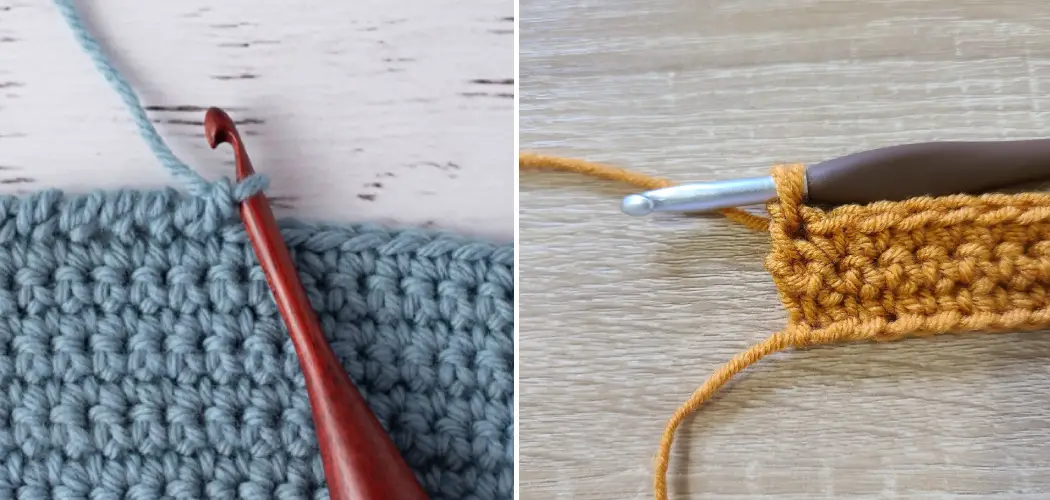
The process for creating this stitch involves inserting your hook into the fabric from the back side (rather than from front to back as you would do for a normal single crochet) and then yarn over and draw the yarn through.
Once you have completed this step, you will have two loops on your hook. To finish the stitch, yarn over and pull through both of these loops.Reverse single crochet is a great way to give your project an eye-catching detail that will draw attention to it.
This technique can also be used for different types of projects, such as scarves, shawls, blankets, and more. You can even use this stitch to create a foundation row for your crochet project. With reverse single crochet, you can easily transition from one color to another when working with multiple colors in the same project.
Why Reverse Single Crochet Is Useful in Crochet Projects
Reverse single crochet is an invaluable technique for creating design elements that stand out in any crocheted project. It can be used to add texture to a pattern, create ribbing and edgings, and even join pieces of fabric together for an effect that looks like knitting or weaving!
The unique stitch adds dimension and visual interest to whatever you’re making—whether it’s an afghan, a scarf, or a baby blanket. With practice and patience, you can use this stitch to make even the most elaborate crochet designs look professional.

But before you get started, make sure your chain and single crochet stitches look neat and even. Reverse Single Crochet (RSC) is easier than regular single crochet if you have the basics down, so practice until your foundation and single crochet stitches look nice and even.
To begin, make a chain of any multiple number of stitches (at least 10). To create a Reverse Single Crochet stitch, insert your hook from back to front into the second chain from your hook. Yarn over and draw through the chain loop; this should leave two loops on your hook. Yarn over and draw through those two loops, and you have made a Reverse Single Crochet!
11 Steps How to Reverse Single Crochet
Step 1: Gather Your Materials
Before you embark on your journey of learning the reverse single crochet stitch, gather your materials. You’ll need your chosen yarn, a crochet hook that matches your yarn weight, and a pair of scissors to neatly cut the yarn once you’re done.
Step 2: Begin with a Foundation Row
To practice the reverse single crochet stitch, start by creating a foundation row of single crochet stitches. You can use any number of stitches, depending on the project you’re working on. Ensure that your foundation row is evenly worked.
Step 3: Turn Your Work
Unlike traditional crochet, where you would typically turn your work at the end of a row, the reverse single crochet is worked in the opposite direction. Turn your work so that the wrong side is facing you.
Step 4: Insert the Hook
Insert your crochet hook from back to front into the first stitch of the previous row, which is the stitch closest to you. It should be the right side of the stitch. You want to make sure that your hook goes through both loops of the stitch, so you can wrap the yarn around it and complete a single crochet stitch.

Step 5: Yarn Over
Wrap the yarn over your hook from back to front, just like you would for a regular single crochet stitch. This will create a loop on your hook. Pull the yarn through both loops to complete the stitch.
Now, you’ve learned how to reverse single crochet and add texture and edging to your projects. You can use this stitch for crocheted cuffs, collars, blankets or other items that need some accents. It’s also great for giving extra structure to a piece of work. However you use it, this is an easy stitch to learn and has many applications.
Step 6: Pull Through
Gently pull the yarn through the stitch, creating a loop on your hook. This will be the first stitch of your reverse single crochet. Continue working in this manner all along the row until you reach the end.
At the very end, when only one loop remains on your hook, slip it off and gently tug on the tail to secure your work. Congratulations – you have successfully completed a row of reverse single crochet!
Step 7: Yarn Over Again
Wrap the yarn over your hook once more, from back to front. Then, insert the hook into the next stitch and draw up a loop. Pull through two loops on your hook to complete the second half of your single crochet stitch. Congratulations! You’ve finished one reverse single crochet or crab stitch.
Step 8: Complete the Stitch
Pull the yarn through both loops on your hook. This motion creates a single crochet stitch that is worked in the reverse direction, effectively creating the crab stitch. However, if you are working a round, be sure to make the stitch in the same direction as all other stitches. Repeat Steps 3-8 until you reach the end of your project. The reversing single crochet will give your project a unique look and texture.

Step 9: Repeat the Process
Continue working reverse single crochet stitches across the entire row. Insert your hook into the next stitch from back to front, yarn over, pull through a loop, yarn over again, and pull through both loops on the hook. Repeat this process until you reach the end of the row.
Step 10: Finish and Secure
Once you’ve completed the reverse single crochet row, cut the yarn, leaving a tail to weave in later. Gently pull the last loop through to secure the stitch. Weave in any loose ends using a tapestry needle. Congratulations! You’ve just learned how to reverse single crochet. It may seem tricky at first, however with a little practice you’ll be able to add this unique texture to your project quickly and easily.
Step 11: Practice Makes Perfect
As with any new skill, practice is key. Work on several small swatches to perfect your technique before applying the reverse single crochet to larger projects. Experiment with different yarns and hook sizes to achieve the desired texture and appearance.
Things to Consider When Reverse Single Crochet

When it comes to reverse single crochet, there are a few important things to consider. First, it’s important to use the right type of hook for your project or work – a standard aluminum hook will usually suffice. Additionally, it’s recommended that you practice the stitches before beginning a project with them. This is especially helpful for someone who may not have used this type of crochet before.
For the project itself, make sure to use a yarn that is suitable for your skill level. A thicker or more textured yarn will provide an easier result than thin or fine yarns. Additionally, you may want to consider using stitch markers to mark each reverse single crochet row. This will make it easier to keep track of where you are in the project as you go.
Conclusion
Overall, you can be confident that learning how to reverse single crochet can help you enhance your skills and take on more complex projects. With practice comes perfect and you may even develop your own variation of this stitch. As with any other type of stitching, it may seem overwhelming at first but with patience and dedication, soon enough, you will be able to create stunning masterpieces with confidence.
Try it out today! Create a piece where you can explore the limits of reverse single crochet or come up with something fun that uses this unique technique. Whether its an intricate blanket for the newborn or a scarf for the fashionista in your life – give it a try and see what is within your reach!