
Are you looking for a unique and creative way to express yourself? Then why not give painting Jenga blocks a go? If you’ve never heard of it before, don’t worry – we are here to explain all the elements that will help you create some amazing custom pieces of artwork.

Painting Jenga blocks is easy, fast and fun and can be used for anything from adding zing to ordinary household items such as tables or chairs to making your own one-of-a-kind art projects. So what are you waiting for? Read on how to paint jenga blocks and learn how this crafty activity can help bring some new flair into your life.
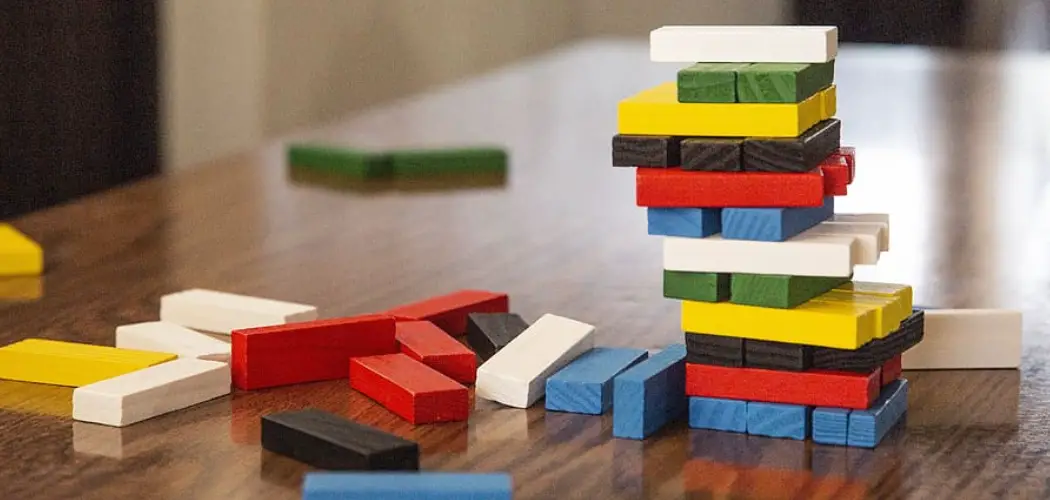
What are Jenga Blocks?
Jenga blocks are wooden blocks that have been cut from a single sheet of wood and then stacked to create a tower structure. The name is Jenga comes from the Swahili word ‘kujenga’, which means ‘to build’. Jenga has been around since 1983 when it was invented by Leslie Scott.
Jenga blocks come in various sizes and shapes, ranging from square to rectangular to octagonal. The size of the block determines how tall the tower can be built. Most players start with a stack of 54 blocks which is usually enough for 3-4 layers depending on the size of the blocks.
11 Step-by-step Guidelines on How to Paint Jenga Blocks
Step 1: Gather Your Supplies
You will need:
- Jenga Block Set (You Can Usually Find These at Any Toy Store)
- Acrylic Paints in Various Colors
- Paint Brushes of Different Sizes
- Pencil and Paper for Sketching Out Your Design
- Water Cup to Rinse Off Brushes
- Paper Towels or Rags for Wiping Up Spills and Cleaning the Blocks After Painting
- A Variety of Decorative Stickers to Add Some Finishing Touches (Optional)

Step 2: Select The Color Scheme for Your Design
Decide what type of design you want to create and what colors will work best with your concept. Make sure that the colors you choose complement each other and bring out the details in your design. It’s important to pick colors that you will be comfortable working with, so don’t be afraid to experiment with different shades.
This will help you create a painting that is truly unique. This step is also a great opportunity to get creative and explore different color combinations. It’s important to keep in mind that the colors may look different once they are applied to the blocks, so it is a good idea to do a few test runs on scrap paper before you start painting the Jenga blocks.
Step 3: Prepare the Jenga Blocks for Painting
Before starting to paint, make sure that the Jenga blocks are clean and dry. Wipe them down with a damp cloth and allow the blocks to air-dry completely before you begin painting. If the blocks are still wet, your paint will not stick properly and you may end up with an uneven finish.
But if they are too dry, the paint will not adhere to the wood either. It is important to strike the right balance. This will also help you avoid any potential messes or accidents.
Step 4: Sketch Out Your Design On A Piece Of Paper
This will help you visualize the end result of your project. Decide which colors to use for each block and how they will be arranged. It is also helpful to number the blocks so you can keep track of what block goes with which color.
This will make your life easier when it comes time to actually start painting on the Jenga blocks. It is also important to plan ahead and figure out which colors will need to be painted first. But don’t forget to have fun and explore different combinations.

Step 5: Start Painting!
Now it’s time to start painting! Dip your brush into the paint, making sure there is enough coverage on the bristles. Apply the paint to the blocks using light, even strokes. You can use multiple colors for each block if you want to achieve an interesting look. However, it is important to make sure that the colors don’t blend together too much.
You can always go back and add more layers of paint if necessary. It is also important to make sure that you are painting with the grain of the wood. It will give a smoother finish. But if you are feeling creative, feel free to experiment with different techniques.
Step 6: Let The Paint Dry
Once your painted Jenga blocks are completely dry, it’s time to start assembling them into your desired arrangement. Make sure that each block is firmly secured in place before continuing. It is also important to make sure that all of the blocks are facing in the same direction.
This will help ensure a balanced and even look for your finished product. You can also add some finishing touches like decorative stickers to the blocks if you want. This is a great way to personalize your design and make it truly unique.
Step 7: Apply Stickers As Desired (Optional)
Once your blocks are arranged the way you like, you can add some fun and colorful stickers to enhance your design. You can find these at craft stores or online. It is best to use stickers that are made specifically for Jenga blocks, as these will stick better and last longer.

But feel free to get creative and try out different shapes, sizes and colors. It is also important to make sure that the stickers are firmly secured in place so they won’t come off during gameplay. You can use a bit of glue to make sure they stay in place.
Step 8: Seal The Blocks With Clear Acrylic Spray
Spray a light coat of clear acrylic spray on the blocks to help protect your artwork from wear and tear. This will also give it a glossy shine. Allow the spray to dry completely before handling or displaying your finished piece. If you want a more durable finish, you can apply multiple coats of clear acrylic spray.
But make sure to wait for the previous coat to dry completely before applying another. It is also important to make sure that you are working in a well-ventilated area as the fumes can be harmful.
Step 9: Show Off Your Masterpiece!
You’ve painted Jenga blocks – now you can show off your masterpiece! Put it on display and enjoy the compliments from friends and family. But don’t forget to keep the completed set away from young children, as it could pose a choking hazard.
This is especially important if you included any stickers in your design. But with proper care and maintenance, you can enjoy your Jenga set for years to come.
Step 10: Make a Game Of It
Painting Jenga blocks isn’t just about making art – you can also use them to play a fun game of Jenga. Follow the regular rules of the game, but this time with colorful painted pieces. It’s a great way to put your creativity and painting skills on display. Plus, it makes the game more exciting as you can enjoy all the different colors and designs!

Although, be careful not to get too carried away – Jenga can be quite addictive! It’s up to you whether or not you want to make your own set of rules. This will surely make your game even more challenging and exciting.
Step 11: Have Fun and Create!
Painting Jenga blocks is a great way to express your creativity. Don’t be afraid to experiment with different colors, designs, and techniques. And don’t forget to have fun while you’re at it! It can take some time to perfect your technique, but the results will be worth it.
Once you’ve mastered painting Jenga blocks, why not try branching out into other crafts and activities? The possibilities are endless! So go ahead and create something beautiful – you never know what great ideas you’ll come up with. Happy crafting!
Now that you know how to paint Jenga blocks, why not try creating a unique set of your own? From abstract shapes and vibrant colors to fun patterns and characters, the possibilities are endless. So get creative and have fun!
And don’t forget – if you ever need help with this project or any other crafting activity, be sure to check out our website for more tips and tricks! We always love hearing from our
Following these steps will help you to create a beautiful set of painted Jenga blocks that you can proudly display in your home. You can also get creative and use them as part of a unique game or gift for your family and friends. So go ahead, pick up some supplies, and let the fun begin!
Do You Need to Hire a Professional Painter?
If you’re looking for a professional painter to help you with your Jenga block painting project, there are some things that you should consider. First and foremost, make sure that the artist is experienced in this type of work and can provide references from previous projects.

You’ll also want to discuss your vision so that they know exactly what you’re looking for. Finally, make sure to get a quote in writing so that there are no surprises down the line.
With these tips in mind, you’re ready to start your own Jenga painting project. So get out there and show off your skills! You never know what kind of beautiful artwork you can create until you try it. Good luck!
Tips
When it comes to protecting your painted Jenga blocks, you want to make sure that you take the proper precautions. Be sure to apply a light coat of clear acrylic spray on each block after painting. This will help protect your artwork from wear and tear and also give it a glossy shine. You should also store your blocks in a safe place, away from direct sunlight or moisture.
It’s also important to remember that Jenga blocks are not all the same size and shape. Be sure to measure each block before painting so that you can create even coverage across them all. This will ensure that your design looks uniform and professional.
How Much Could It Cost?
The cost of painting Jenga blocks depends on a few factors. The size and complexity of the project, as well as the type of paint used, will all influence the price. On average, you can expect to pay anywhere from $100 – $500 per set, depending on your needs. Of course, if you decide to hire a professional painter, the cost of materials and labor will be much higher.

No matter what your budget is, you can find a way to make painting Jenga blocks a fun and creative activity. With some patience and dedication, you’ll soon have the perfect set of blocks that you can proudly display in your home or give as a unique gift. So get started today and show off your artwork!
Conclusion
Painting your Jenga blocks is a simple and creative way to transform the classic game into something entirely new! You can customize the colors however you like, give them each unique pattern, or even write inspiring words on them. The possibilities are endless when it comes to creating a fun and personalized version of Jenga.
Not only does painting Jenga blocks create a unique gaming experience, but it’s also a great way to spend quality time with friends or family. It promotes creativity while still being enjoyable for all involved. Furthermore, with just a little bit of paint and some simple tools, you can create endless memories that will last long after the game is over!
So why not spruce up your old Jenga pieces today and create an unforgettable evening? Thanks for reading this article on how to paint jenga blocks.